PCF Component: Extract Text From Image Using Azure AI Vision

I recently explored Azure AI Vision and wanted to learn more about its services and capabilities.
Azure AI Vision service processes images and videos and provides the associated information. This includes the following significant features:
- Optical Character Recognition (OCR): Deep-learning models extract printed and handwritten text from images and documents. Supports various languages and works across surfaces like invoices, business cards, and whiteboards.
- Image Analysis: Identifies visual features in images, such as text, objects, faces, and adult content, and generates descriptive text. It is ideal for broad image-based analysis.
- Face: Detects, recognizes, and analyzes human faces for scenarios like identification, touchless access, and privacy-focused face blurring.
- Video Analysis: Analyzes video content with features like Spatial Analysis for tracking movement and Video Retrieval for natural language-based video searches.
I wanted to explore the OCR capabilities and see how a PCF control could be built and utilized within a model-driven app. This article discusses creating a PCF control for extracting text using the Read feature in the Image Analysis API.
Contents
Here is what we will cover in this article
- PCF Control Overview
- Azure AI Vision Image Analysis - Read Feature
- Custom API
- PCF Control
- Testing Different Images
- Alternatives
PCF Control Overview
Microsoft documentation is the best place to start if you are new to building PCF components. If you want to look at a component that leverages React, refer to my older blog post, which walks through the step-by-step process.
For the ImageAnalysis control, we will go through the high-level overview of the component and other services the PCF will rely on rather than the details of building the component.
Note that although I have used ImageAnalysis for the control, this doesn't mean we will implement all the features. For this post, we will only be looking at the Read feature. I plan to enhance the PCF control with additional features for another post later.
Here is the overview of what the PCF component will be doing
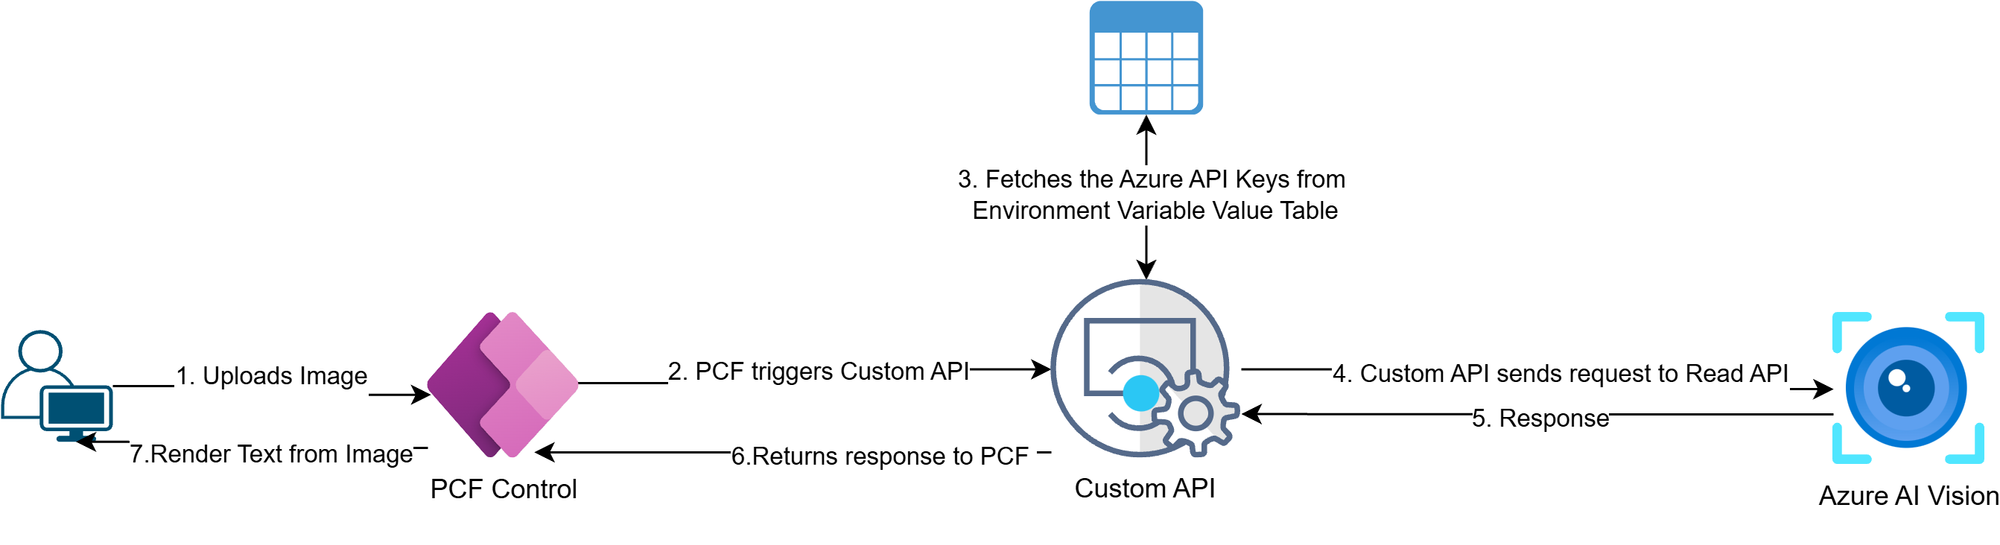
- Azure AI Vision: analyzes images and extracts text.
- Custom API: Accepts the image data as a base64 string input and returns the Azure AI Vision API response. It uses a Plug-in package to call the Azure API, which leverages the Azure AI Vision Image Analysis SDK
- PCF Control: Allows users to upload images and triggers the Custom API. Reads the response from the Custom API and renders the extracted text from the images.
The source code for the control is available here.
Azure AI Vision Image Analysis - Read Feature
To extract the text from the image, we will use the Image Analysis API and target the version v4.0 (2024-02-01). The Image Analysis API has the Analyze Image operation. It supports a bunch of features that we can specify to be used when analyzing the image. For our use case, we will pass in the read feature.
Let's explore this endpoint with a simple example. I will be using the image below from Unsplash to keep it simple.

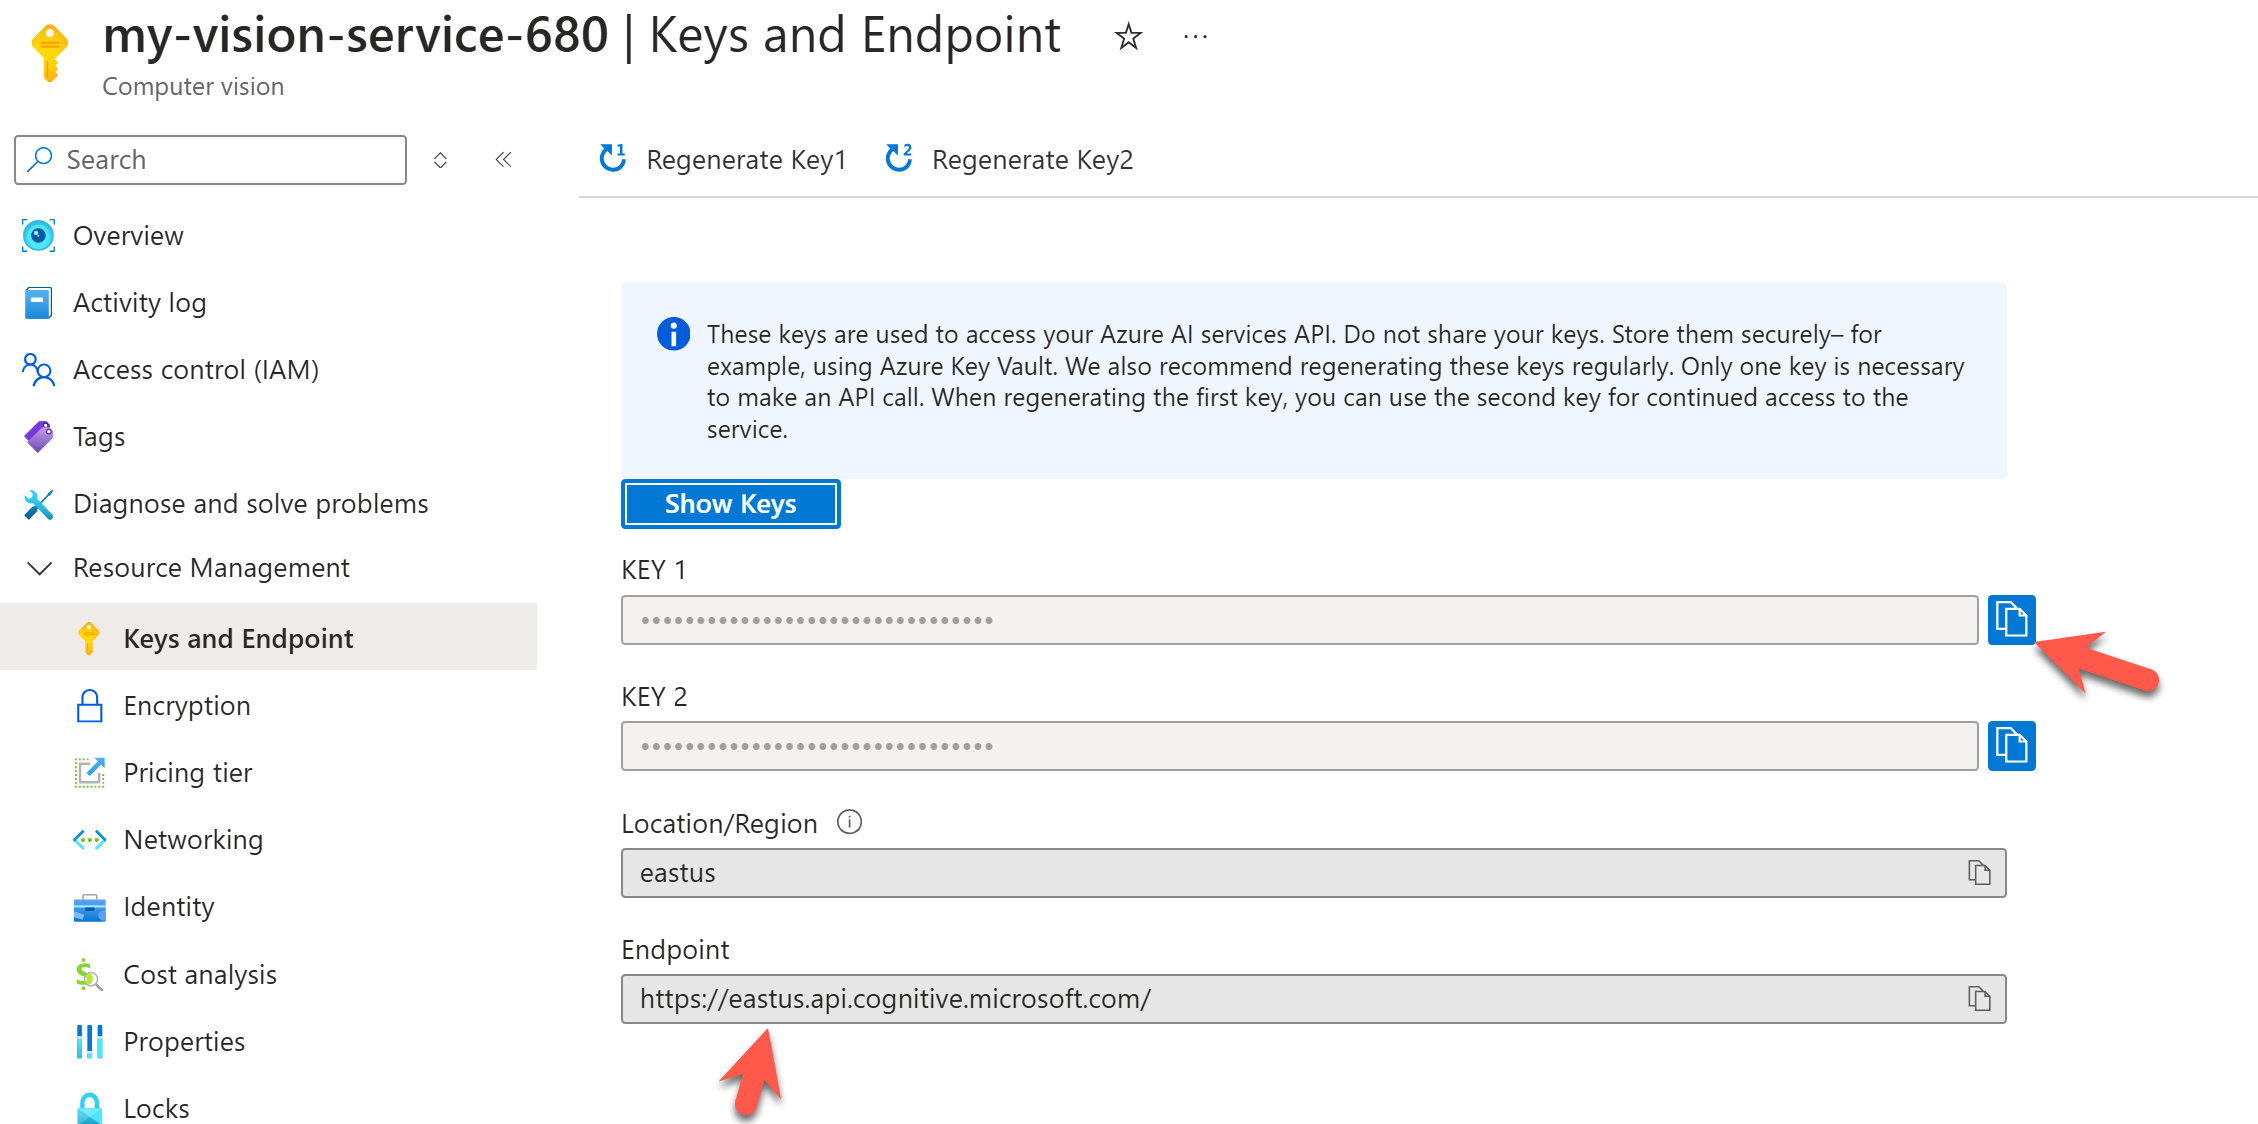
My Azure AI vision resource is provisioned in the East US to use the URL below in the HTTP request snippet. You can quickly grab your resource's URL and API key, as shown below. We will use the API key authentication passed in the header, but we can also leverage Microsoft Entra ID authentication with RBAC to make it more secure.
We must make a POST request and pass binary data in the request body. We could use a URL, but binary data is the most feasible approach for most cases where the images are private.
HTTP Request
POST https://eastus.api.cognitive.microsoft.com/computervision/imageanalysis:analyze?api-version=2023-10-01&features=read

Content-Type: image/jpeg
Ocp-Apim-Subscription-Key: KEY_HERE

**Image Binary data**
HTTP Response
{
    "modelVersion": "2023-10-01",
    "metadata": {
        "width": 5668,
        "height": 3775
    },
    "readResult": {
        "blocks": [
            {
                "lines": [
                    {
                        "text": "Hello!",
                        "boundingPolygon": [
                            {
                                "x": 1984,
                                "y": 1544
                            },
                            {
                                "x": 3726,
                                "y": 1554
                            },
                            {
                                "x": 3724,
                                "y": 2010
                            },
                            {
                                "x": 1982,
                                "y": 2004
                            }
                        ],
                        "words": [
                            {
                                "text": "Hello!",
                                "boundingPolygon": [
                                    {
                                        "x": 1997,
                                        "y": 1545
                                    },
                                    {
                                        "x": 3720,
                                        "y": 1570
                                    },
                                    {
                                        "x": 3705,
                                        "y": 2010
                                    },
                                    {
                                        "x": 1982,
                                        "y": 2010
                                    }
                                ],
                                "confidence": 0.993
                            }
                        ]
                    }
                ]
            }
        ]
    }
}
As we can see, the response is very straightforward. Multiple blocks represent each Image; within each block, we have various lines and the bounding polygon for each line. It also describes the bounding polygon for each word in the line, but we will use only the lines in our use case for the PCF control.
Notice that the overall image dimensions are 5668w x 3775H in the JSON response under the metadata. Using this, if we were to identify the text "Hello!" by using the line bounding polygon, it would appear as below on the image.
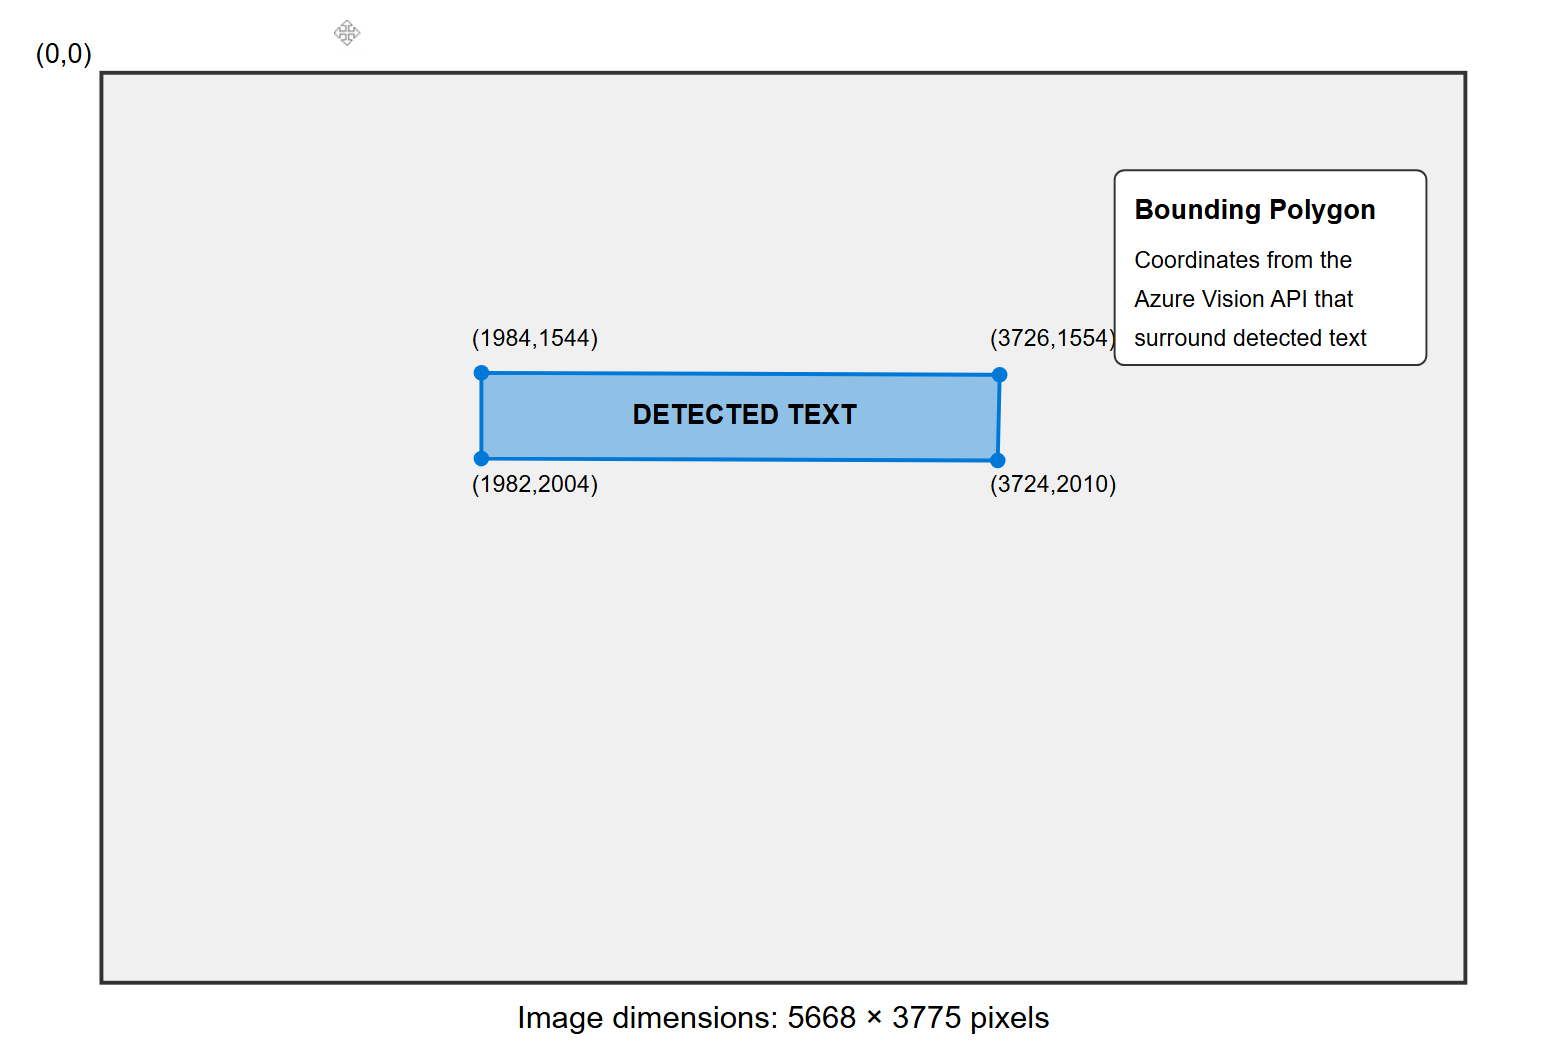
- The coordinate system places (0,0) at the top-left corner with the width on the x-axis and the height on the y-axis.
- Using the bounding polygon, the first point (1984,1544) represents the top-left corner of the detected text.
- The points proceed in clockwise order around the text.
- The slight differences in coordinates (e.g., y-values of 1544 vs 1554) represent the slight skew or perspective in the text area.
I have also attached an essential Postman collection and environment to the repo for quick testing.
Custom API
The custom API acts as a wrapper on the Azure Vision AI API. This allows for the following flexibility:
- The client-side PCF executes the Custom API and passes the input data. It doesn't have to worry about handling authentication, which makes it more secure as the Azure AI vision key is not exposed.
- Azure Vision API key is stored in an Environment Variable Value table and is retrieved by the custom API plugin.
- In the future, if the custom API plugin needs to leverage the Microsoft Entra ID authentication, we will not have to touch the PCF control. Similarly, any other backend changes that do not involve updating the input and response parameters can be done without modifying the PCF control.
- Custom API can also add toggle gates to potentially configure the PCF control to either use the AI builder or the Azure AI vision.
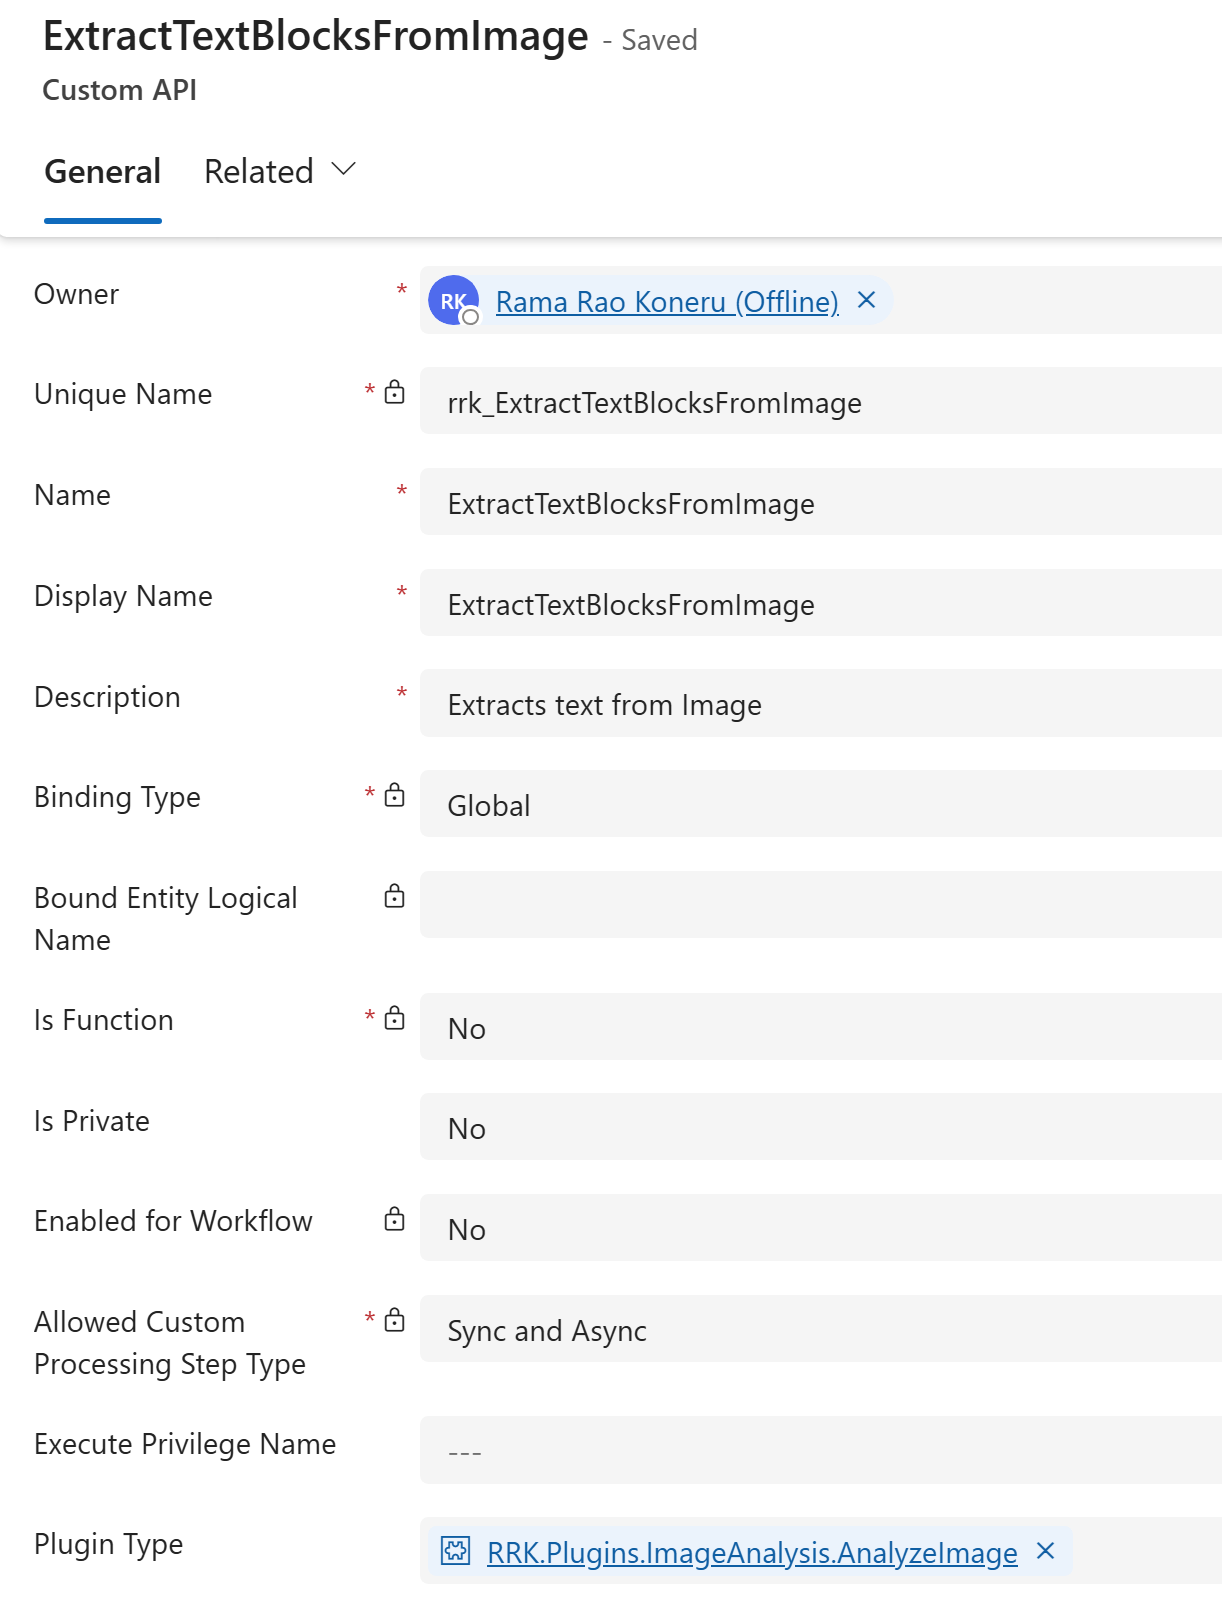
Custom API Configuration
Custom API has the following configuration
- Name: ExtractTextBlocksFromImage
- Parameters:
- Input:
- ImageData(string): Base64 representation of the image.
- Output:
- TextBlocksJSON(string): returns the blocks from the Azure AI vision response in JSON format.
- Input:
- Plugin: Handles the code to trigger the Azure AI vision API and generate data for the output parameter.
Here is how the Custom API is configured
Plug-in Code
The plug-in code uses the plug-in package. This allows us to leverage the Azure.AI.Vision.ImageAnalysis NuGet package, which saves a lot of development time. As we can see below, that's all the code it takes to send the base64 string image data and get the response back.
        public string AnalyzeImage(IOrganizationService organizationService, string imageData)
        {

            AzureVisionConfig azureVisionConfig = GetAzureVisionConfig(organizationService);

            // Authenticate Azure AI Vision client
            ImageAnalysisClient client = new ImageAnalysisClient(
                new Uri(azureVisionConfig.Endpoint),
                new AzureKeyCredential(azureVisionConfig.Key));

            byte[] imageBytes = Convert.FromBase64String(imageData);


            // Use Analyze image function to read text in image
            ImageAnalysisResult result = client.Analyze(
                BinaryData.FromBytes(imageBytes),
                // Specify the features to be retrieved
                VisualFeatures.Read);

            string textBlocksJSON = JsonSerializer.Serialize(result.Read.Blocks);
            return textBlocksJSON;
        }
PCF Control
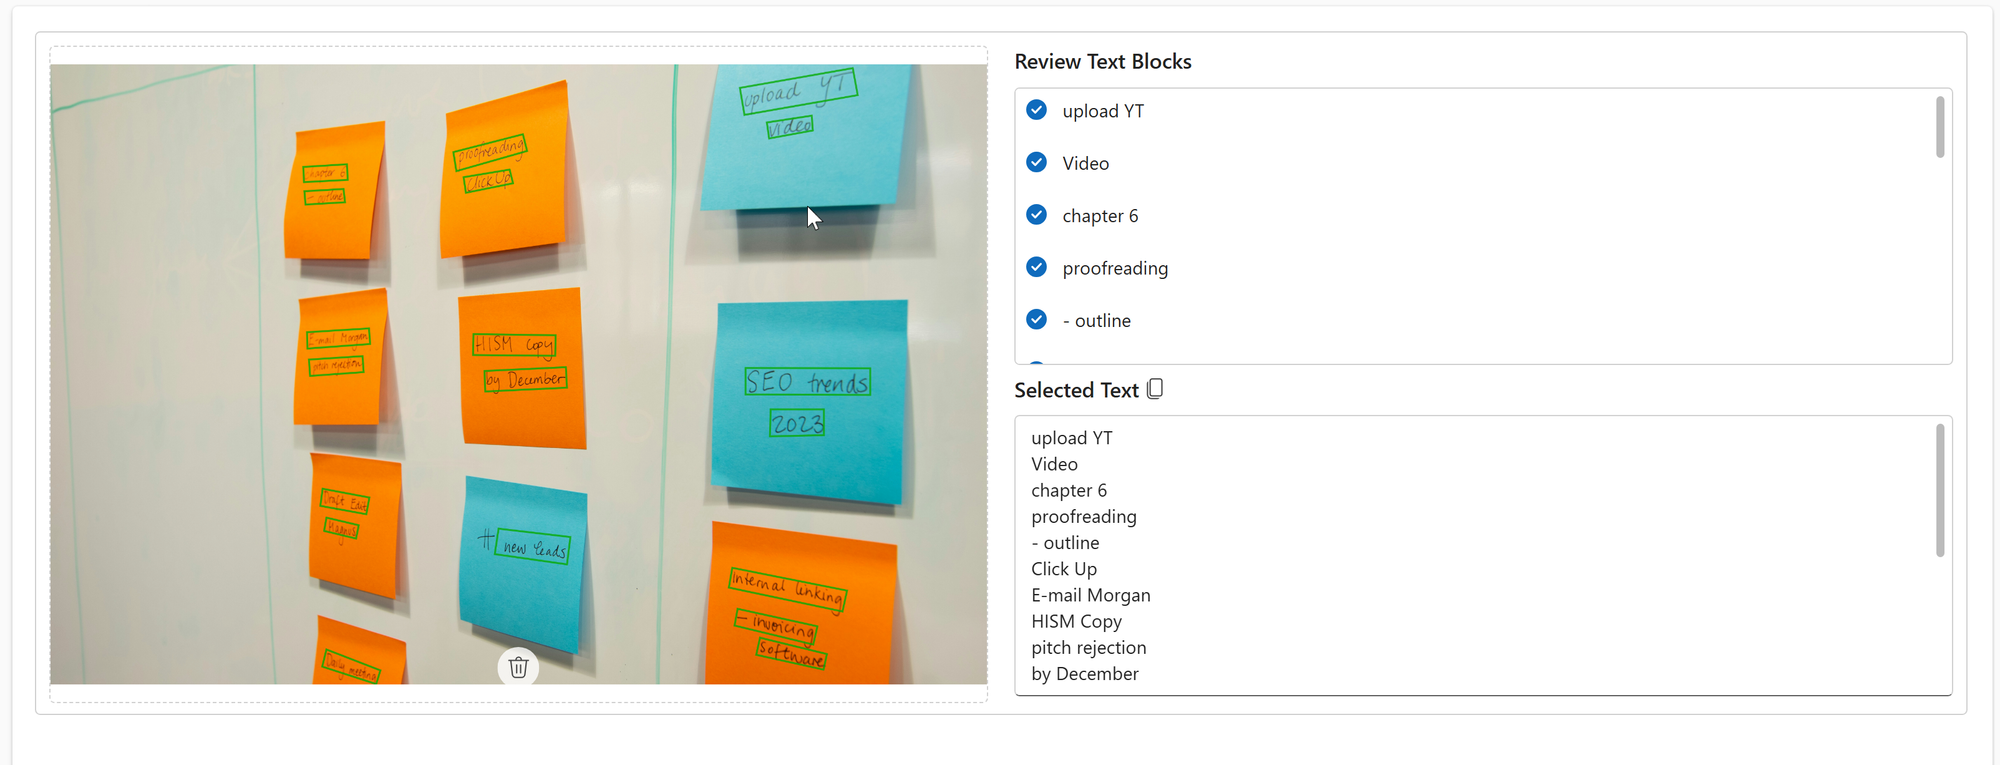
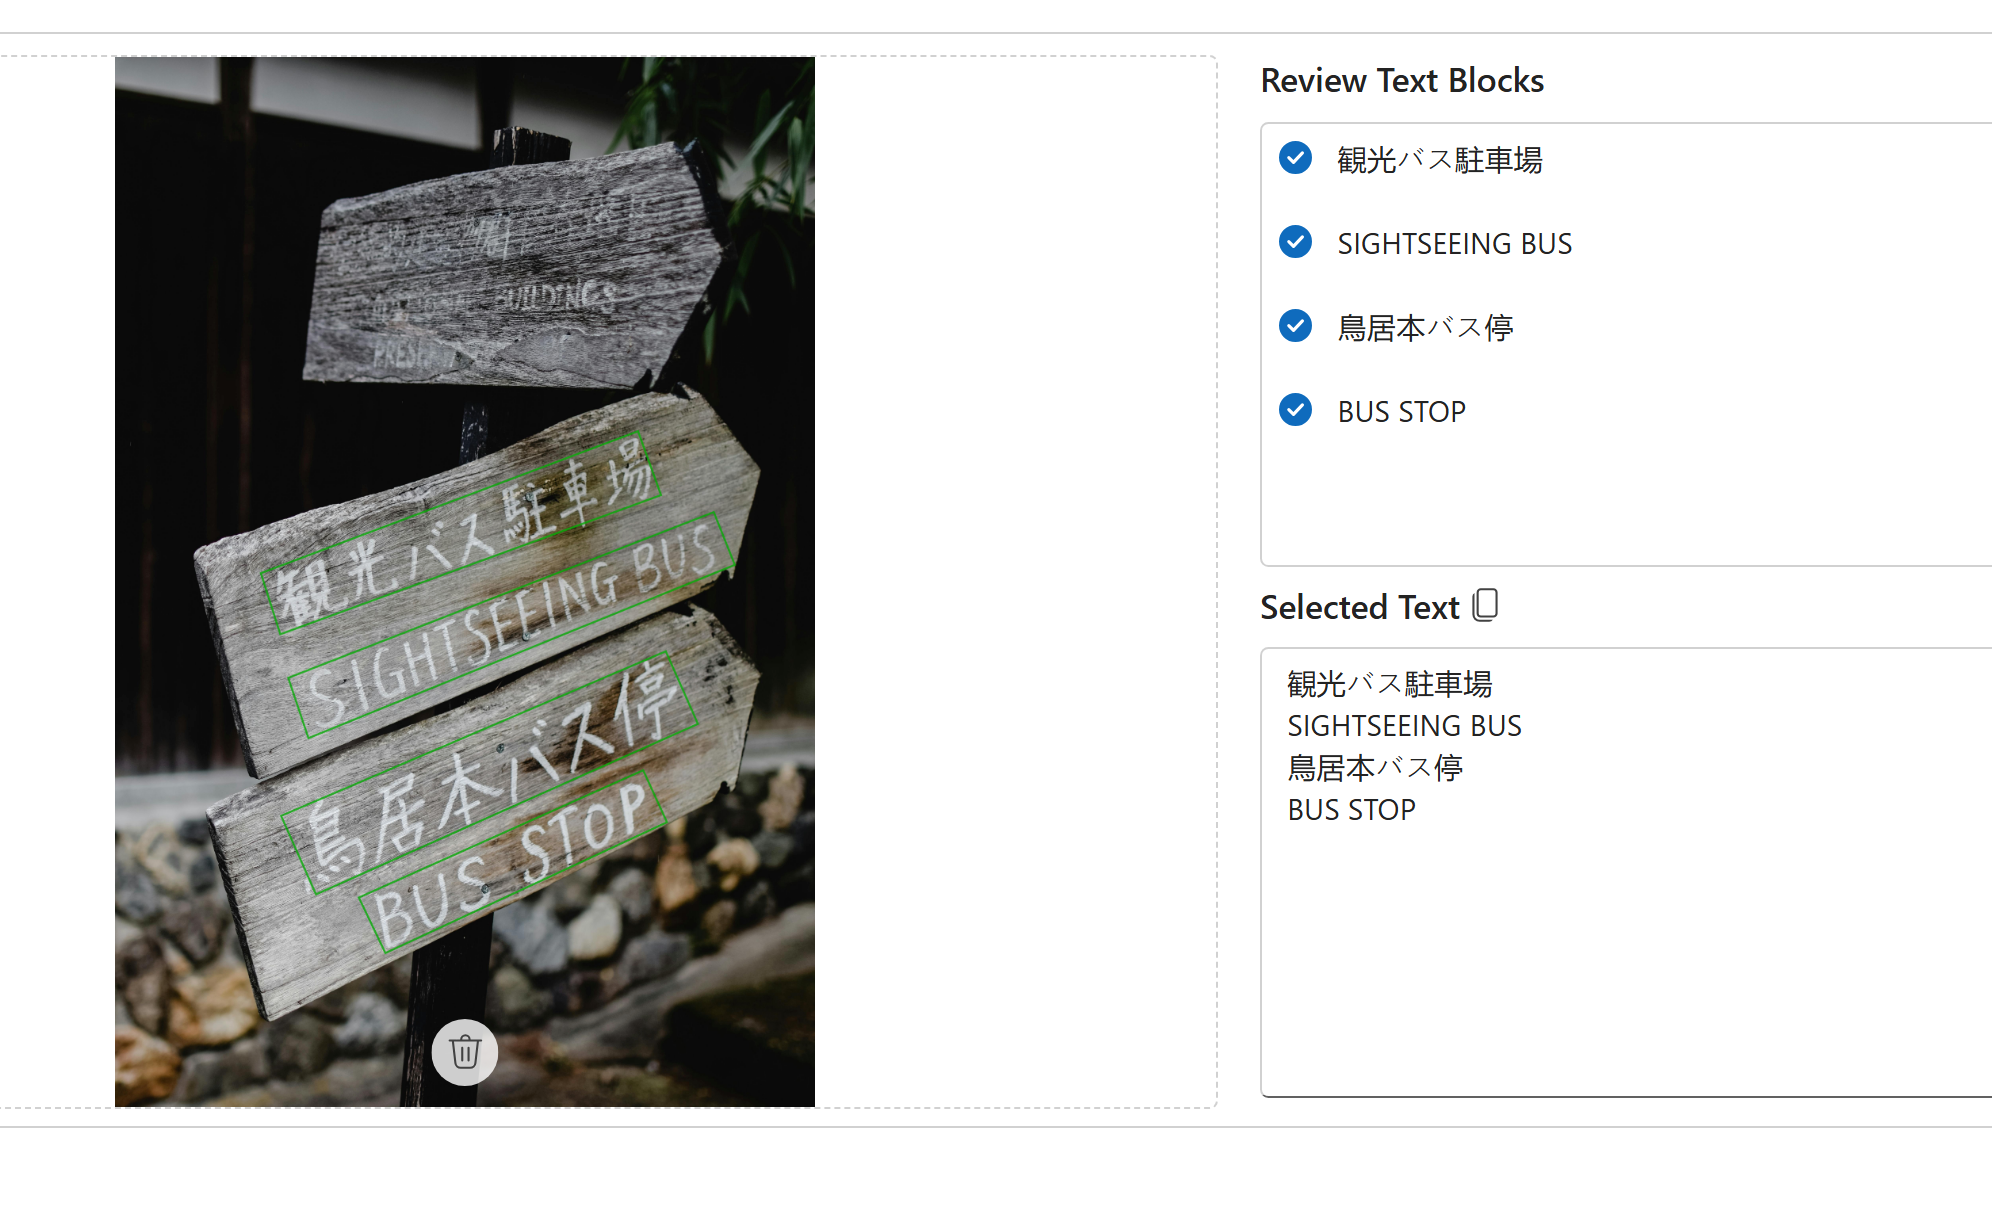
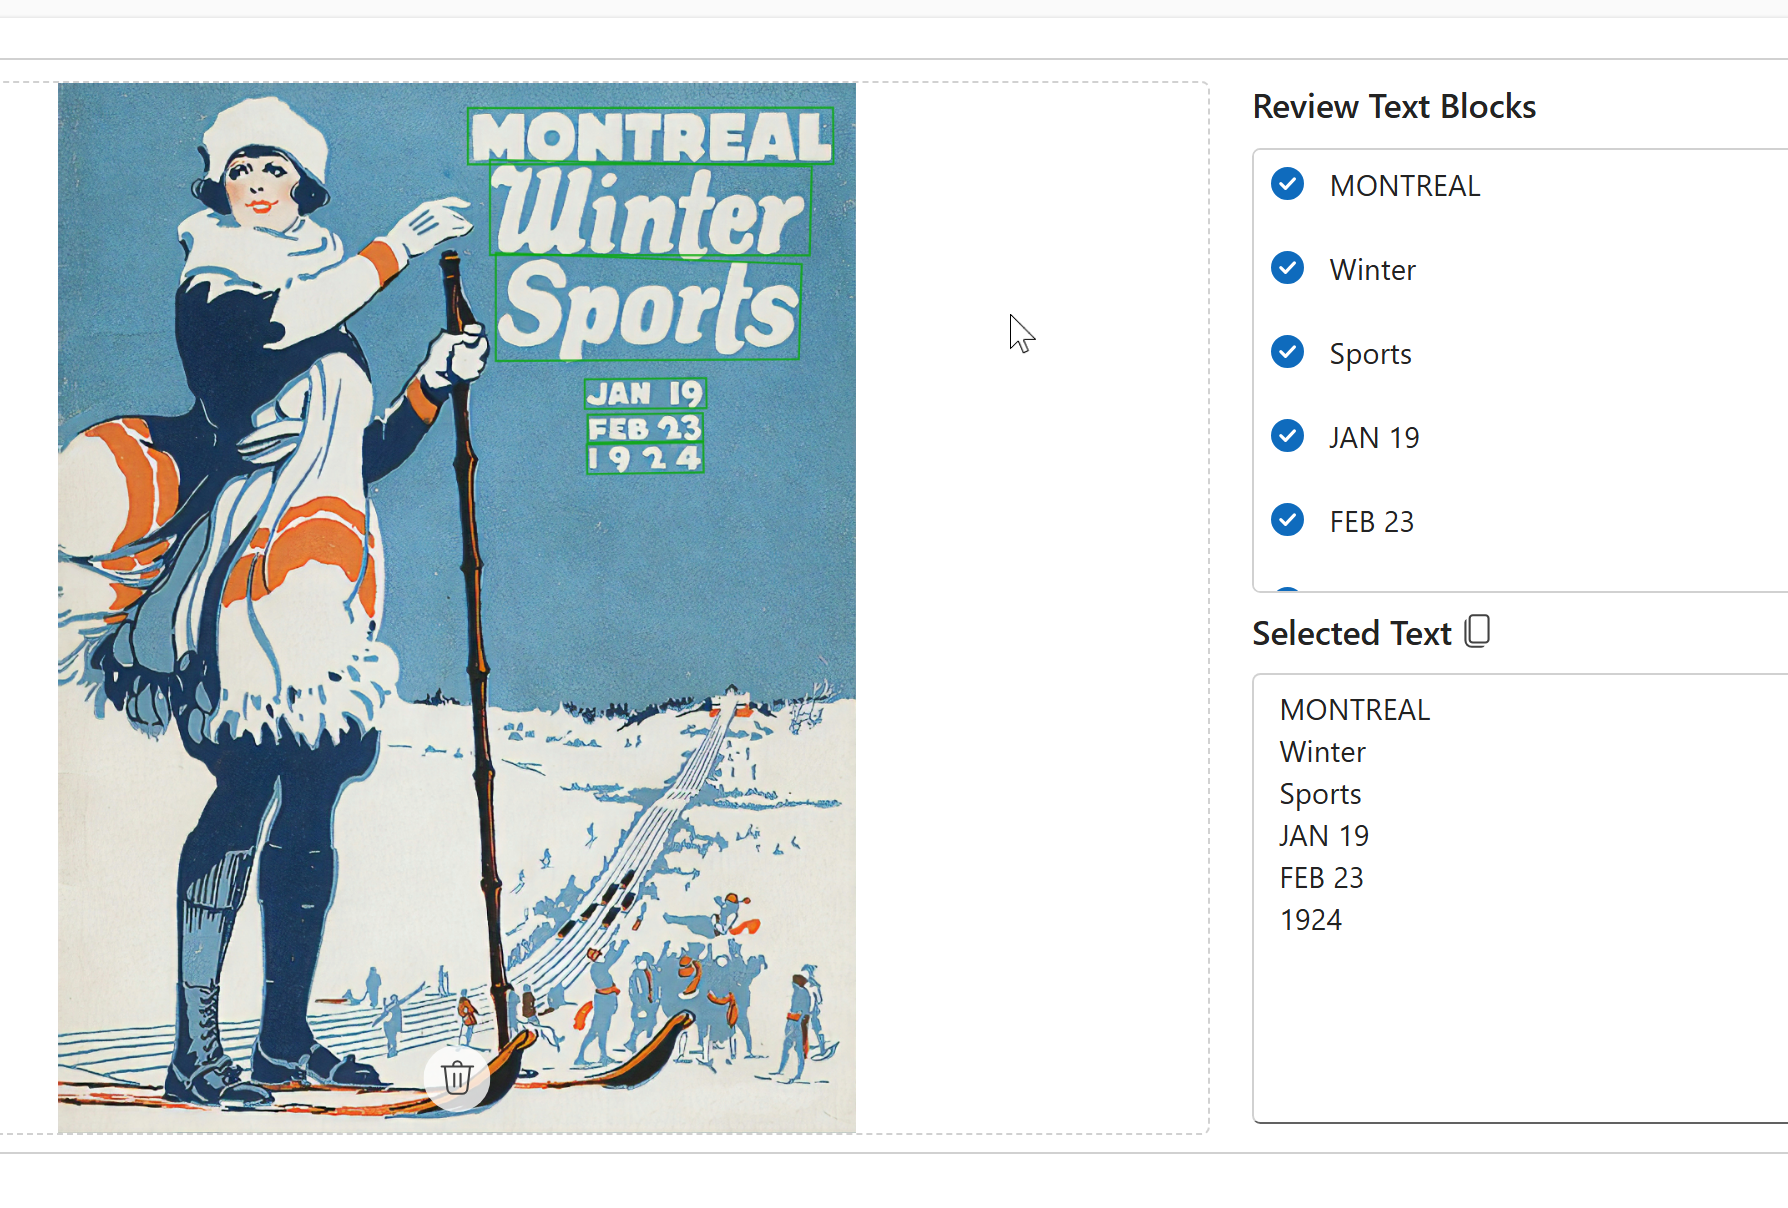
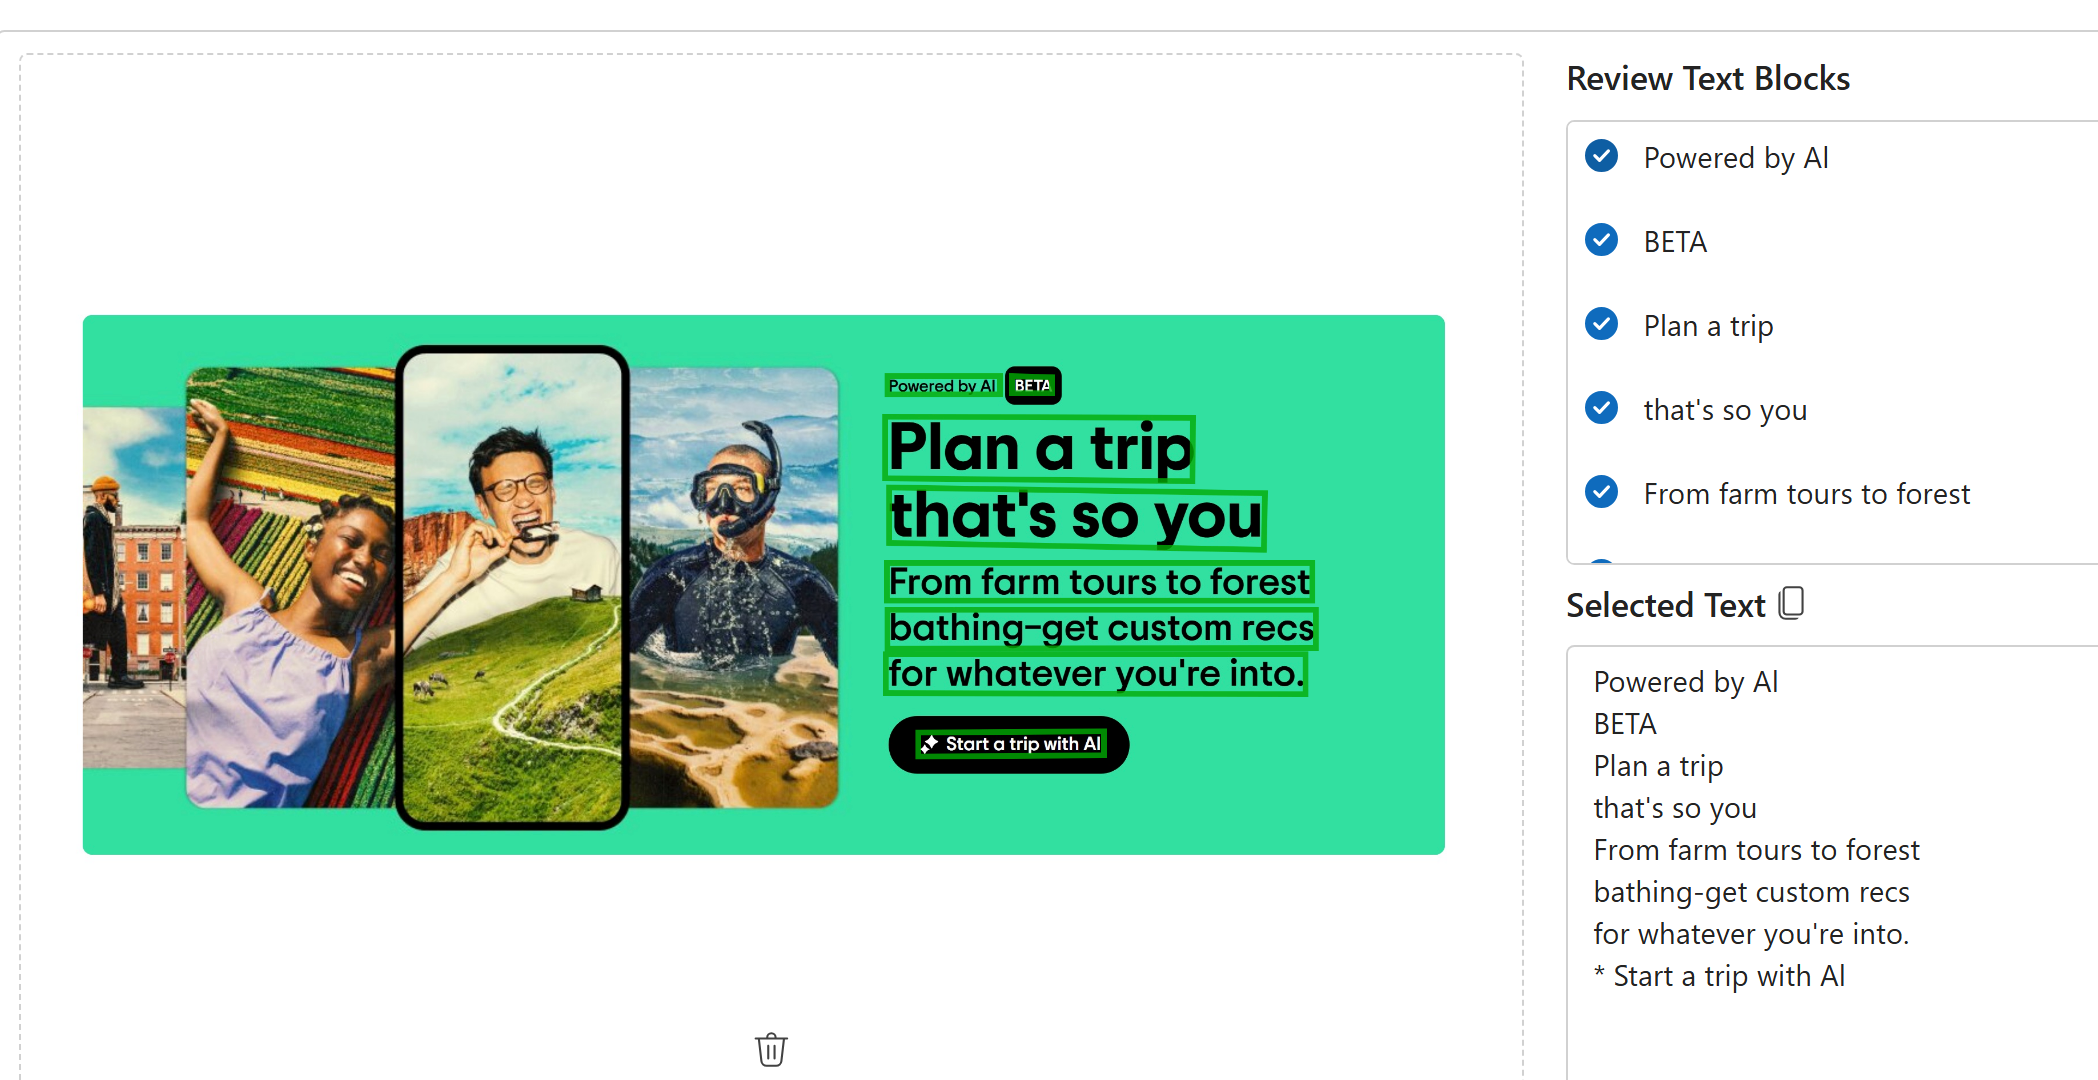
The PCF control looks like the image below when added to the form. It has two panes: the left pane and the right pane.
- The Left Pane allows the user to upload the image to extract text.
- The Right Pane contains
- Review Text Blocks: text blocks that are extracted from the image.
- Selected Text: text generated from all the selections made on the Review Text Blocks. The User can make any necessary changes and click on the copy icon to copy the text.
The control highlights recognized text in green color. The example below shows highlighted text that is accurately predicted, even when it's difficult for the human eye to read.
Executing Custom API
Since we will use the PCF control in the context of the model-driven app, we must build a custom request to trigger the custom API. This is because the web API component in PCF doesn't provide methods to execute a custom API.
However, the logic for implementing the custom API is straightforward, as shown below.
    async function callCustomAPI(apiName: string, jsonData: string): Promise<Response> {


        const url = `/api/data/v9.2/${apiName}`;

        try {
            const response = await fetch(url, {
                method: 'POST',
                headers: {
                    'Accept': 'application/json',
                    'Content-Type': 'application/json; charset=utf-8',
                    'OData-MaxVersion': '4.0',
                    'OData-Version': '4.0'
                },
                body: jsonData
            });

            if (!response.ok) {
                throw new Error(`HTTP error! status: ${response.status}`);
            }

            return response;

        } catch (error) {
            // Handle errors here
            console.error('Error:', error);
            throw error;
        }
    }
Rendering the Image
We use the bounding box details from the response generated to draw the coordinates on the image. We could do this either on the server side or the client side.
Doing it on the client side provides the additional benefit of faster rendering than on the client side and allows for greater customization if needed. Here is how we do it on the PCF control
- Create a hidden Canvas element on the control.
    <canvas
        ref={canvasRef}
        style={{
            position: 'absolute',
            top: 0,
            left: 0,
            display: 'none',
            pointerEvents: 'none' // Allows clicking through canvas
        }}
/>- Create a new in-memory image from the original image sent to the Custom API.
        const image = new window.Image();
        image.src = imageUrl ?? "";
image.hidden = true;- Using the bounding box coordinates, draw the measurements onto the canvas to highlight the identified text from the image.
        const canvas = canvasRef.current;
        if (!canvas) return;

        const ctx = canvas.getContext('2d');
        if (!ctx) return;


        image.onload = () => {
            // Set canvas size to match image
            canvas.width = image.width;
            canvas.height = image.height;

            // Draw original image
            ctx.drawImage(image, 0, 0);

            // Style for bounding boxes
            ctx.strokeStyle = 'hsla(120, 92.10%, 34.90%, 0.80)';
            ctx.lineWidth = 10;

            // Draw boxes for each text block
            textBlocks.forEach(block => {
                block.Lines.forEach(line => {
                    const points = line.BoundingPolygon;

                    ctx.beginPath();
                    // Move to first point
                    ctx.moveTo(points[0].X, points[0].Y);

                    // Draw lines to each subsequent point
                    for (let i = 1; i < points.length; i++) {
                        ctx.lineTo(points[i].X, points[i].Y);
                    }

                    // Close the polygon
                    ctx.closePath();
                    ctx.stroke();

                });
            });
- Finally, we convert the canvas to an image representation using the toDataURL, which is presented to the user on the left pane.
      const imageURLWithBoundingBoxes = canvas.toDataURL();
      setImage(imageURLWithBoundingBoxes);
Testing Different Images
Street Signs
User-generated image

Posters
Screenshots
Equations
Notice that the formulas aren't correct. The Read API is meant for text and will not handle math equations.

The Read API is suitable for non-documented images like posters, handwritten notes, screenshots, and user-generated photos, which are not text-heavy using a fast synchronous API.
Alternatives
We looked at how to use the Read API in PCF with the Azure AI vision resource. We can achieve similar effects using one of the following approaches without building a PCF control.
- AI Builder has a prebuilt text recognizer that can be leveraged in the Canvas app.
- You could also leverage the custom page and trigger a flow to achieve the same effect or call the RecognizeText action from the custom page.
- Microsoft might also add AI builder capabilities to the custom page to make it comparable to the Canvas app, a better alternative to a model-driven form.
The benefit of having a PCF control is that it provides more control over the look and appearance and integrates additional Azure AI vision capabilities into the single PCF control.
However, we must also account for ongoing maintenance when building custom, and the AI builder will only become more powerful.
While this is not a great real-world use case, the power comes when we can combine multiple AI resources. For example, we can extract text from images and read it aloud using text-to-speech or translate text recognized in a foreign language to a native language using an Azure AI translator.