Building an Agent Using Microsoft 365 Agents SDK and Microsoft Agent Framework

The Microsoft 365 agents SDK allows developers to create agents, use their preferred AI services, orchestrate and manage knowledge, and deploy them across multiple channels. It's an evolution of the Bot Framework SDK, now archived in favor of the Microsoft 365 agents SDK.
In this post, we will look at how to build an agent using the M365 agents SDK and leverage the Microsoft Agent Framework(an open-source engine for building and orchestrating AI agents), along with the newer Dataverse SDK for Python. I chose Python as the programming language instead of C# because all of the above SDKs and frameworks are open source, and it is the most widely used language globally for building agents.
Prerequisites
If you want to follow along and build the agent, you would need the following:
- VS Code(preferred) or code editor of your choice
- An active Azure subscription
- Python extension installed in VSCode
- Python interpreter
- Access to Azure Open AI
- Azure Bot Service
- Azure App Service
However, if you are not a developer, some of these concepts might still be useful when building agents in the Microsoft ecosystem, and you can quickly skim the post for a high-level overview.
Demo
Source Code
The source code for the agent used in the demo can be found here
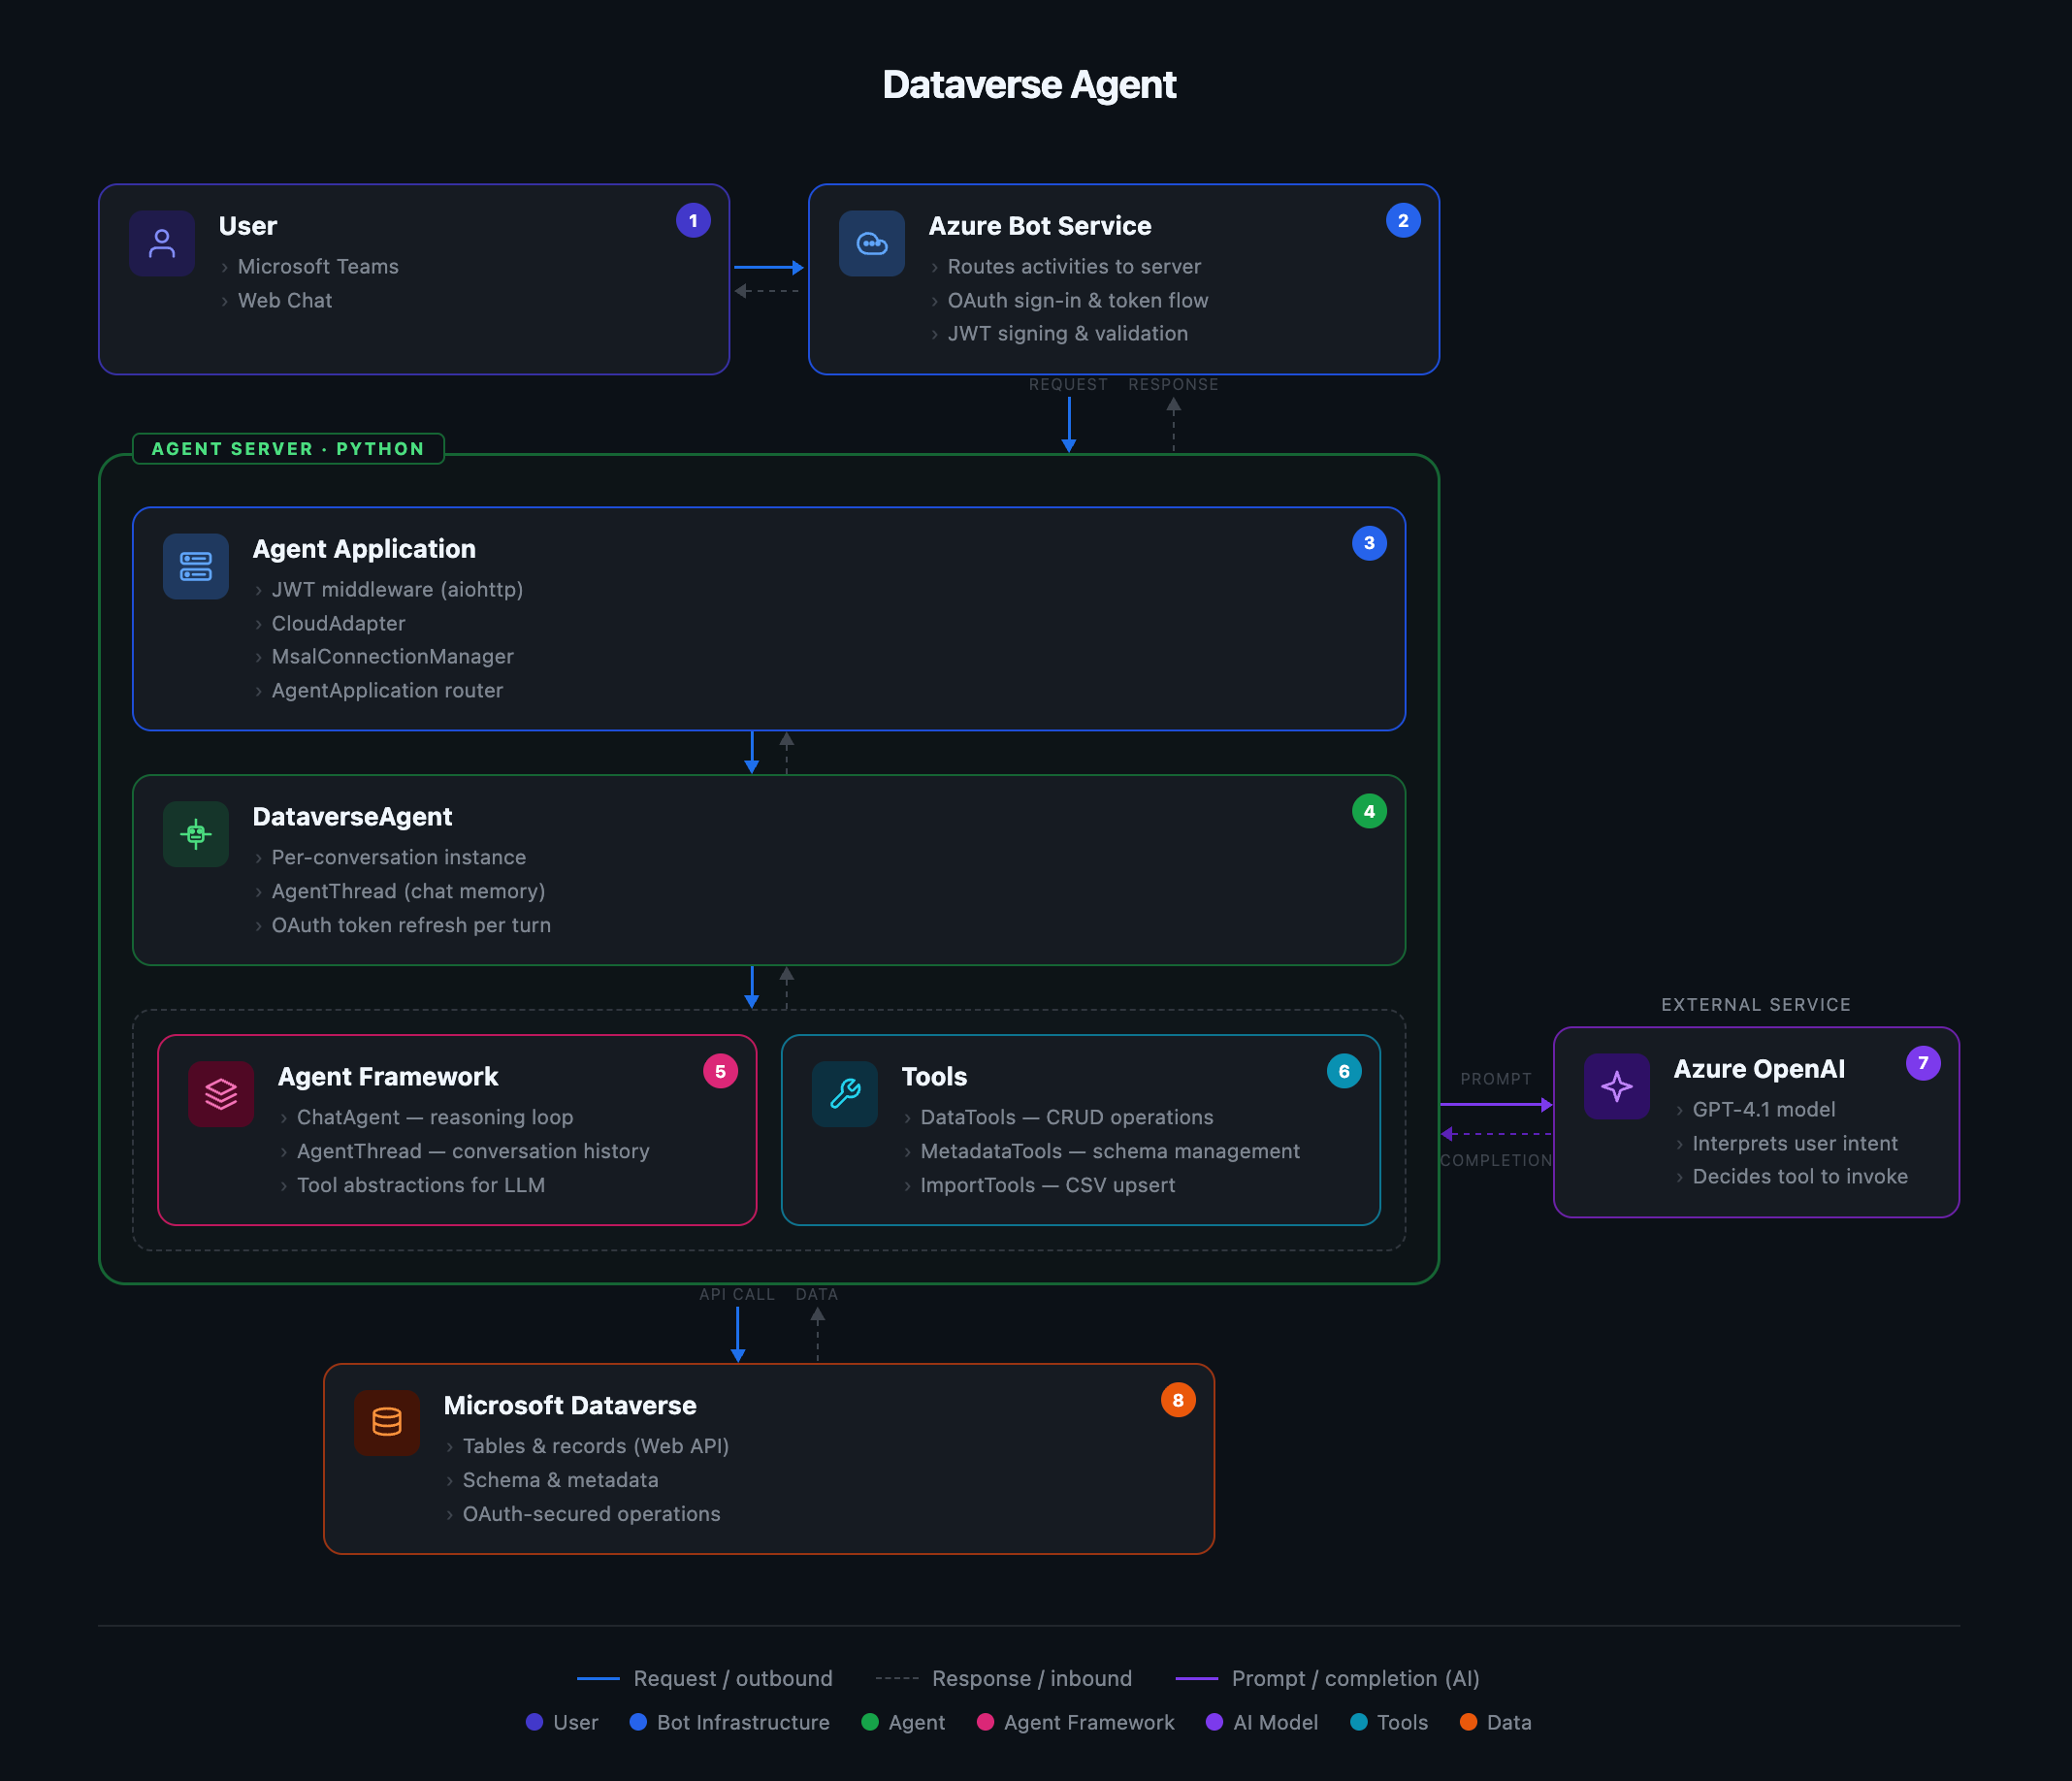
Use Case
For this use case, we will be looking at how to build a Dataverse agent that does the following things:
- Retrieve Records: Look up records from any table, filter them, or view details for specific entries (e.g., searching for accounts or contacts).
- Create Records: Add new records to any table (such as creating an account, contact, or a custom entry).
- Update Records: Modify fields in existing records (for example, updating a contact’s email address or an account’s phone number).
- Import Data: Upload and import CSV files to create or update records in bulk.
- View or Edit Table Metadata: Get information about Dataverse tables, including their fields, relationships, and options.
While this may look like quite a lot, the agent easily handles most of them using the Dataverse SDK for Python.
In addition, I have included the capability to import data, so we can review how to upload attachments, which you can mimic for other attachment-related use cases.
Activity Protocol
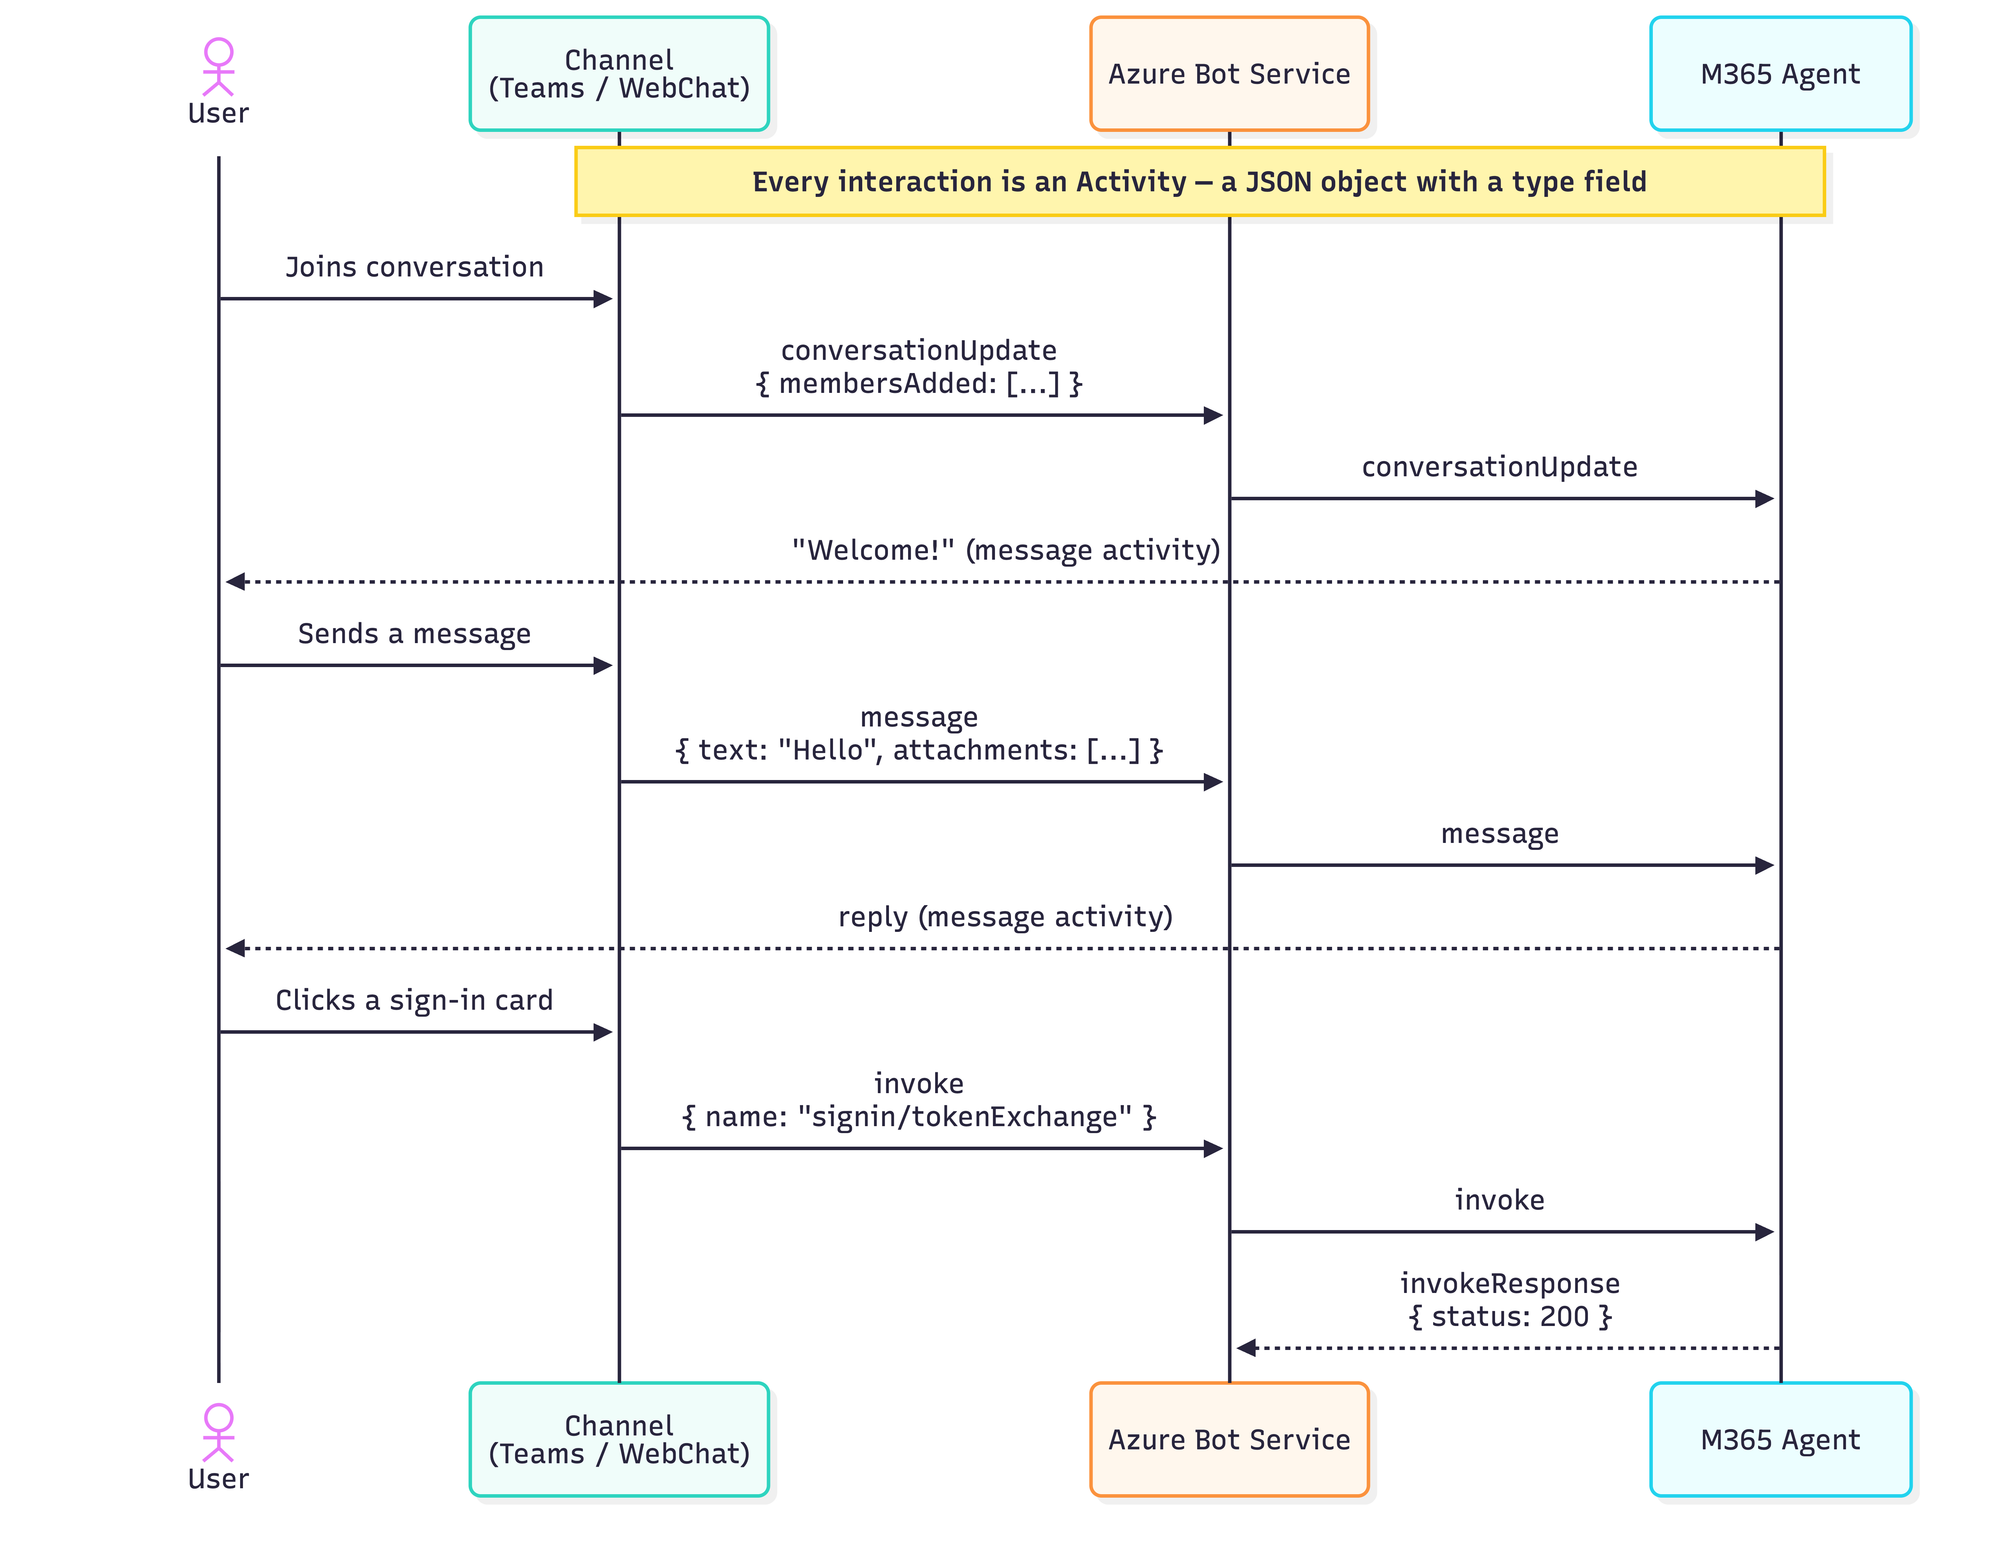
Before we build our agent, let's first understand some core concepts. At the heart of the M365 agent is the Activity Protocol. This communication protocol defines how communication is handled from the client to the server-side agent code and back to the client. The activity protocol uses an Activity to send different types of interactions between the user and the agent.
Activity
An activity uses a structured JSON object to indicate the activity type and the associated data. Every activity includes the following key information:
- Who sent it (from)
- Who should receive it (recipient)
- The conversation context
- The channel it originated from(channelId)
- The type of interaction
- The payload data
Below is an example of an activity object
{
  "type": "message",
  "serviceUrl": "http://localhost:56150/_connector",
  "from": {
    "id": "00000000-0000-0000-0000-00000000000011",
    "name": "Test Bot"
  },
  "conversation": {
    "conversationType": "personal",
    "id": "0c0b2506-46fb-43e1-be98-f849299b01a1",
    "tenantId": "00000000-0000-0000-0000-0000000000001"
  },
  "recipient": {
    "id": "user-id-0",
    "aadObjectId": "00000000-0000-0000-0000-0000000000020"
  },
  "text": "Welcome to the Dataverse Agent! Send me a message to get started.",
  "inputHint": "acceptingInput",
  "replyToId": "5b4bc9f6-d966-430b-88f4-3d1415156c7c",
  "channelId": "msteams"
}
Activity Types
Here are commonly used activity types. For a complete list, refer here.
| Activity Type | Direction | When It Fires | Common Use |
|---|---|---|---|
message |
Both | User sends text, a file, or a card action; bot sends a reply | The core of every conversation — text, attachments, Adaptive Cards |
typing |
Both | User is typing; bot is processing | Show a typing indicator while the bot is thinking |
conversationUpdate |
Channel → Bot | A member joins or leaves the conversation | Send a welcome message when the bot is added |
invoke |
Channel → Bot | User clicks a sign-in button, submits an Adaptive Card action, or a channel needs a synchronous response | OAuth sign-in flow (signin/tokenExchange), Adaptive Card Action.Execute |
invokeResponse |
Bot → Channel | In response to an invoke |
Return a status code and optional payload back to the channel |
event |
Channel → Bot | A client or channel sends programmatic information asynchronously | Custom notifications, client-side signals — fire and forget (no response expected) |
endOfConversation |
Both | Either side signals the conversation is over | Clean up session state; used in skill-to-skill handoff |
messageUpdate |
Channel → Bot | An existing message was edited by the user | Update any stored copy of the message |
messageDelete |
Channel → Bot | An existing message was deleted | Remove stored references to the deleted message |
messageReaction |
Channel → Bot | User reacts (👍, ❤️ etc.) to a message | Track engagement or trigger reaction-based logic |
invoke vs event: invoke expects a synchronous invokeResponse back from the bot; event is fire-and-forget with no response expected.
Here is a sample flow showing what interactions between the user and the M365 agent look like.
TurnContext
A turn consists of a user's interaction with the agent: the user sends an activity to the agent, and the agent responds with one or more activities. This completes the turn. For example, if the user asks when the store is open, and the agent responds by asking which location, that counts as one turn. In the following turn, the user might respond with the location, and the agent might respond with the store hours; this would be another turn.
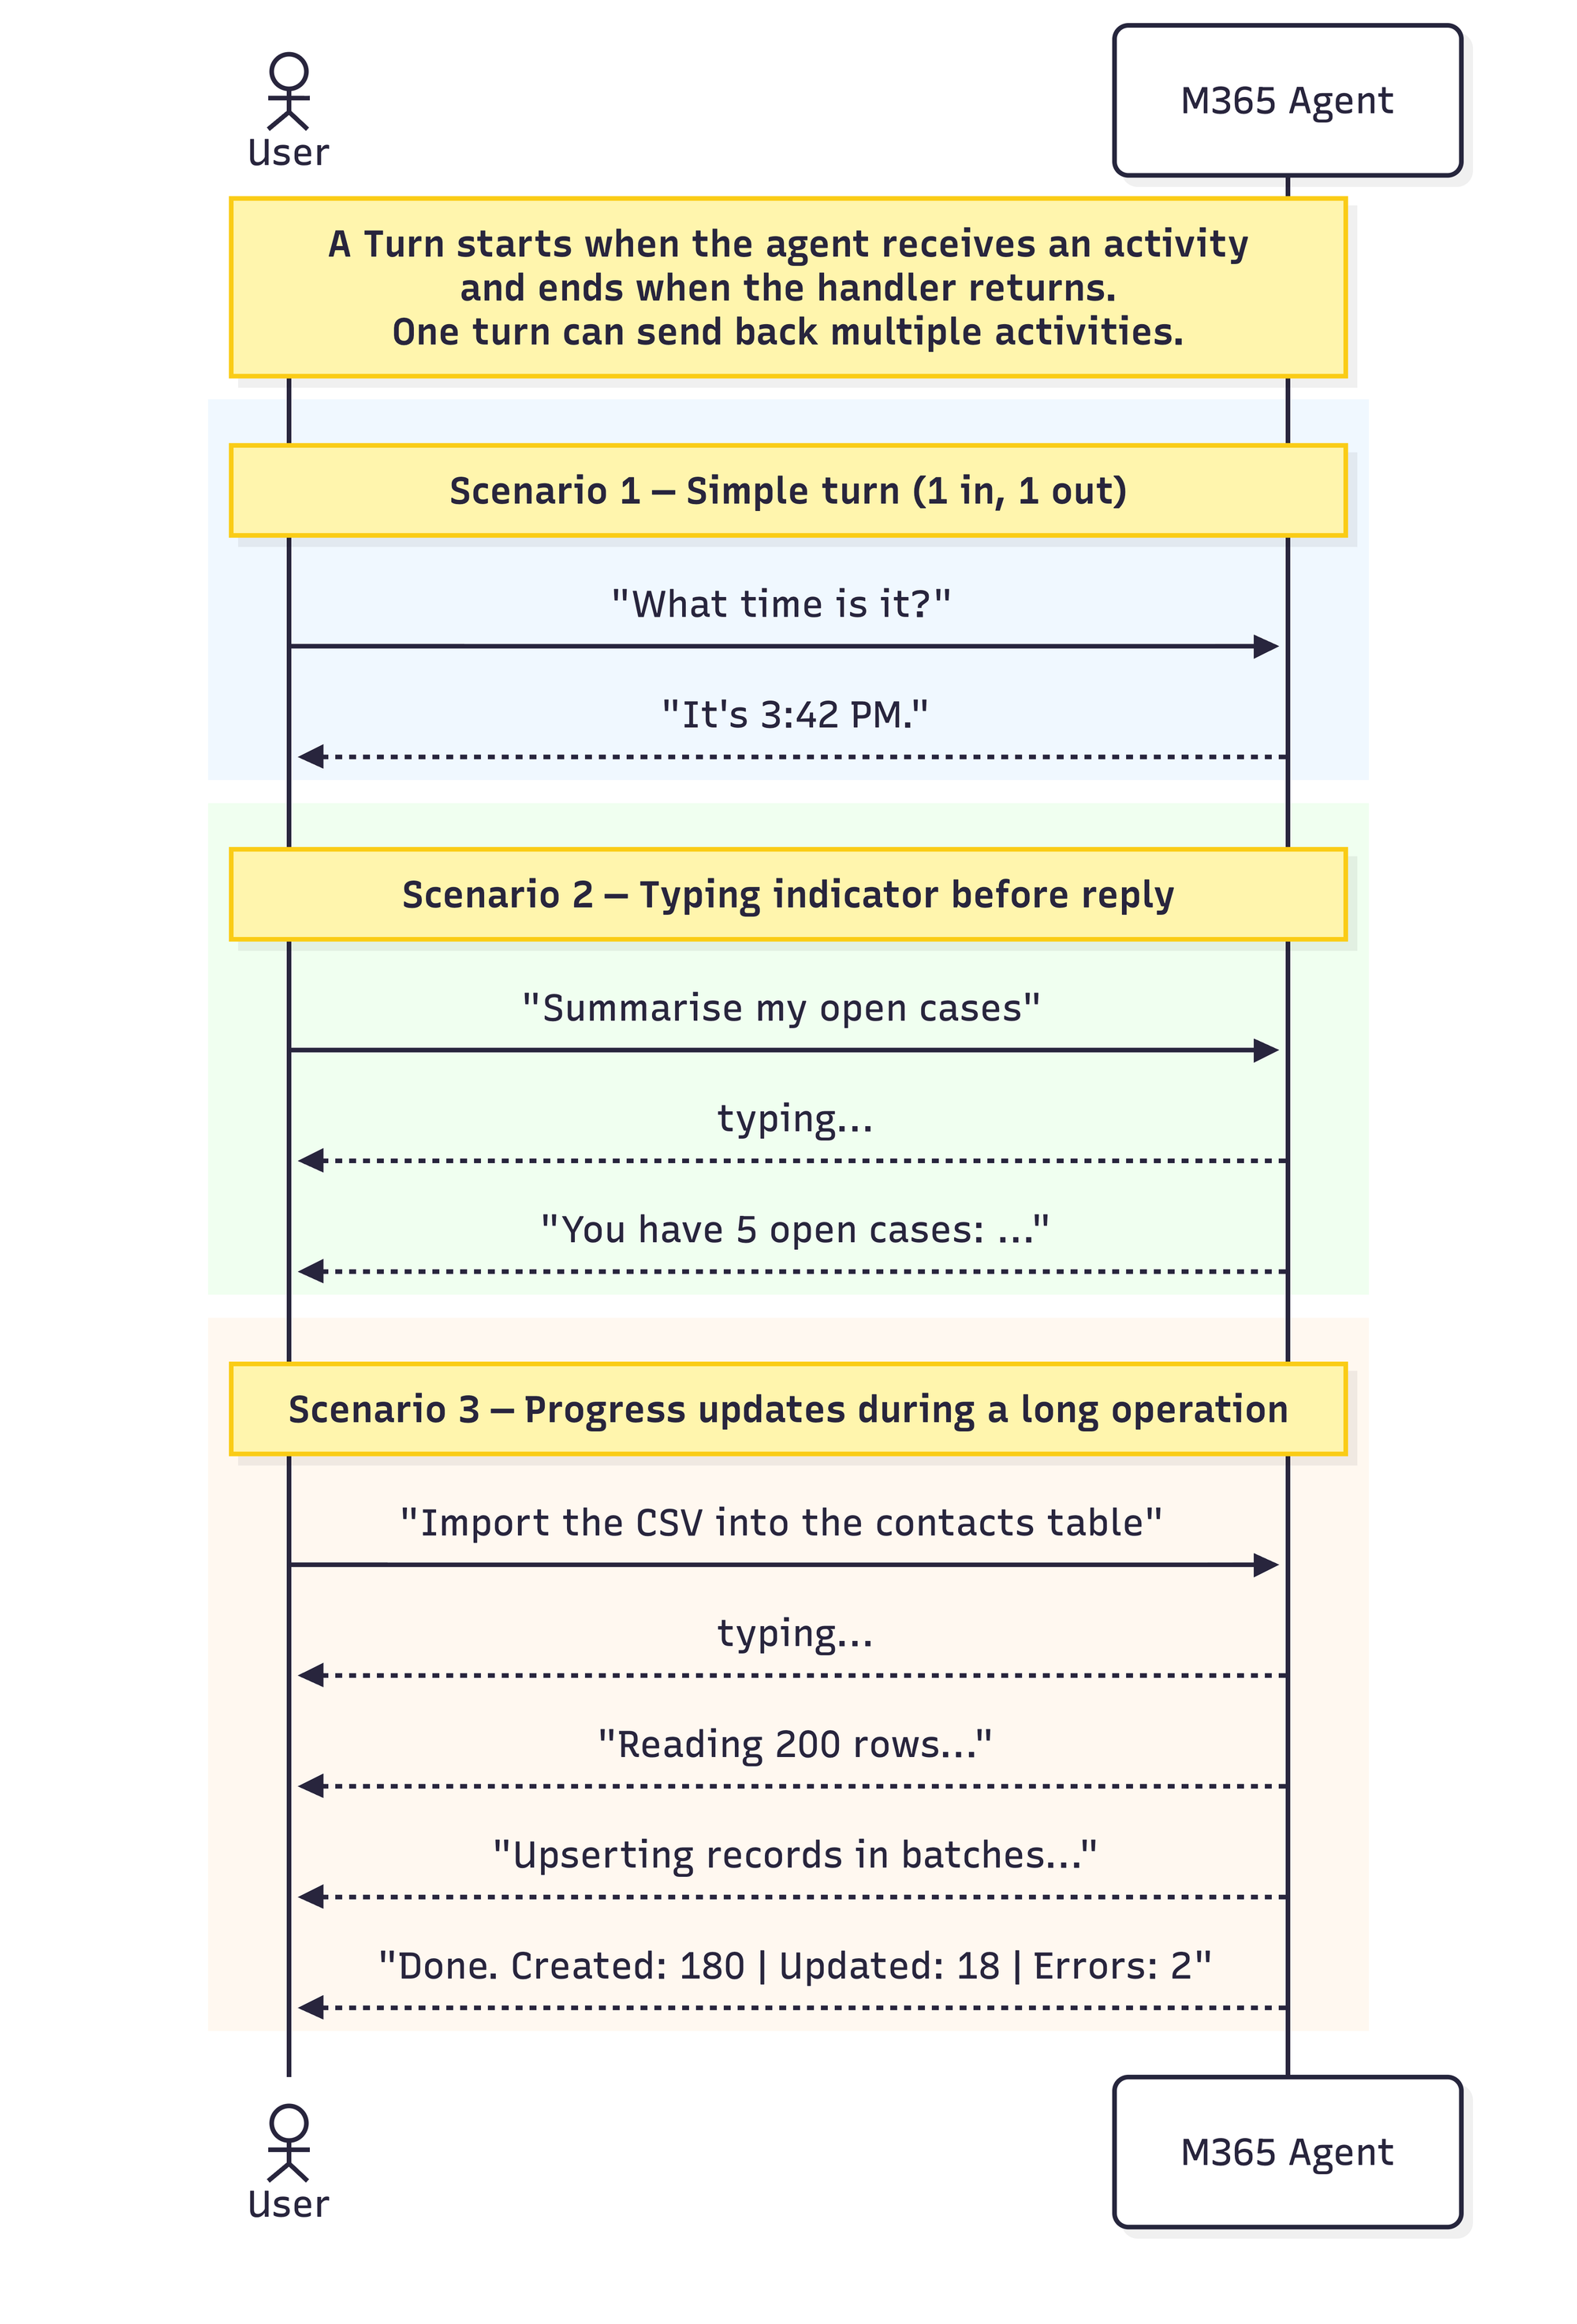
The Microsoft 365 agents SDK provides a TurnContext object for each turn, which is disposed of when the turn ends. It provides access to the incoming activity, methods for sending responses, conversation state management, and the context needed to handle a single turn of conversation.
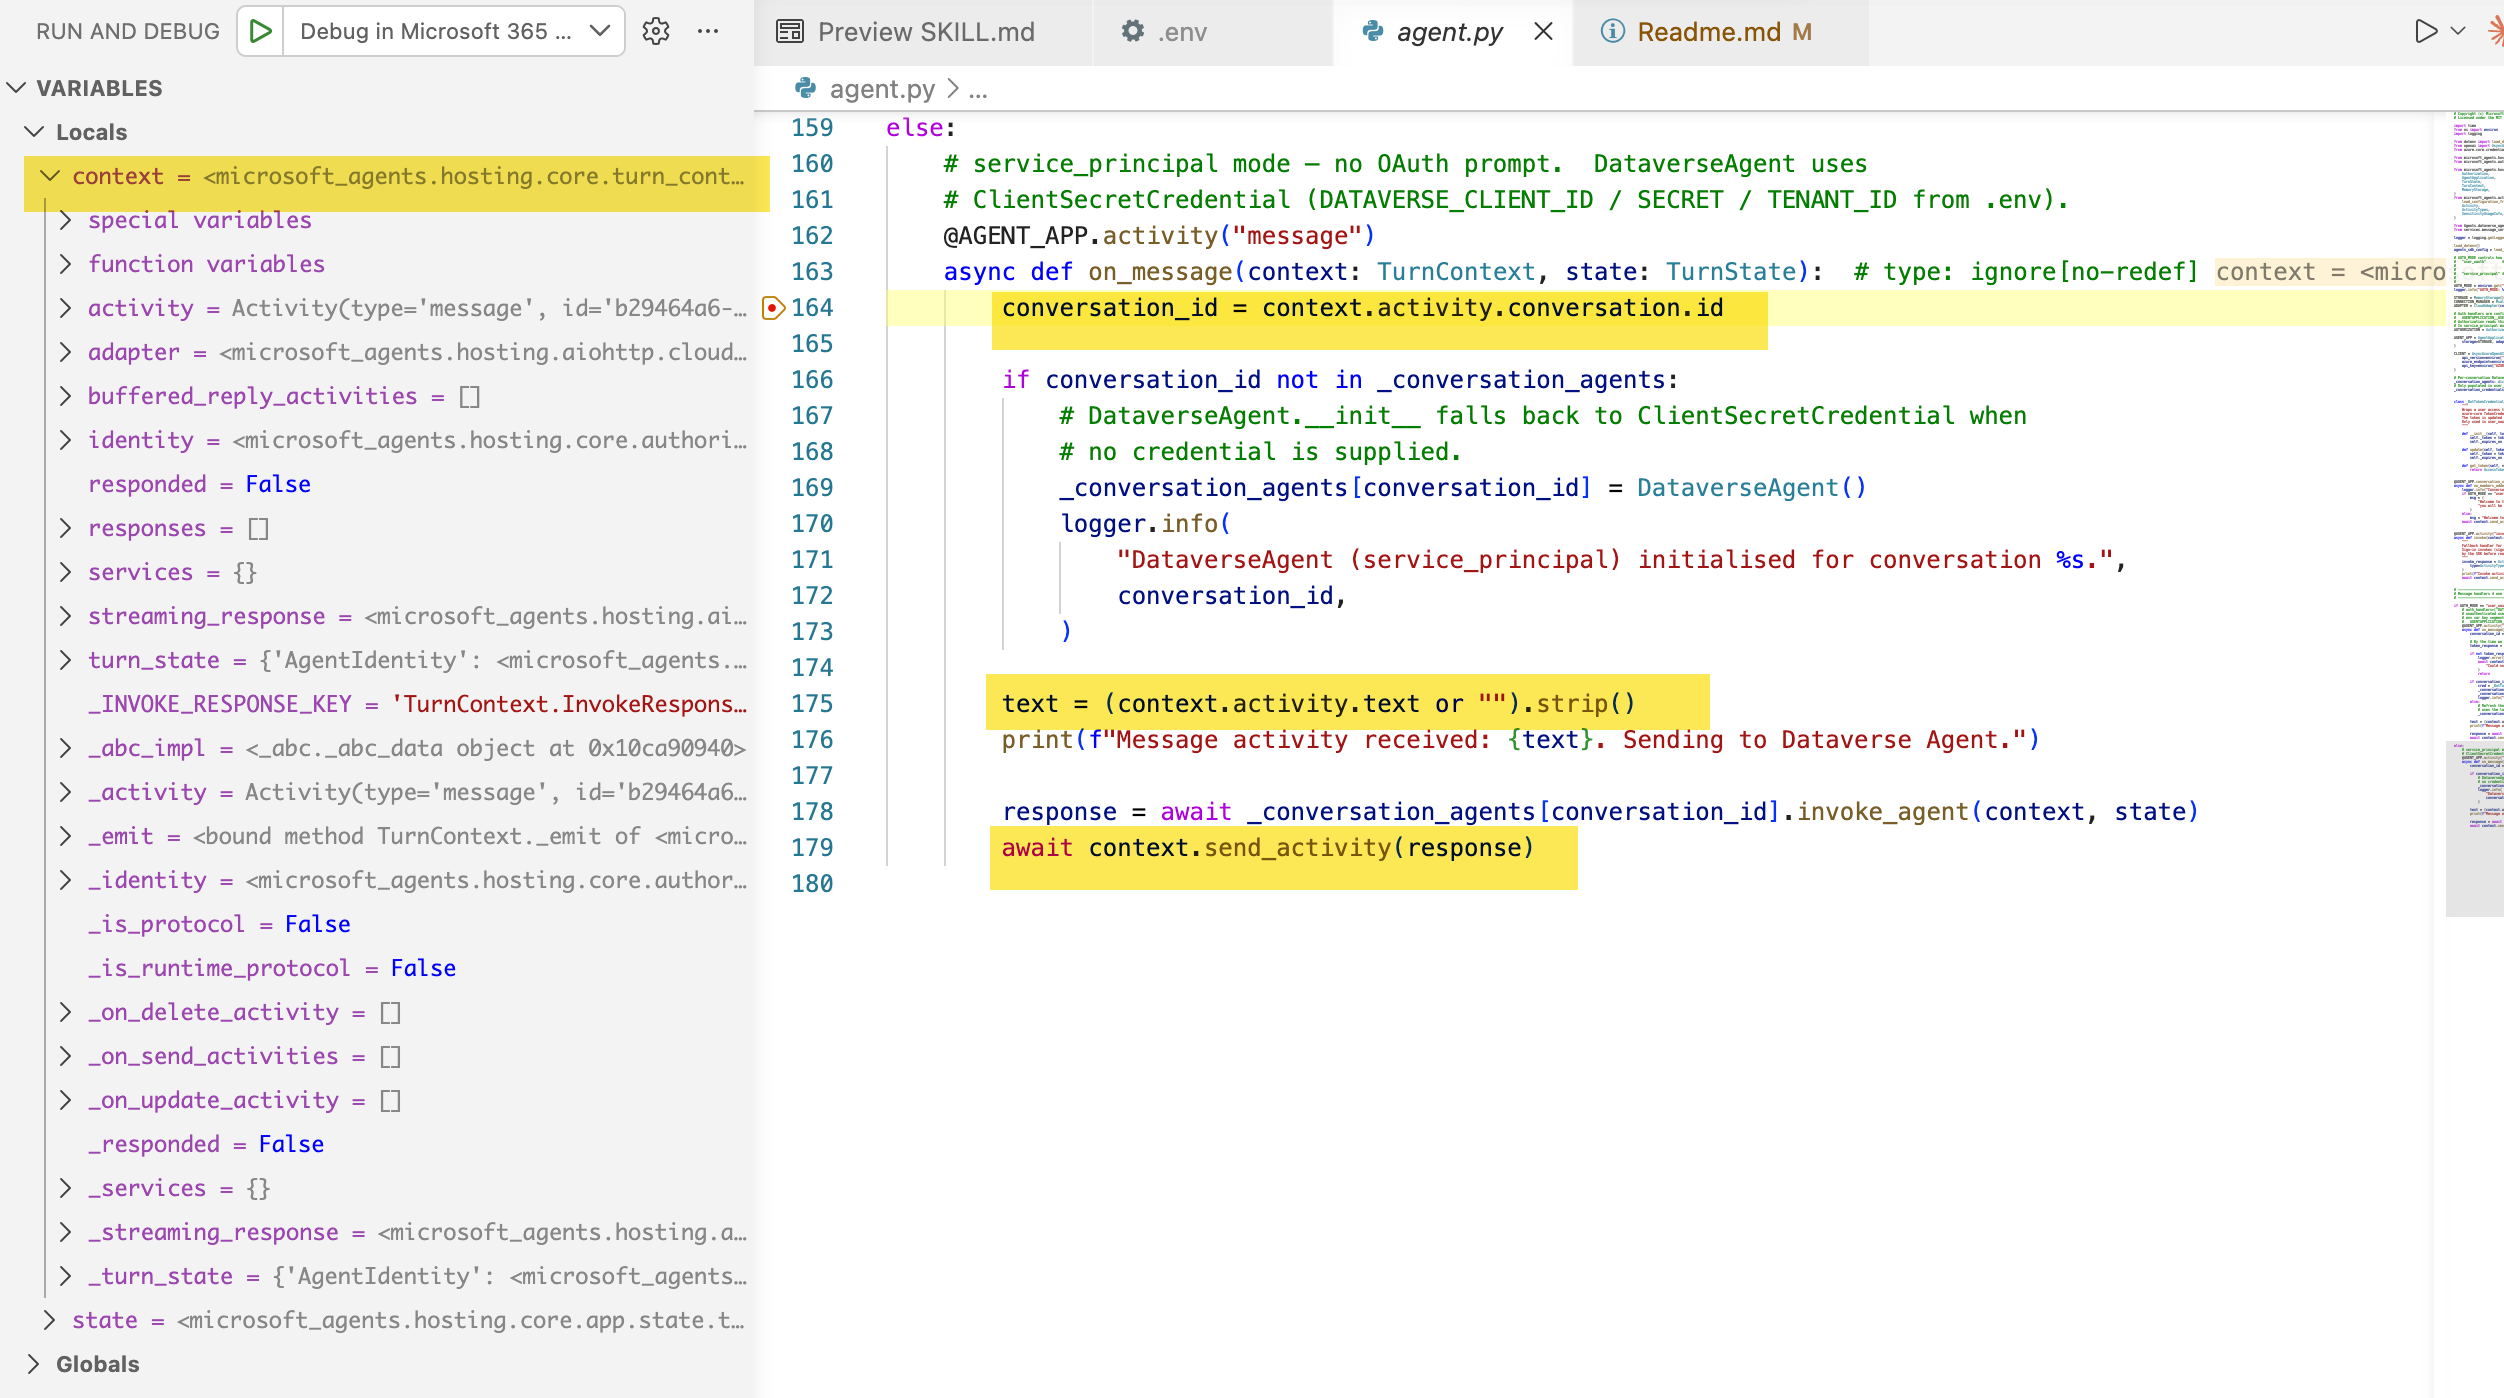
In the example below, we can see the TurnContext for the event handler on_message(when an agent receives a message from the user) and how we can access the activity and send a response using the send_activity method.
Managing State in Agents
Similar to web apps, agents are stateless. The state gives our agents memory. Instead of starting from scratch each time, the agent can store user details, such as their name and preferences, along with the context of the past conversation, if applicable to your use case.
For example, you might want the agent to greet the user the next time, and if they have shared their location with you, you can personalize the greeting. Similarly, if the user is querying the status of their request, past conversation context can improve the experience by allowing the agent to avoid asking for that information again.
Microsoft 365 Agents SDK provides some abstractions to help manage state.
There are multiple layers to managing state in agents:
- Agent Application
- State management
- Storage
Agent Application
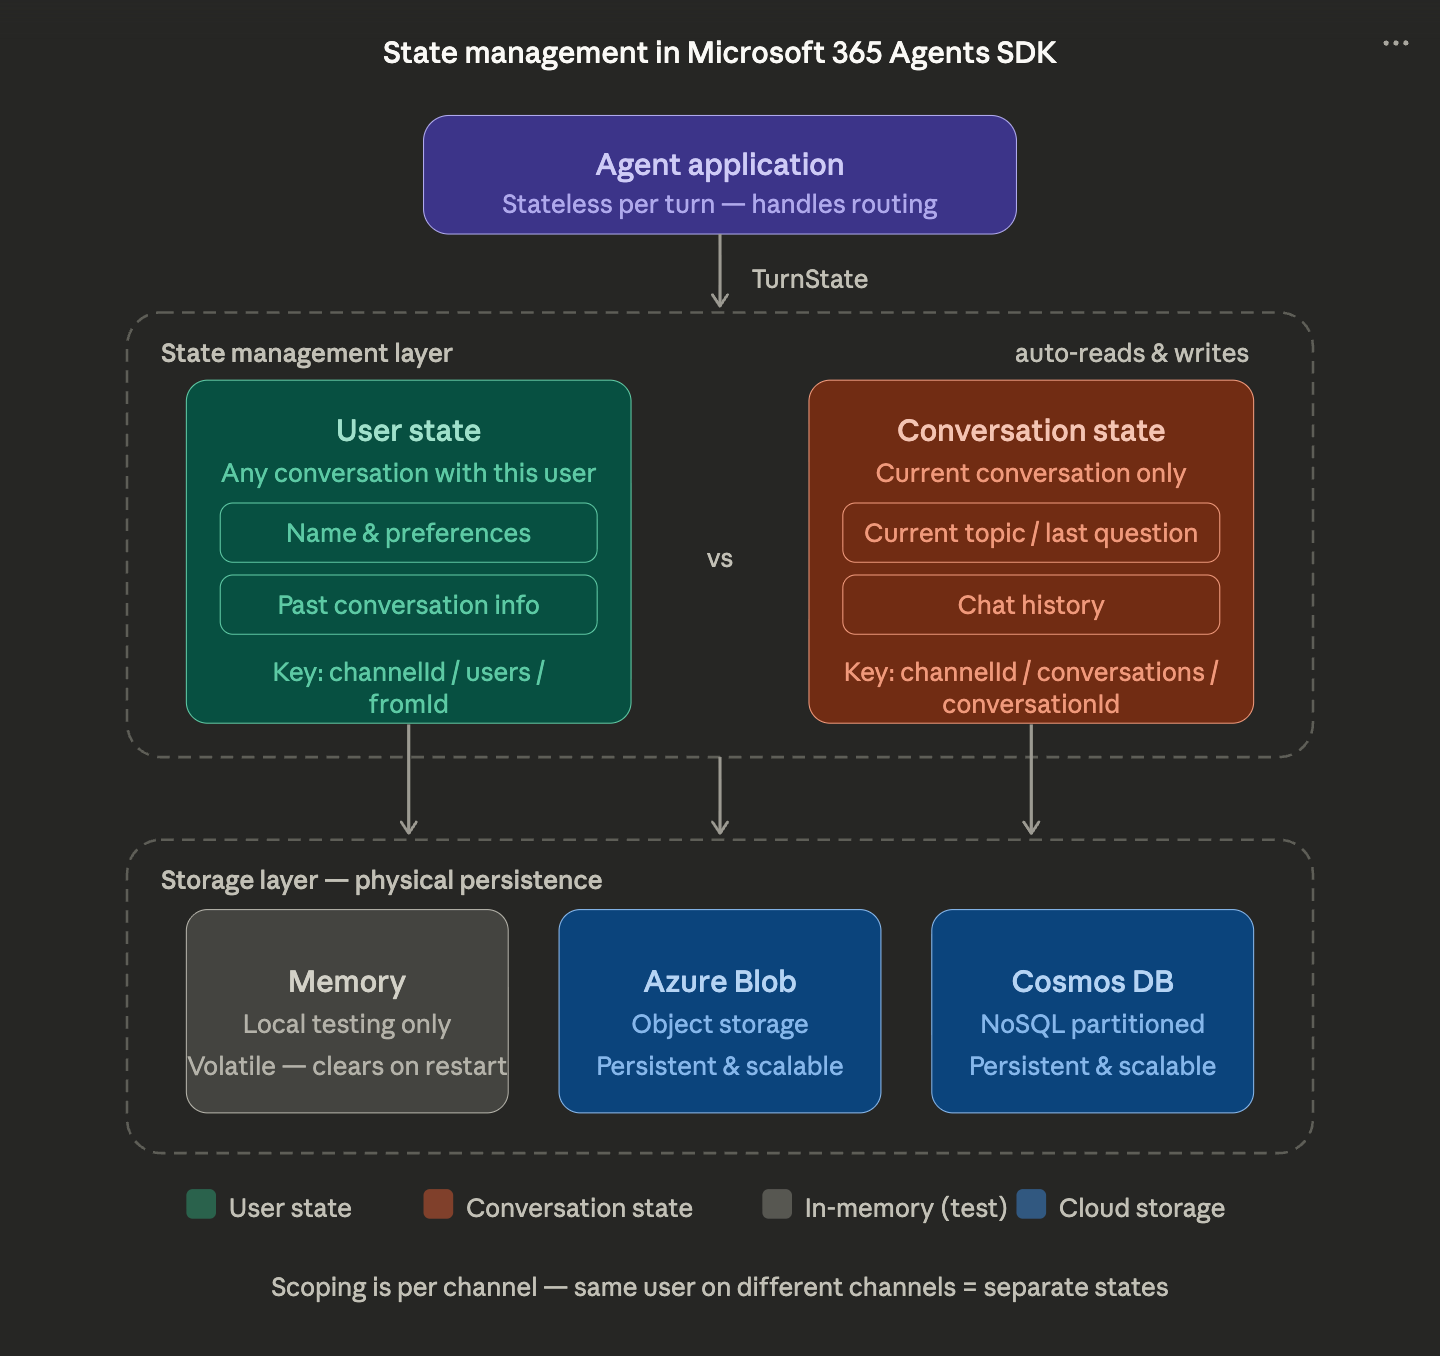
Because agents are stateless, each turn of a conversation might be handled by a different server instance. The SDK passes the TurnState object in every route handler, giving us access to both the user state and the conversation state. We will talk more about the route handler shortly.
State Management
State management automates reading from and writing to the underlying storage layer. State is stored properties, which are key-value pairs that our agent can use to read and write through the state management object without having to worry about the implementation details. The SDK handles this for us.
These state properties are organized into two "buckets":
User State: persists across any conversation in any given turn with that user on a given channel (great for name, preferences, past interactions)
Conversation State: persists across turns within a specific conversation, regardless of the user, such as in group conversations.
Both user state and conversation state are scoped by channel. When setting the keys for each of these states, the SDK uses a specific format and sets them internally. We would just have to call the get and set methods and provide our property name.
User State : {Activity.ChannelId}/users/{Activity.From.Id}#YourPropertyName
Conversation State: {Activity.ChannelId}/conversations/{Activity.Conversation.Id}#YourPropertyName
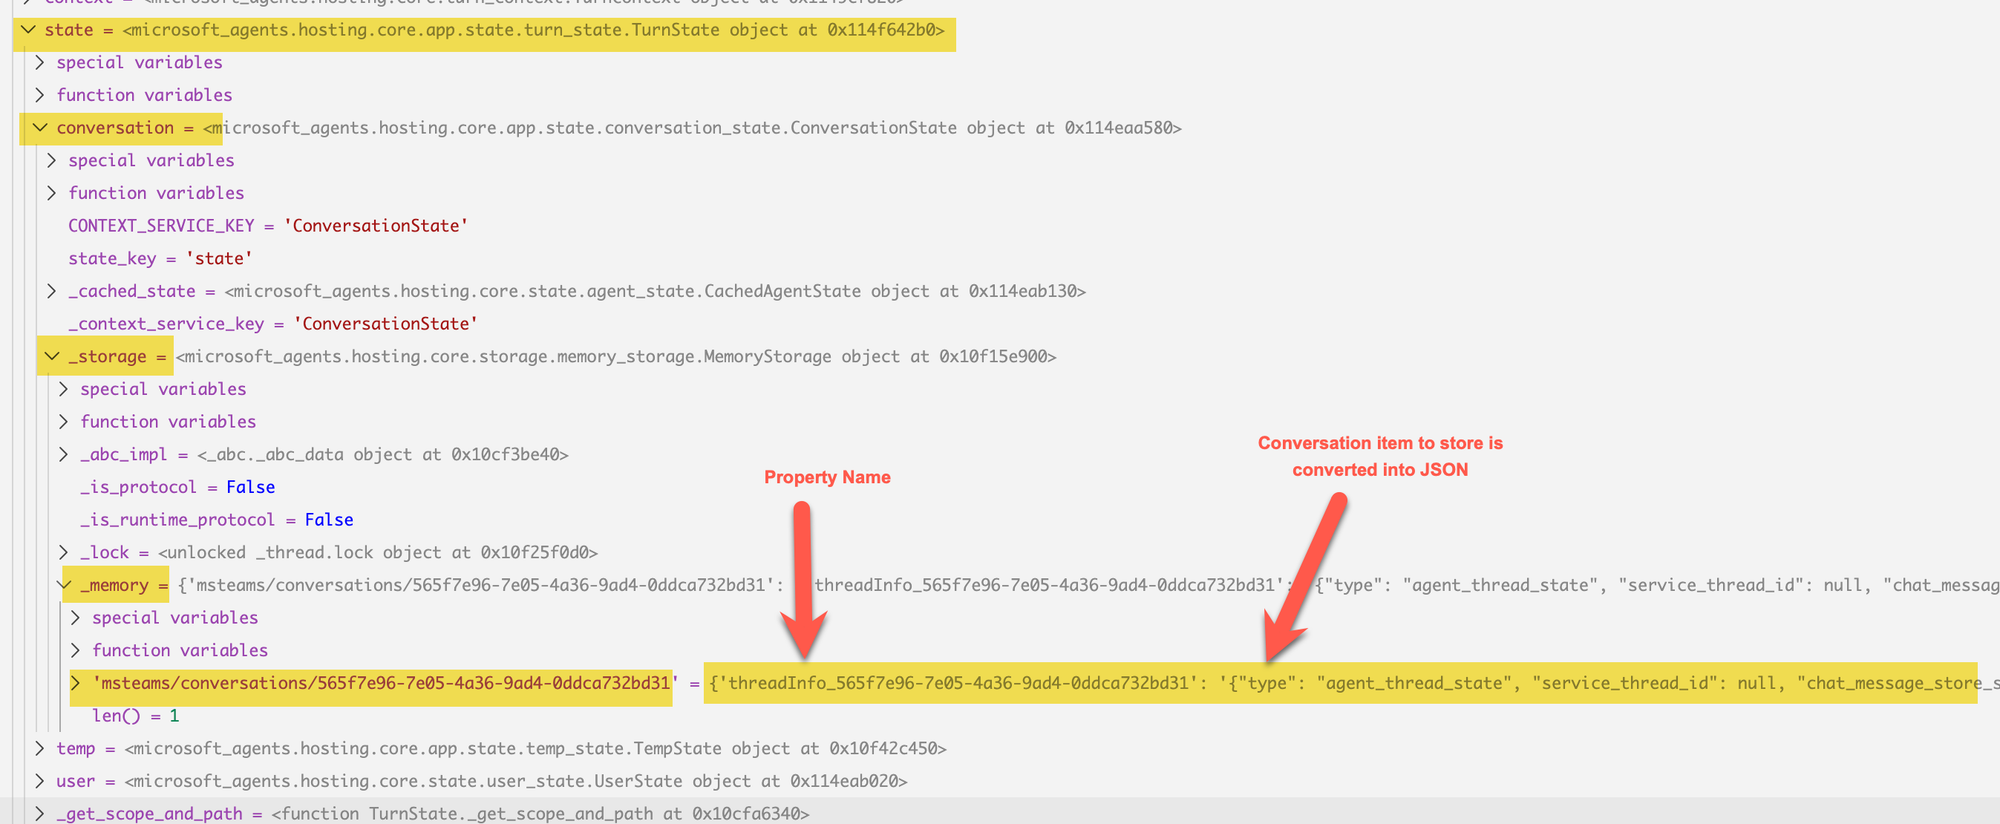
For example, in our agent, if we look at how the data is stored, we can see it as below
# When setting a property name
turn_state.conversation.set_value(f"threadInfo_{conversationId}",conversation_item_to_store)

# When getting a value from the conversation state using a property name that was previously used to store the conversation item
turn_state.conversation.get_value(f"threadInfo_{conversationId}")
If we are using a Teams channel, the data would be stored as shown below in storage; in the example below, it uses memory storage.
Storage Layer
Indicates where the data physically resides for the state information to be persisted and reused across sessions. Microsoft 365 Agents SDK provides multiple storage options:
- Memory storage
- Azure blob storage
- Cosmos DB
- Custom storage can be leveraged by implementing IStorage
For our use case, I only explored the memory storage, but the Azure blob storage looked very straightforward to implement and would be the one I would be using.
Azure Bot Service
We will deploy our agent to the Azure Bot Service and use it for testing across the web channel. For basic testing, we will not need this, but when testing attachments or the Microsoft Teams channel, having an Azure Bot Service would make testing much simpler.
We will look at how to leverage VS Code tunnels for our testing shortly. To follow along, create an Azure Bot Service in the Azure portal and have it ready to go. We will need this for testing the attachments.
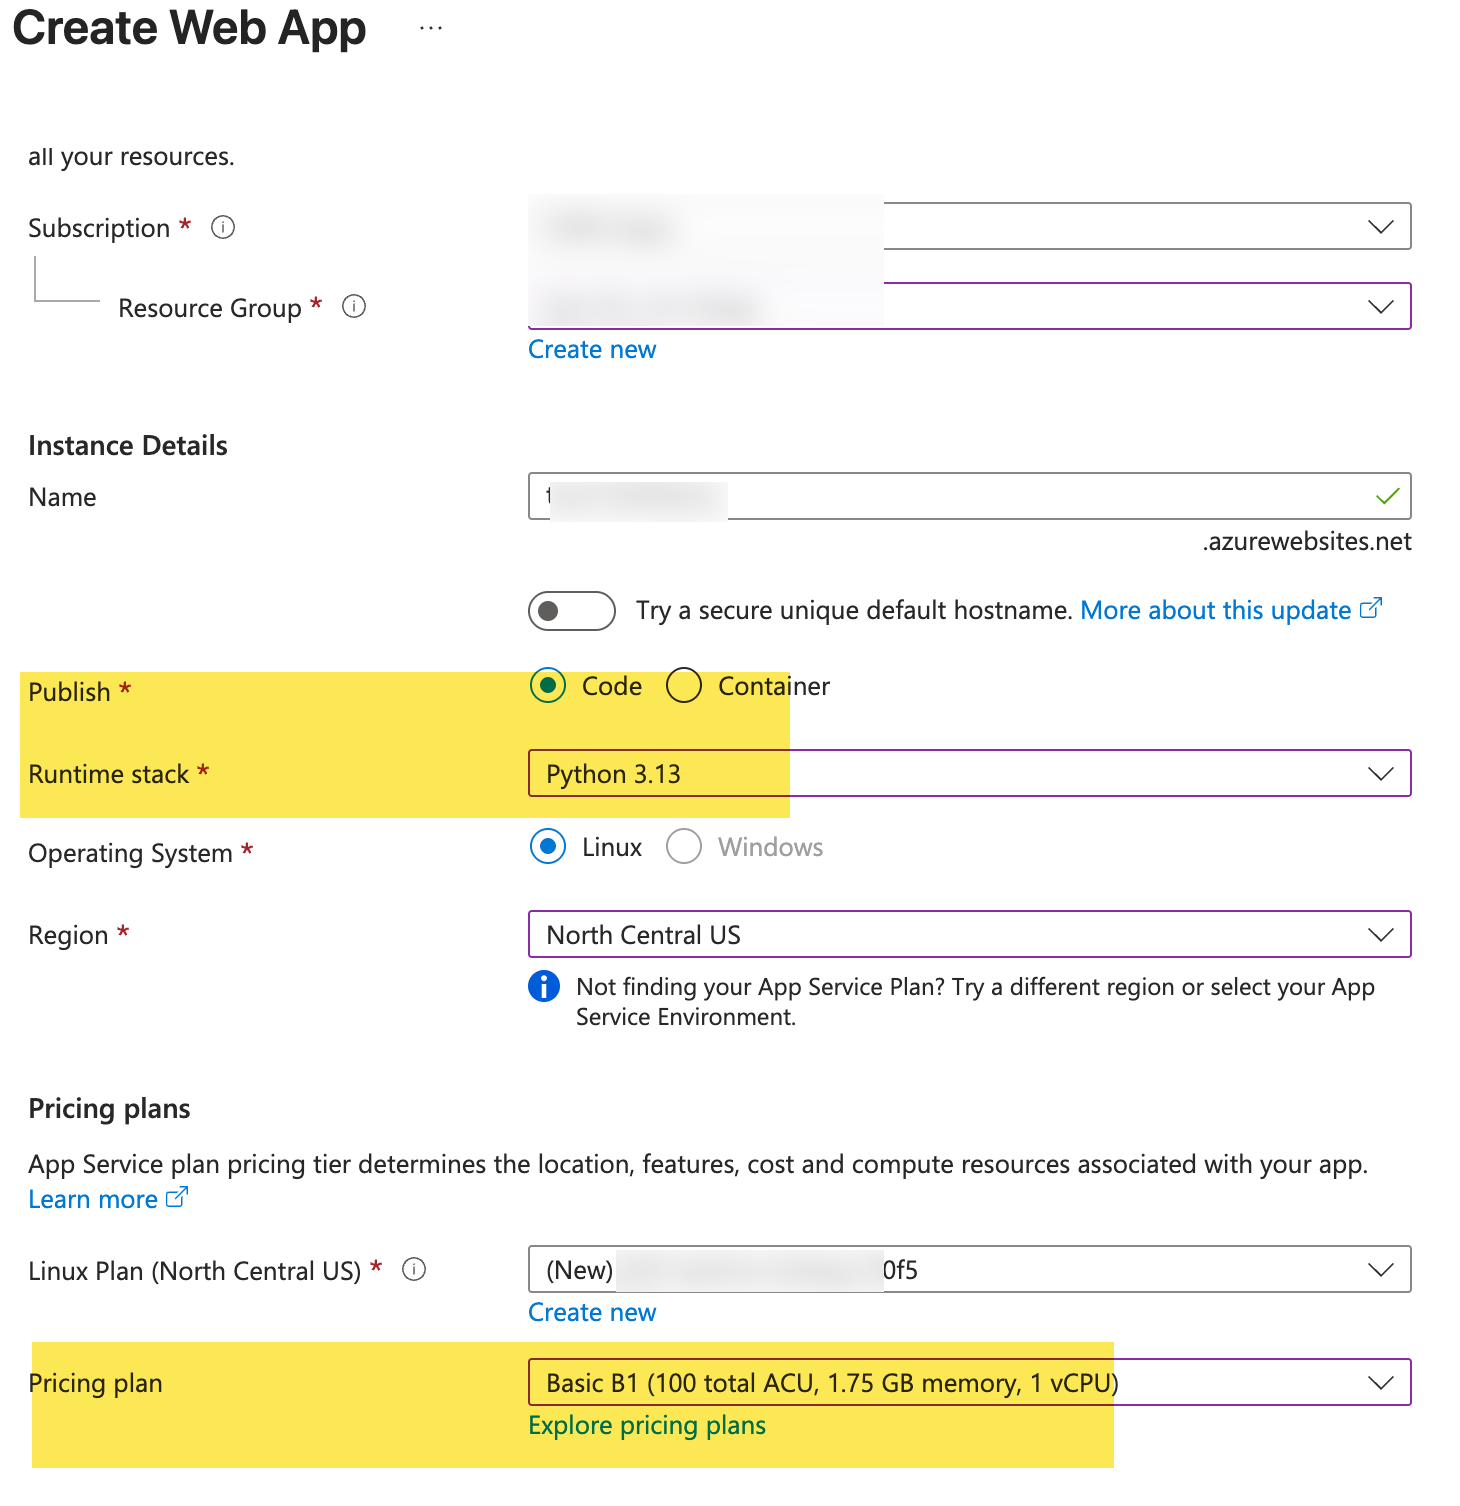
Azure App Service
To host our agent server, which does most of the work, we will leverage Azure App Service and create a simple web app as shown below. You can create it directly from the portal or through the Azure CLI. We will be using Python 3.13 and the Basic B1 plan.
Building the Agent
Finally, the most exciting part of the blog is here. I wanted to make sure we have covered the basics before we dive into building the agent, as these concepts will help you quickly understand what's happening.
This is a bigger agent for a blog post, so I will not be able to cover every single implementation detail, but I will try to explain the main ideas and core components needed to make this agent work. You can debug and play with this agent locally using these concepts to learn more about the implementation details.
Create the Agent Server
To build our agent in Python, I started by cloning the quick-start sample and building on it.
- start_server() takes an AgentApplication and AgentAuthConfiguration (both created in agent.py) and wires up an aiohttp web app.
- The JWT middleware (jwt_authorization_middleware) is applied to all requests, validating the Agent's auth token on every incoming request.
- We will use only a single route (/api/messages) instead of multiple routes, as shown in other samples. All bot traffic comes through here.
- The handler (entry_point) pulls the agent app and adapter off the aiohttp app state and delegates to start_agent_process() from the Microsoft Agents SDK, which handles the rest of the activity protocol.
- Defaults to 3978, overridable via the PORT env var.
from os import environ
from microsoft_agents.hosting.core import AgentApplication, AgentAuthConfiguration
from microsoft_agents.hosting.aiohttp import (
    start_agent_process,
    jwt_authorization_middleware,
    CloudAdapter,
)
from aiohttp.web import Request, Response, Application, run_app


def start_server(
    agent_application: AgentApplication, auth_configuration: AgentAuthConfiguration
):
    async def entry_point(req: Request) -> Response:
        agent: AgentApplication = req.app["agent_app"]
        adapter: CloudAdapter = req.app["adapter"]
        return await start_agent_process(
            req,
            agent,
            adapter,
        )

    APP = Application(middlewares=[jwt_authorization_middleware])
    APP.router.add_post("/api/messages", entry_point)
    APP["agent_configuration"] = auth_configuration
    APP["agent_app"] = agent_application
    APP["adapter"] = agent_application.adapter

    try:
        run_app(APP, host="localhost", port=int(environ.get("PORT", 3978)))
    except Exception as error:
        raise error
start_server.py
Create an Instance of the Agent Application
Don't be overwhelmed by the code below; it's actually straightforward and makes sense once we go through the main components.
import time
from os import environ
import logging

from dotenv import load_dotenv
from openai import AsyncAzureOpenAI
from azure.core.credentials import AccessToken

from microsoft_agents.hosting.aiohttp import CloudAdapter
from microsoft_agents.authentication.msal import MsalConnectionManager

from microsoft_agents.hosting.core import (
    Authorization,
    AgentApplication,
    TurnState,
    TurnContext,
    MemoryStorage,
)
from microsoft_agents.activity import (
    load_configuration_from_env,
    Activity,
    ActivityTypes,
    SensitivityUsageInfo,
)

from Agents.dataverse_agent import DataverseAgent


logger = logging.getLogger(__name__)

load_dotenv()
agents_sdk_config = load_configuration_from_env(environ)

# AUTH_MODE controls how the agent authenticates with Dataverse:
#   "user_oauth"        — Azure Bot Service OAuth flow; operations run as the signed-in user.
#                         Requires Azure Bot Service + OAuth connection. Use for production and
#                         any deployment that needs delegated user credentials.
#   "service_principal" — Client credentials (app-only); operations run as the service principal
#                         defined by DATAVERSE_CLIENT_ID / DATAVERSE_CLIENT_SECRET.
#                         No sign-in prompt; suitable for local dev with the Bot Framework Emulator.
AUTH_MODE = environ.get("AUTH_MODE", "user_oauth").lower()
logger.info("AUTH_MODE: %s", AUTH_MODE)

STORAGE = MemoryStorage()
CONNECTION_MANAGER = MsalConnectionManager(**agents_sdk_config)
ADAPTER = CloudAdapter(connection_manager=CONNECTION_MANAGER)

# Auth handlers are configured entirely from env vars using the naming convention:
#   AGENTAPPLICATION__USERAUTHORIZATION__HANDLERS__DATAVERSE__SETTINGS__AZUREBOTOAUTHCONNECTIONNAME=<name>
# Authorization reads this automatically from agents_sdk_config.
# In service_principal mode this object is still created but no OAuth handlers are invoked.
AUTHORIZATION = Authorization(STORAGE, CONNECTION_MANAGER, **agents_sdk_config)

AGENT_APP = AgentApplication[TurnState](
    storage=STORAGE, adapter=ADAPTER, authorization=AUTHORIZATION, **agents_sdk_config
)

CLIENT = AsyncAzureOpenAI(
    api_version=environ["AZURE_OPENAI_API_VERSION"],
    azure_endpoint=environ["AZURE_OPENAI_ENDPOINT"],
    api_key=environ["AZURE_OPENAI_API_KEY"],
)

# Per-conversation DataverseAgent instances.
_conversation_agents: dict[str, DataverseAgent] = {}
# Only populated in user_oauth mode; holds mutable token credentials refreshed each turn.
_conversation_credentials: dict[str, "_BotTokenCredential"] = {}


class _BotTokenCredential:
    """
    Wraps a user access token obtained from Azure Bot Service OAuth into an
    azure-core TokenCredential so it can be passed to DataverseClient.
    The token is updated each turn via update() so it stays fresh.
    Only used in user_oauth mode.
    """

    def __init__(self, token: str):
        self._token = token
        self._expires_on = int(time.time()) + 3600

    def update(self, token: str) -> None:
        self._token = token
        self._expires_on = int(time.time()) + 3600

    def get_token(self, *scopes: str, **kwargs) -> AccessToken:
        return AccessToken(self._token, self._expires_on)


@AGENT_APP.conversation_update("membersAdded")
async def on_members_added(context: TurnContext, _state: TurnState):
    logger.info("Conversation update received: %s", context.activity)
    if AUTH_MODE == "user_oauth":
        msg = (
            "Welcome to the Dataverse Agent! Send any message to get started — "
            "you will be prompted to sign in."
        )
    else:
        msg = "Welcome to the Dataverse Agent! Send me a message to get started."
    await context.send_activity(msg)


@AGENT_APP.activity("invoke")
async def invoke(context: TurnContext, _state: TurnState) -> str:
    """
    Fallback handler for non-sign-in invoke activities.
    Sign-in invokes (signin/verifyState, signin/tokenExchange) are intercepted
    by the SDK before reaching this handler.
    """
    invoke_response = Activity(
        type=ActivityTypes.invoke_response, value={"status": 200}
    )
    print(f"Invoke activity received: {context.activity}")
    await context.send_activity(invoke_response)


# ---------------------------------------------------------------------------
# Message handlers — one per AUTH_MODE registered at startup.
# ---------------------------------------------------------------------------

if AUTH_MODE == "user_oauth":
    # auth_handlers=["DATAVERSE"] triggers the Azure Bot Service OAuth flow for
    # unauthenticated users before the handler runs.  "DATAVERSE" must match the
    # env var key segment:
    #   AGENTAPPLICATION__USERAUTHORIZATION__HANDLERS__DATAVERSE__SETTINGS__...
    @AGENT_APP.activity("message", auth_handlers=["DATAVERSE"])
    async def on_message(context: TurnContext, state: TurnState):
        conversation_id = context.activity.conversation.id

        # By the time we reach here the SDK has guaranteed the user is signed in.
        token_response = await AGENT_APP.auth.get_token(context, "DATAVERSE")

        if not token_response or not token_response.token:
            logger.error(
                "No token available after auto-signin — this should not happen."
            )
            await context.send_activity(
                "Could not retrieve your credentials. Please try signing in again."
            )
            return

        if conversation_id not in _conversation_agents:
            cred = _BotTokenCredential(token_response.token)
            _conversation_credentials[conversation_id] = cred
            _conversation_agents[conversation_id] = DataverseAgent(credential=cred)
            logger.info(
                "DataverseAgent initialised for conversation %s.", conversation_id
            )
        else:
            # Refresh the token in the existing credential so the agent always
            # uses the latest token without rebuilding its thread.
            _conversation_credentials[conversation_id].update(token_response.token)

        text = (context.activity.text or "").strip()
        print(f"Message activity received: {text}. Sending to Dataverse Agent.")

        response = await _conversation_agents[conversation_id].invoke_agent(
            context, state
        )
        await context.send_activity(response)

else:
    # service_principal mode — no OAuth prompt.  DataverseAgent uses
    # ClientSecretCredential (DATAVERSE_CLIENT_ID / SECRET / TENANT_ID from .env).
    @AGENT_APP.activity("message")
    async def on_message(context: TurnContext, state: TurnState):  # type: ignore[no-redef]
        conversation_id = context.activity.conversation.id

        if conversation_id not in _conversation_agents:
            # DataverseAgent.__init__ falls back to ClientSecretCredential when
            # no credential is supplied.
            _conversation_agents[conversation_id] = DataverseAgent()
            logger.info(
                "DataverseAgent (service_principal) initialised for conversation %s.",
                conversation_id,
            )

        text = (context.activity.text or "").strip()
        print(f"Message activity received: {text}. Sending to Dataverse Agent.")

        response = await _conversation_agents[conversation_id].invoke_agent(
            context, state
        )
        await context.send_activity(response)
agent.py
Here is a breakdown of the code above and what each part does.
Global Setup
When the module loads, it bootstraps four core objects as global variables:
- STORAGE: In-memory storage for conversation state (turn state persists here between messages).
- CONNECTION_MANAGER: MSAL-based auth manager that handles the bot's own credentials with Azure Bot Service.
- ADAPTER: The CloudAdapter, which is the SDK protocol layer. It translates raw HTTP requests into TurnContext objects.
- AGENT_APP: The top-level AgentApplication. Think of it as the router — it dispatches incoming activities to the right handler based on type.
AUTH_MODE
The bot supports two modes, controlled by the AUTH_MODE env var:
- user_oauth (default/production): Users sign in via Azure Bot Service OAuth. Dataverse operations run as that user, with their permissions. Requires an OAuth connection configured in Azure Bot Service.
- service_principal (local dev): Skips the sign-in flow entirely. All Dataverse operations run as the app's service principal using DATAVERSE_CLIENT_ID / DATAVERSE_CLIENT_SECRET from .env. Great for testing using the
teamsapptesterwithout having to rely on an Azure Bot Service. However, functionality like the attachments will not work currently.
_BotTokenCredential
  class _BotTokenCredential:
      def update(self, token: str) -> None: ...
      def get_token(self, *scopes, **kwargs) -> AccessToken: ...
This is a small adapter class that bridges two worlds: the Agent's SDK (which provides a raw OAuth token string) and the Azure SDK (which expects an object implementing the TokenCredential interface).
Rather than creating a new DataverseAgent instance each turn (which is expensive), the credential object is mutated in place via update() each turn. So the agent and its conversation thread survive across turns, but each turn uses a fresh token.
Per-Conversation Agent Instances
_conversation_agents: dict[str, DataverseAgent] = {}
_conversation_credentials: dict[str, _BotTokenCredential] = {}
Each unique conversation ID gets its own DataverseAgent instance. This isolation means:
- Conversation history (the AgentThread) doesn't bleed between users/conversations.
- Tokens are scoped per conversation, not shared globally.
- Helps with simplifying the attachment process tied to data imports. These files can be accessed
Route Handlers
The @AGENT_APP decorator registers handlers for specific activity types similar to HTTP route handlers.
on_members_added: fires when someone joins the conversation. Sends a welcome message (with or without a sign-in prompt, depending on AUTH_MODE).
invoke: handles M365 Agent SDK invoke activities (e.g., adaptive card actions). Sign-in invokes are intercepted by the SDK before reaching here; this is just a catch-all fallback that returns HTTP 200.
on_message: the main handler, registered differently per mode:
user_oauth: decorated with auth_handlers=["DATAVERSE"], which tells the SDK to intercept unauthenticated users and trigger the OAuth sign-in flow before the handler runs. In the first message, a new DataverseAgent and _BotTokenCredential are created. On subsequent messages, the credential is refreshed in-place.service_principal: no auth handler — the message goes straight through. A DataverseAgent is created without a credential argument, so it falls back to
ClientSecretCredential internally.
In both cases, the handler ends by calling invoke_agent() on the per-conversation agent and sending the response back.
Dataverse Agent
This is where the intelligence is assembled, and each conversation turn is driven. It's a single class responsible for three things:
- Initializing the agent
- Handling attachments
- Managing per-turn conversation flow
#imports removed for brevity


class DataverseAgent:
    """
    Agent to interact with Dataverse based on user intents.
    """

    agent_name = "DataverseAgent"

    instructions = """You are a Dataverse assistant. Your task is to help users perform actions on Dataverse based on their intents,
    which can include retrieving records, creating records, updating records, importing data, and opening records.
    Use the identified intent to guide your responses and actions within Dataverse.
    Always ensure that your responses are clear, concise, and relevant to the user's request regarding Dataverse operations.
    Use the tools to perform actions in Dataverse as needed.

    ## Table and Column Discovery (IMPORTANT)
    You MUST use MetadataTools to discover table names and columns. Never guess or assume logical names.

    **Resolving a table name:**
    1. use `search_tables` with a
       keyword (e.g., search_term="case" or search_term="product"). This searches the cached table list
       and returns only matching results — it is fast and lightweight.
    3. Once you have the correct table name, proceed with your query.

    **Resolving columns:**
    - Call `get_table_columns` on the resolved table to discover available column logical names and types.
    - Use the `attribute_type` filter to narrow results when you only need specific column types
      (e.g., attribute_type="Lookup" to find relationship fields).
    - For choice/picklist columns, use `get_column_options` to discover valid values.

    **Optimization rules:**
    - Do NOT call `get_table_columns` if you already know the exact columns needed from a prior turn.
    - Use `get_last_table_info` to avoid redundant lookups when working with the same table across turns.

    ## Querying Data — Use FetchXML
    When retrieving data from Dataverse, **always prefer `query_fetchxml`** over `retrieve_multiple`.
    FetchXML is more expressive, supports operators like `eq-userid` (current user) without needing
    a GUID, and handles joins, aggregation, and complex filters cleanly.

    Build FetchXML queries using this pattern:
    ```xml
    <fetch version="1.0" output-format="xml-platform" mapping="logical"
        no-lock="false" distinct="true">
        <entity name="ENTITY_LOGICAL_NAME">
            <attribute name="col1" />
            <attribute name="col2" />
            <order attribute="col1" descending="false" />
            <filter type="and">
                <condition attribute="statecode" operator="eq" value="0" />
            </filter>
        </entity>
    </fetch>
    ```

    Only list the `<attribute>` elements you actually need — do not fetch all columns.
    Use `retrieve_multiple` only as a fallback if FetchXML is not suitable for a specific query.

    ## User-Specific Queries
    When the user asks about "my" records, records they own, or records assigned to them:
    1. Use `query_fetchxml` with the `eq-userid` operator — this automatically resolves to the
       signed-in user without needing their GUID.
    2. Add `statecode eq 0` to filter for active records.

    Example — active cases owned by the current user:
    ```xml
    <fetch version="1.0" output-format="xml-platform" mapping="logical"
        no-lock="false" distinct="true">
        <entity name="incident">
            <attribute name="title" />
            <attribute name="ticketnumber" />/>
            <order attribute="title" descending="false" />
            <filter type="and">
                <condition attribute="ownerid" operator="eq-userid" />
                <condition attribute="statecode" operator="eq" value="0" />
            </filter>
        </entity>
    </fetch>
    ```

    ## General Dataverse Conventions
    - `statecode eq 0` means Active, `statecode eq 1` typically means Inactive/Resolved/Closed.
    - Use `get_column_options` on the `statecode` or `statuscode` columns to discover exact values for any table.
    - All tables have `createdon`, `modifiedon`, `ownerid`, and `statecode` columns.

    ## Important Guidelines
    - If a tool call returns an error, do NOT retry the same call with the same parameters. Adjust the filter or approach.
    - Keep tool calls minimal — resolve metadata once, then query data. Do not make unnecessary discovery calls.
    """

    def __init__(self, credential=None):
        load_dotenv()
        api_version = environ["AZURE_OPENAI_API_VERSION"]
        azure_endpoint = environ["AZURE_OPENAI_ENDPOINT"]
        api_key = environ["AZURE_OPENAI_API_KEY"]
        deployment_name = environ["AZURE_OPENAI_CHAT_DEPLOYMENT_NAME"]

        print("Dataverse Agent initialized with endpoint: %s", azure_endpoint)
        print("Using API version: %s", api_version)
        print("Using Deployment Name: %s", deployment_name)

        # Track whether the caller supplied a user credential (user_oauth mode) before
        # we potentially replace it with a ClientSecretCredential below.
        is_user_oauth = credential is not None

        if credential is None:
            credential = ClientSecretCredential(
                tenant_id=environ["DATAVERSE_TENANT_ID"],
                client_id=environ["DATAVERSE_CLIENT_ID"],
                client_secret=environ["DATAVERSE_CLIENT_SECRET"],
            )

        dataverse_client = DataverseClient(
            base_url=environ["DATAVERSE_API_URL"],
            credential=credential,
        )

        print("Dataverse Client initialized.")

        metadata_tools = MetadataTools(dataverse_client)
        data_tools = DataTools(dataverse_client)
        utility_tools = UtilityTools()
        self.import_tools = ImportTools(dataverse_client)

        tool_list = [
            metadata_tools.get_table_info,
            metadata_tools.search_tables,
            metadata_tools.get_table_columns,
            metadata_tools.get_column_options,
            metadata_tools.get_last_table_info,
            data_tools.create_record,
            data_tools.get_record,
            data_tools.update_record,
            data_tools.retrieve_multiple,
            data_tools.query_fetchxml,
            utility_tools.get_time,
            self.import_tools.import_csv,
            self.import_tools.import_uploaded_csv,
        ]

        # Build instructions — dynamically append current user context in user_oauth mode.
        agent_instructions = self.instructions

        if is_user_oauth:
            user_tools = UserTools(credential, environ["DATAVERSE_API_URL"])
            tool_list.append(user_tools.get_current_user)

            user_info = user_tools.get_current_user()
            if "systemuserid" in user_info:
                agent_instructions += f"""

    ## Current Signed-In User
    The following user is currently signed in. Use this information when the user asks
    about "my" records, records they own, or records assigned to them — you do NOT need
    to call `get_current_user` again unless the user explicitly asks to refresh their profile.
    Greet the user by their first name in your first response to make the experience personal.

    {user_info}
    """
                print("Current user context loaded into agent instructions.")
            else:
                print(
                    "Could not resolve current user during init; "
                    "LLM can still call get_current_user at runtime."
                )

        self.agent = ChatAgent(
            chat_client=AzureOpenAIChatClient(
                api_version=api_version,
                endpoint=azure_endpoint,
                api_key=api_key,
                deployment_name=deployment_name,
            ),
            instructions=agent_instructions,
            name=self.agent_name,
            tools=tool_list,
        )

    async def _download_attachment_content(self, attachment) -> Optional[str]:
        """
        Download a single attachment and return its content as a string.
        Handles both inline (base64) content and URL-based content.
        """
        # Inline content (base64 encoded bytes)
        if attachment.content and isinstance(attachment.content, (str, bytes)):
            try:
                raw = attachment.content
                if isinstance(raw, str):
                    raw = raw.encode("utf-8")
                return base64.b64decode(raw).decode("utf-8", errors="replace")
            except Exception as e:
                print(f"Error decoding inline attachment content: {e}")

        # URL-based content (Teams SAS URL or emulator content URL)
        if attachment.content_url:
            try:
                async with aiohttp.ClientSession() as session:
                    async with session.get(attachment.content_url) as response:
                        if response.status == 200:
                            raw_bytes = await response.read()
                            return raw_bytes.decode("utf-8", errors="replace")
                        else:
                            print(
                                f"Failed to download attachment: HTTP {response.status}"
                            )
            except Exception as e:
                print(f"Error downloading attachment from URL: {e}")

        return None

    async def _handle_attachments(self, context: TurnContext) -> str:
        """
        Process CSV attachments from the activity.
        Downloads content into memory, stores it on import_tools, and returns
        a context string to append to the user message.
        """
        attachments = context.activity.attachments
        if not attachments:
            return ""

        csv_info: List[str] = []
        for attachment in attachments:
            name = attachment.name or "uploaded_file.csv"
            is_csv = getattr(attachment, "content_type", "") in (
                "text/csv",
                "application/csv",
            ) or name.lower().endswith(".csv")
            if not is_csv:
                continue

            print(f"Processing CSV attachment: {name}")
            content = await self._download_attachment_content(attachment)
            if content:
                self.import_tools.set_csv_content(content)
                csv_info.append(name)
                print(
                    f"CSV attachment '{name}' loaded into memory ({len(content)} chars)"
                )
            else:
                print(f"Could not retrieve content for attachment: {name}")

        if not csv_info:
            return ""

        names = ", ".join(f"'{n}'" for n in csv_info)
        return (
            f"\n\n[System: The user has uploaded the following CSV file(s): {names}. "
            "The content is loaded in memory. Use the `import_uploaded_csv` tool to import it — "
            "no file path is needed.]"
        )

    async def invoke_agent(self, context: TurnContext, turn_state: TurnState) -> str:

        conversationId = context.activity.conversation.id

        print("Invoking agent for conversation ID: %s", conversationId)

        thread = await self.get_conversation_thread(conversationId, turn_state)

        print("Received activity text: %s", context.activity.text)
        text = context.activity.text or ""

        attachment_context = await self._handle_attachments(context)
        text = text + attachment_context

        response_msg = await self.agent.run(text, thread=thread)

        print("Response from agent: %s", response_msg.text)

        serialized_thread_after = await thread.serialize()
        serialized_thread_after_json = json.dumps(serialized_thread_after)

        print(
            "Setting conversation thread state for conversation ID: %s", conversationId
        )
        turn_state.conversation.set_value(
            f"threadInfo_{conversationId}", serialized_thread_after_json
        )

        print("Response message from agent:")
        if response_msg:
            return response_msg.text

        return ""

    async def get_conversation_thread(
        self, conversationId: str, turn_state: TurnState
    ) -> "AgentThread":

        agent_thread_info: Optional[str] = turn_state.conversation.get_value(
            f"threadInfo_{conversationId}"
        )

        if not agent_thread_info:
            thread = self.agent.get_new_thread()
        else:
            thread_data = json.loads(agent_thread_info)
            thread = await self.agent.deserialize_thread(thread_data)

        return thread
dataverse_agent.py
Here is a layout of the above code for quick reference
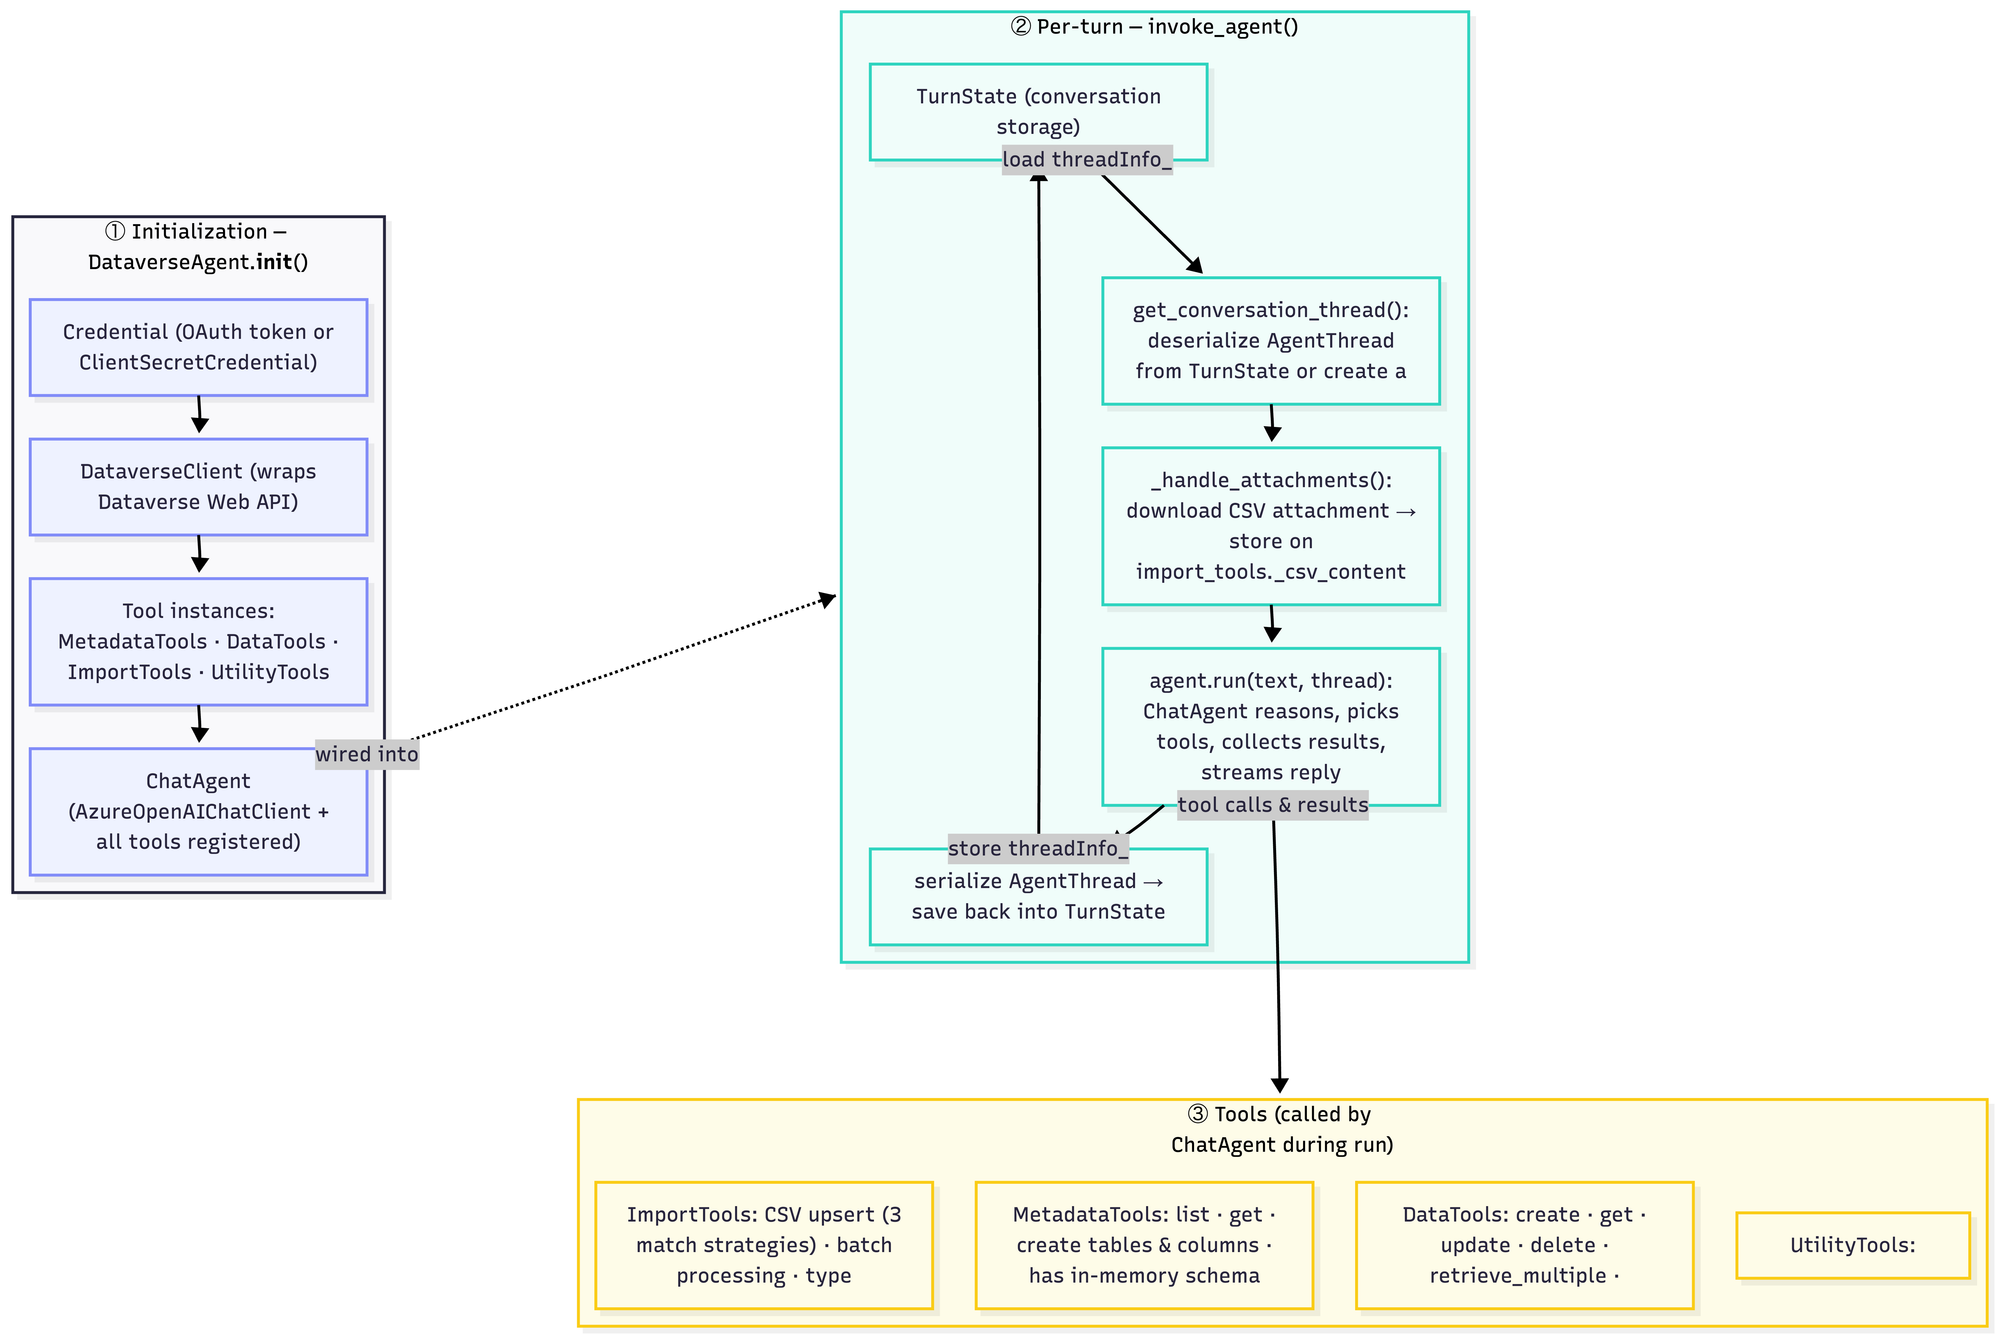
Initializing the Dataverse Agent
The constructor is where everything gets assembled. It reads the Azure OpenAI configuration from environment variables, sets up a DataverseClient (using either a passed-in OAuth credential or, if not provided, a ClientSecretCredential for service principal mode), and instantiates the four tool groups.
I was initially thinking of performing intent classification and then invoking the corresponding logic to handle the intent. But this would have been the traditional approach of using the LLM. I wanted to see how well the LLMs handle intent classification and calling the appropriate tool, and they do a pretty good job as long as the tool instructions are clear and unambiguous. Below are the tools the agent uses:
- MetadataTools: helps with identifying the tables and the metadata associated with those tables.
- DataTools: CRU operations on records
- ImportTools: CSV upsert with batch processing
- UtilityTools: lightweight helpers (e.g., current time)
Those tools are registered directly with a ChatAgent from the Microsoft Agent Framework. The ChatAgent uses Azure OpenAI's native tool-calling to decide which function to invoke — the constructor just declares what's available, and the LLM handles the rest. We will look at the advantages of using the Agent Framework shortly.
The system instructions set the persona and scope, but don't describe all the capabilities. The descriptions on the tools will help the LLM identify the right tool.
Handling Attachments
Before passing a message to the LLM, the agent checks the activity for CSV attachments. Two delivery mechanisms are supported:
- Inline (base64) — common in the M365 Agents Playground Emulator; the content is already embedded in the activity payload and just needs decoding.
- URL-based (SAS URL) — common in Teams, the file is hosted temporarily and fetched via aiohttp. Although, I haven't tested this.
Once downloaded, the CSV content is stored in-memory on the ImportTools instance via set_csv_content(). The method then returns a short system message, something like the one below, which is appended to the user's message text before it reaches the LLM.
The user has uploaded 'contacts.csv'. Use import_uploaded_csv — no file path needed.
Rather than adding attachment awareness to the LLM prompt or the tool signatures, the agent silently preprocesses the file and then tells the model what happened and what to do next in plain text. The LLM sees a normal instruction and picks the right tool.
The Turn Loop
Each call to invoke_agent follows a consistent pattern:
- Recover thread: get_conversation_thread() checks TurnState for a serialized AgentThread. If found, it deserializes it to restore conversation history. If not, a fresh thread is created.
- Process attachments: — _handle_attachments() runs and appends any context to the user text.
- Run the agent: self.agent.run(text, thread=thread) hands control to ChatAgent, which may call zero or more tools before producing a response.
- Persist thread: the updated thread is serialized back to TurnState under a key scoped to the conversation ID, so the next turn picks up exactly where this one left off.
The serialization approach is worth noting. AgentThread is the memory model — it holds the full message history, including tool calls and results. By serializing it to JSON in the Agent SDK turn state store, the agent's memory is tied to the conversation's storage lifecycle rather than the processes. Restarting the server doesn't cause an in-flight conversation to be lost if we use Azure Blob Storage or a similar service, rather than in-memory storage.
Start the Web Server
We now have everything ready to start our web server. We do this in main.py, which does the following things:
- Logging setup: Configures the microsoft_agents logger to print to stdout at INFO level.
- Import AGENT_APP and CONNECTION_MANAGER from agent.py: these are the fully initialized agent application and auth/connection manager (created at module load time when agent.py is imported).
- Calls start_server() with the agent app and the default auth configuration pulled from CONNECTION_MANAGER.
import logging

ms_agents_logger = logging.getLogger("microsoft_agents")
ms_agents_logger.addHandler(logging.StreamHandler())
ms_agents_logger.setLevel(logging.INFO)

from agent import AGENT_APP, CONNECTION_MANAGER
from start_server import start_server

start_server(
    agent_application=AGENT_APP, auth_configuration=CONNECTION_MANAGER.get_default_connection_configuration()
)
main.py
Agent Framework
We used the Microsoft Agent Framework to simplify a few aspects of our agent.
- Built-in Tool/Function Calling Loop: The framework handles the full agentic loop automatically for us, where the LLM decides to call a tool, the framework executes it, feeds the result back, and continues until a final answer is reached.
- Conversation Thread Management: AgentThread serializes and restores conversation history across turns. Without it, we have to manage the messages[] array manually.
- Tool Registration & Dispatch: Tools like those in Tools/DataTools.py, MetadataTools.py, and ImportTools.py are registered declaratively. The framework introspects their signatures/docstrings to build the OpenAI function schema, and routes calls to the right handler. Direct LLM calls require manually writing and maintaining JSON schemas for every tool.
- State Isolation per Conversation: The DataverseAgent instance + AgentThread pair per conversation (stored in _conversation_agents) gives clean state isolation. Without the framework, we would have to implement this session management.
- Swappable LLMs: The agent framework allows us to easily change the underlying models or providers without rewriting the tool orchestration logic. In our example, we would only have to change the
AzureOpenAIChatClienton thechat_clientparameter.
self.agent = ChatAgent(
            chat_client=AzureOpenAIChatClient(
                api_version=api_version,
                endpoint=azure_endpoint,
                api_key=api_key,
                deployment_name=deployment_name,
            ),
            instructions=self.instructions,
            name=self.agent_name,
            tools=[
                metadata_tools.get_table_info,
                metadata_tools.list_tables,
                metadata_tools.get_last_table_info,
                data_tools.create_record,
                data_tools.get_record,
                data_tools.update_record,
                data_tools.retrieve_multiple,
                data_tools.query_fetchxml,
                utility_tools.get_time,
                self.import_tools.import_csv,
                self.import_tools.import_uploaded_csv,
            ],
        )
Local Testing
Clone the repo and ensure you have configured the environment and installed the packages as described in the local setup. Once that's complete, we can begin our testing locally.
First, let's start our agent server by running python -m main in a new terminal.

Similarly, in another terminal instance, install the Microsoft 365 Agents Playground by running the command below.
npm install -g @microsoft/teams-app-test-tool
Once the test tool is installed, run the command below to harness the app. This will open the Agents Playground in a new browser window
teamsapptester
- Notice that the authentication failed as it requires the Azure Bot Service. Ideally, we should be able to bypass this setting and avoid using Azure Bot Service for local testing, but I haven't found a way to do so at the moment.
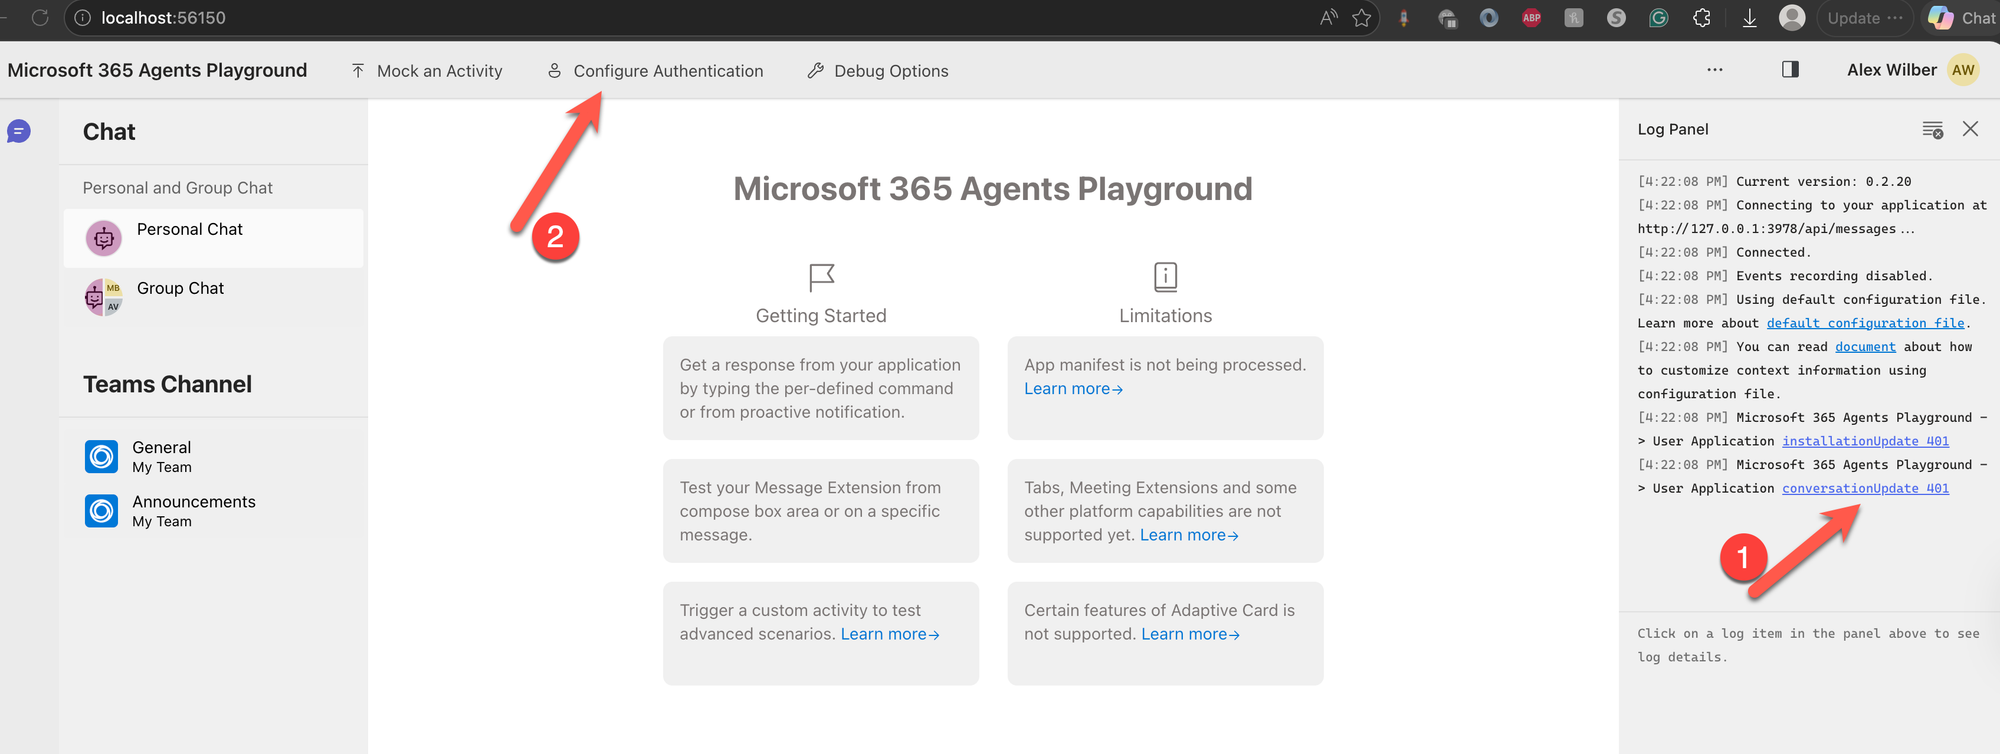
- To work around it, click Configure Authentication and manually provide the values from the
.envfile for the ClientID, ClientSecret and Tenant ID that starts with the prefix CONNECTIONS__SERVICE_CONNECTION__SETTINGS__
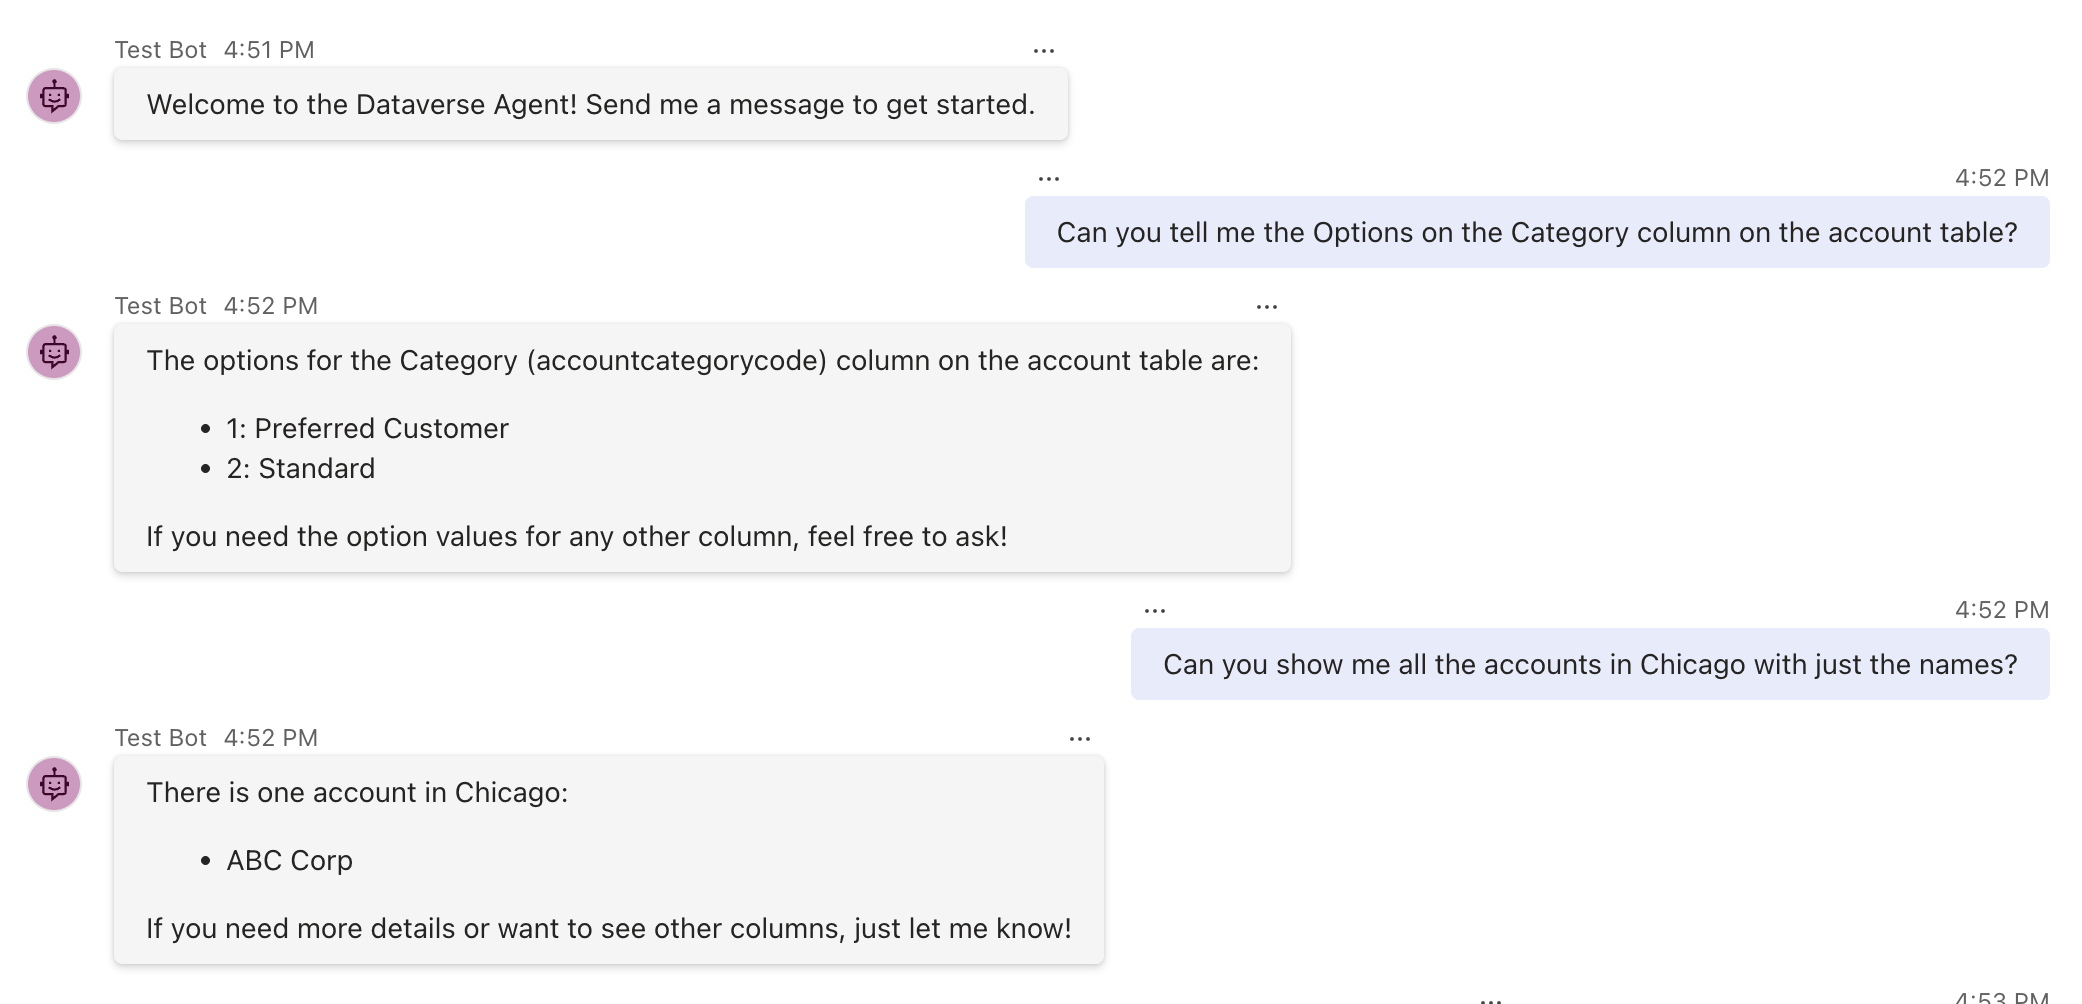
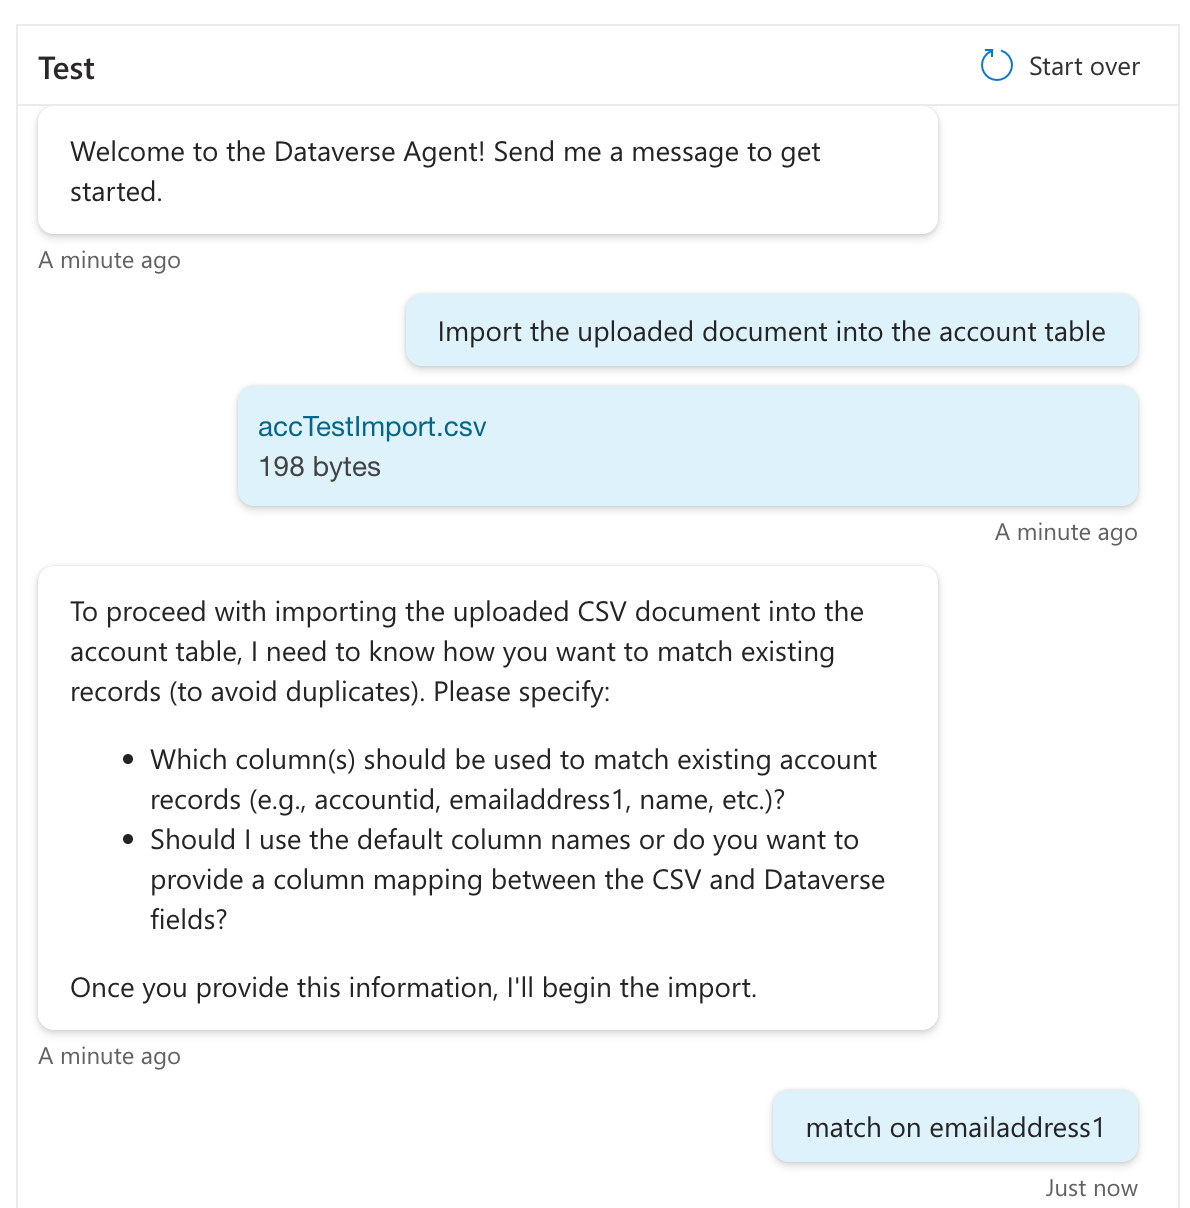
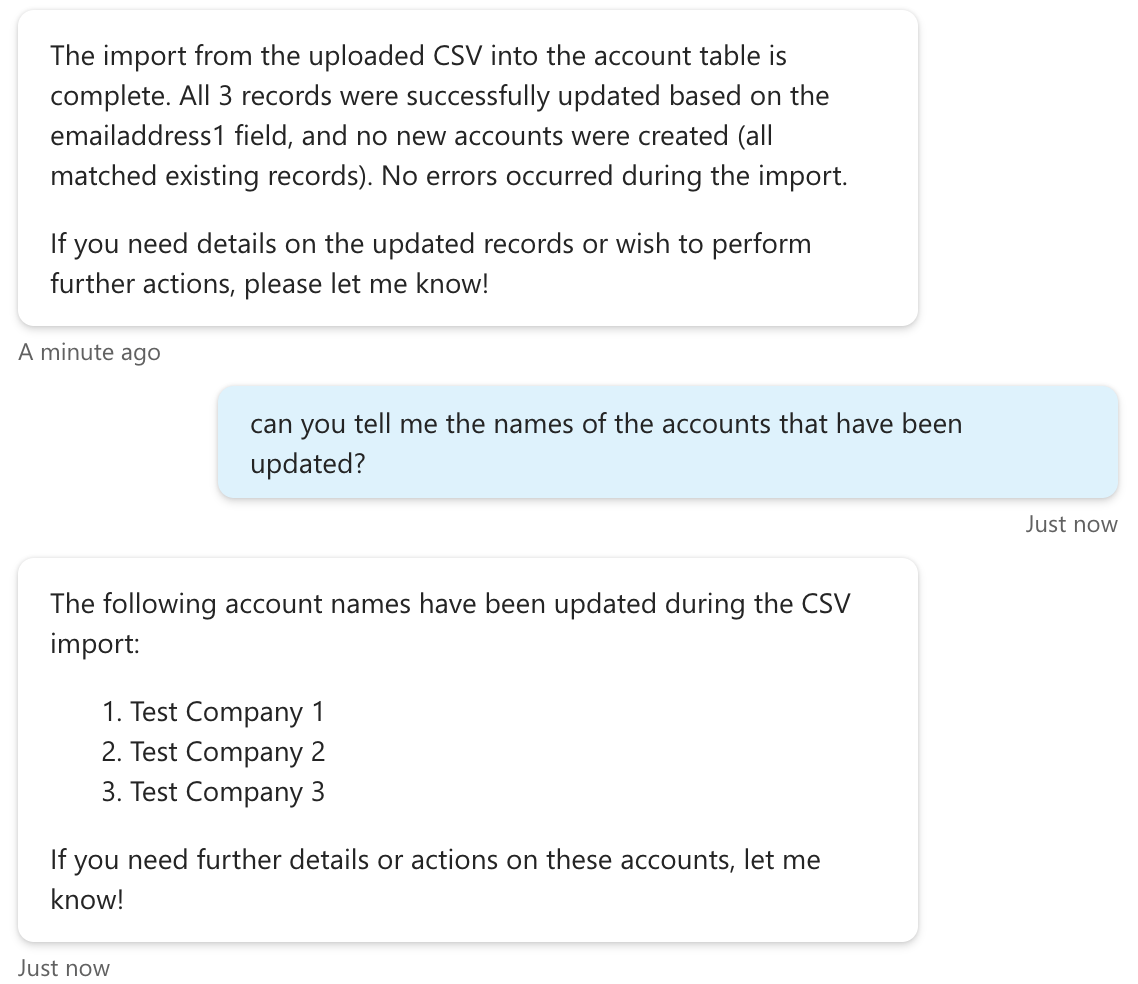
Refresh, and you should now see the agent ready to go. I asked a few questions, and you can see the responses it returns.
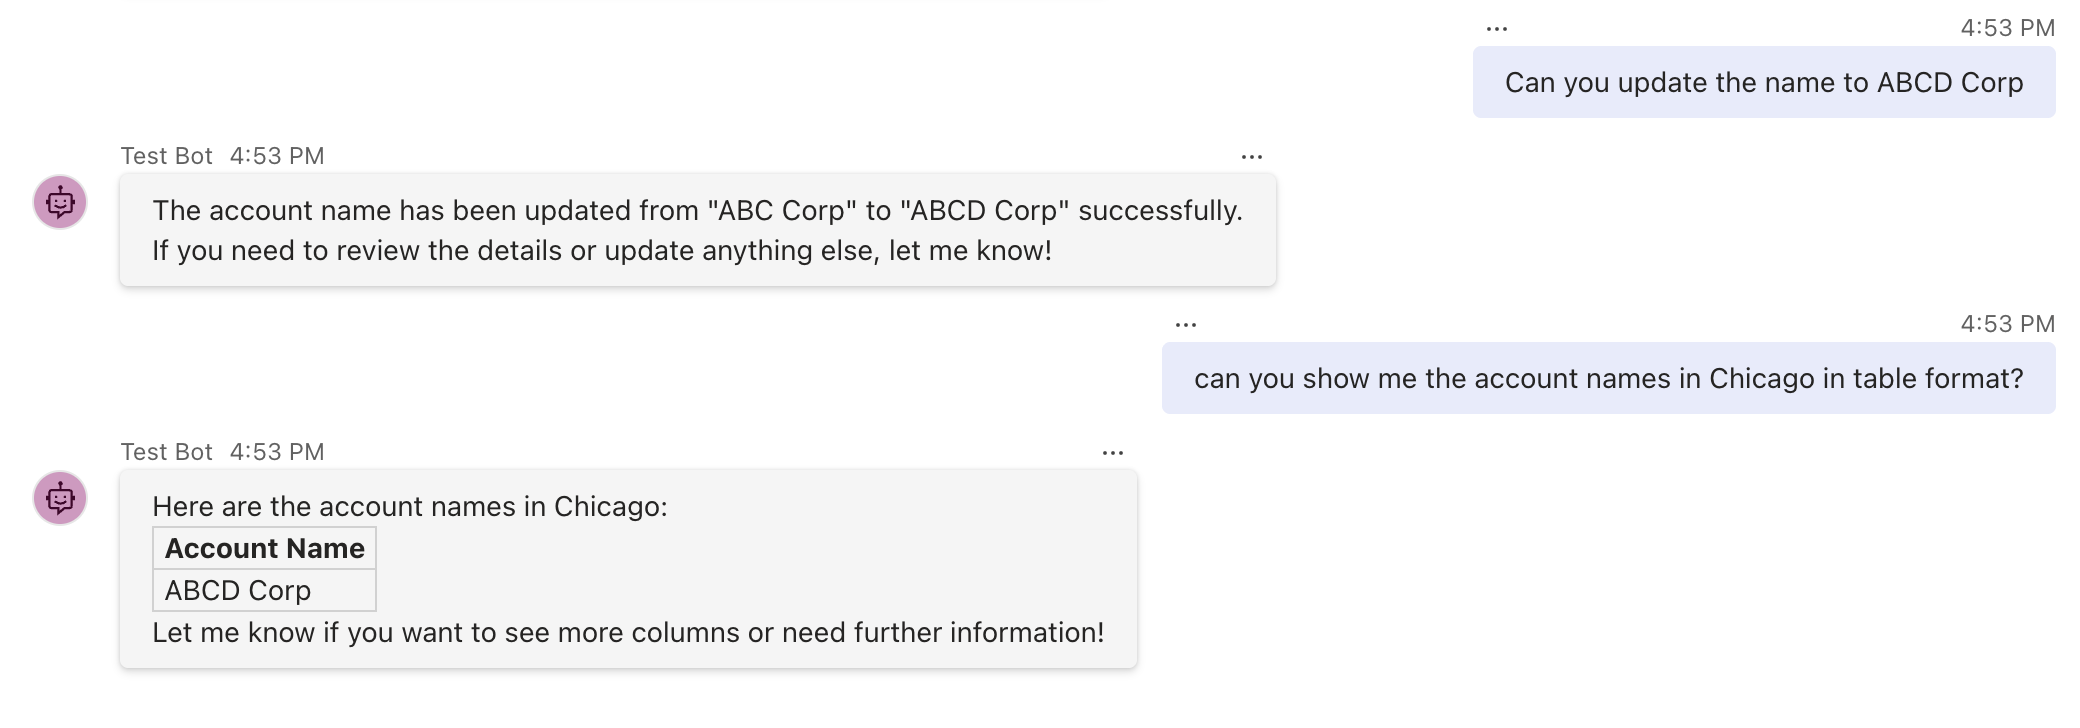
Updating the account and verifying the changes
Testing Attachments and User Auth using VS Code Tunnel
Our agent also supports uploading attachments to process data into CRM and can perform an Upsert operation based on the matching criteria.
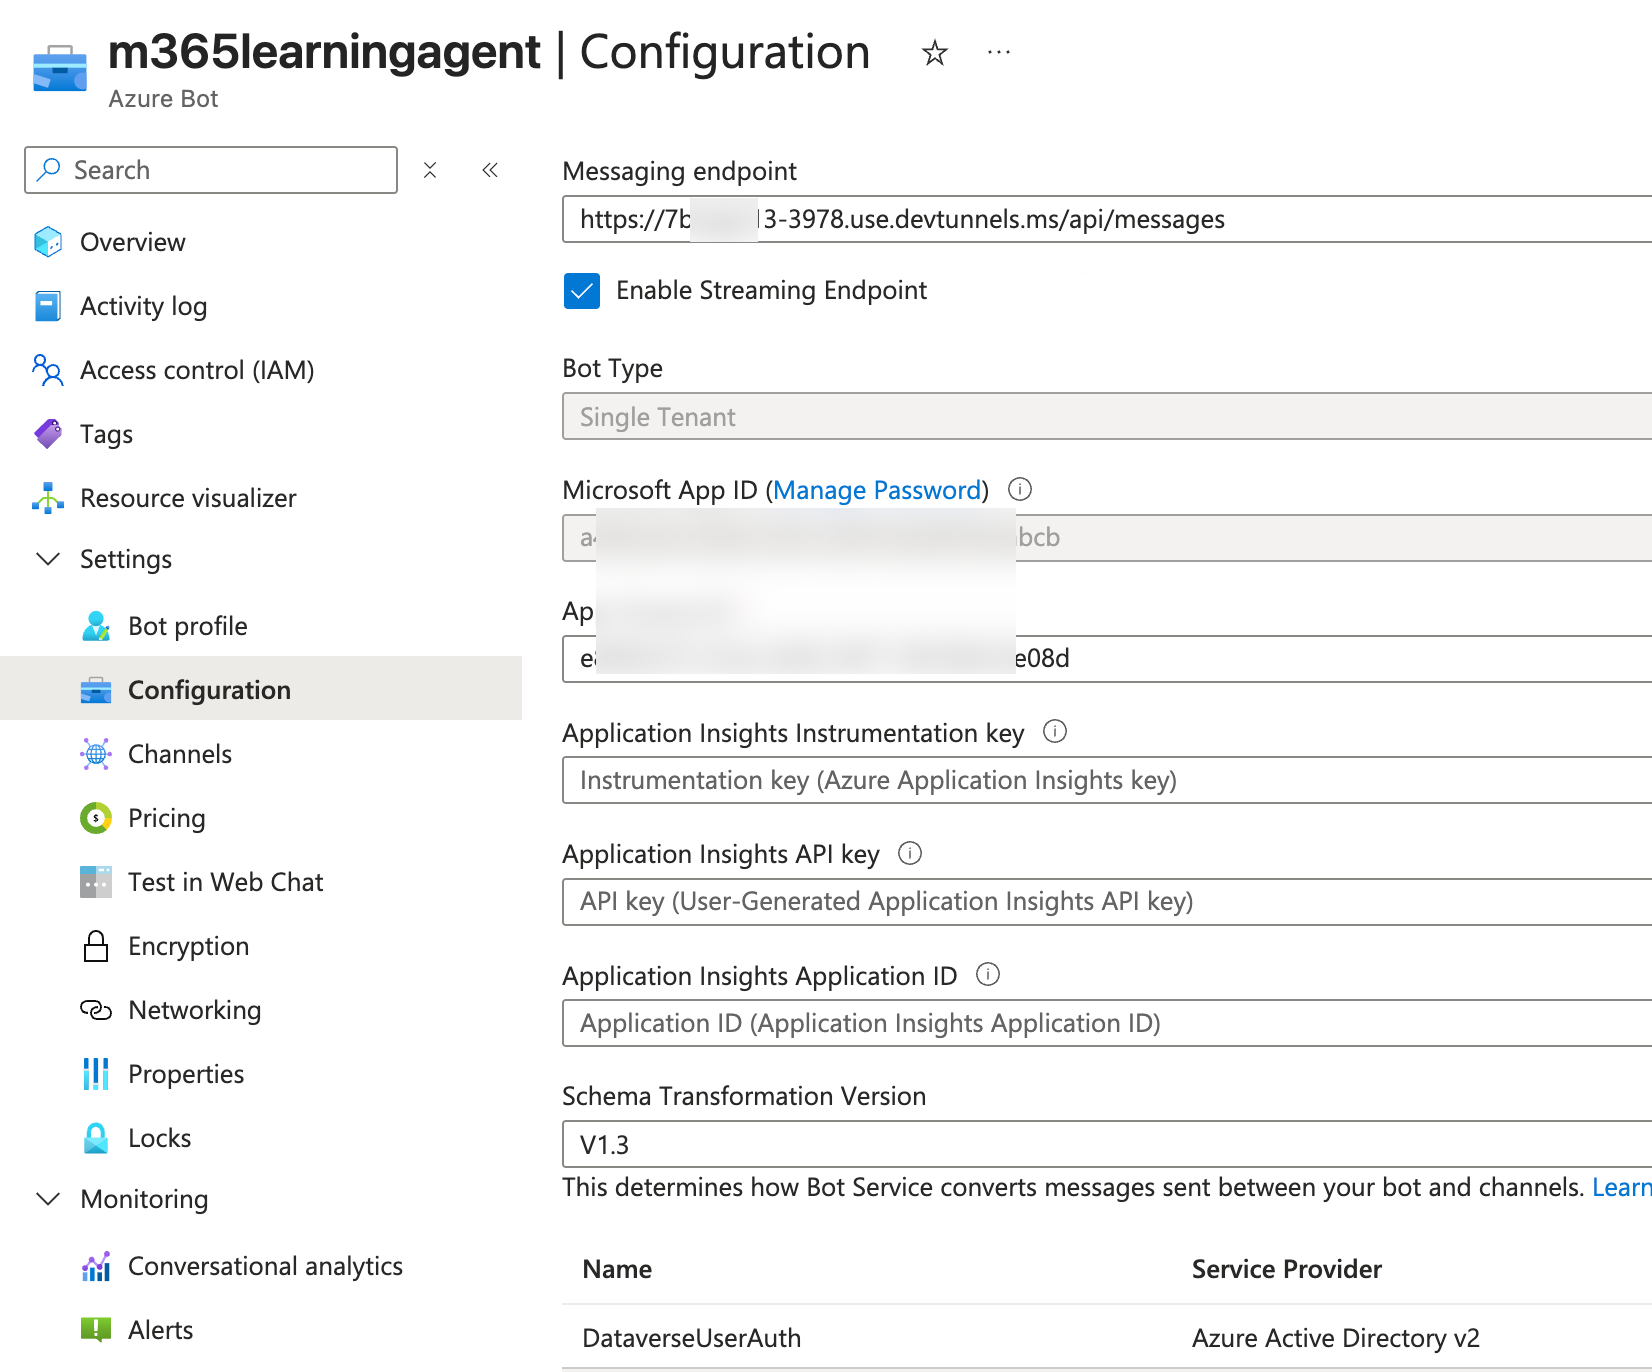
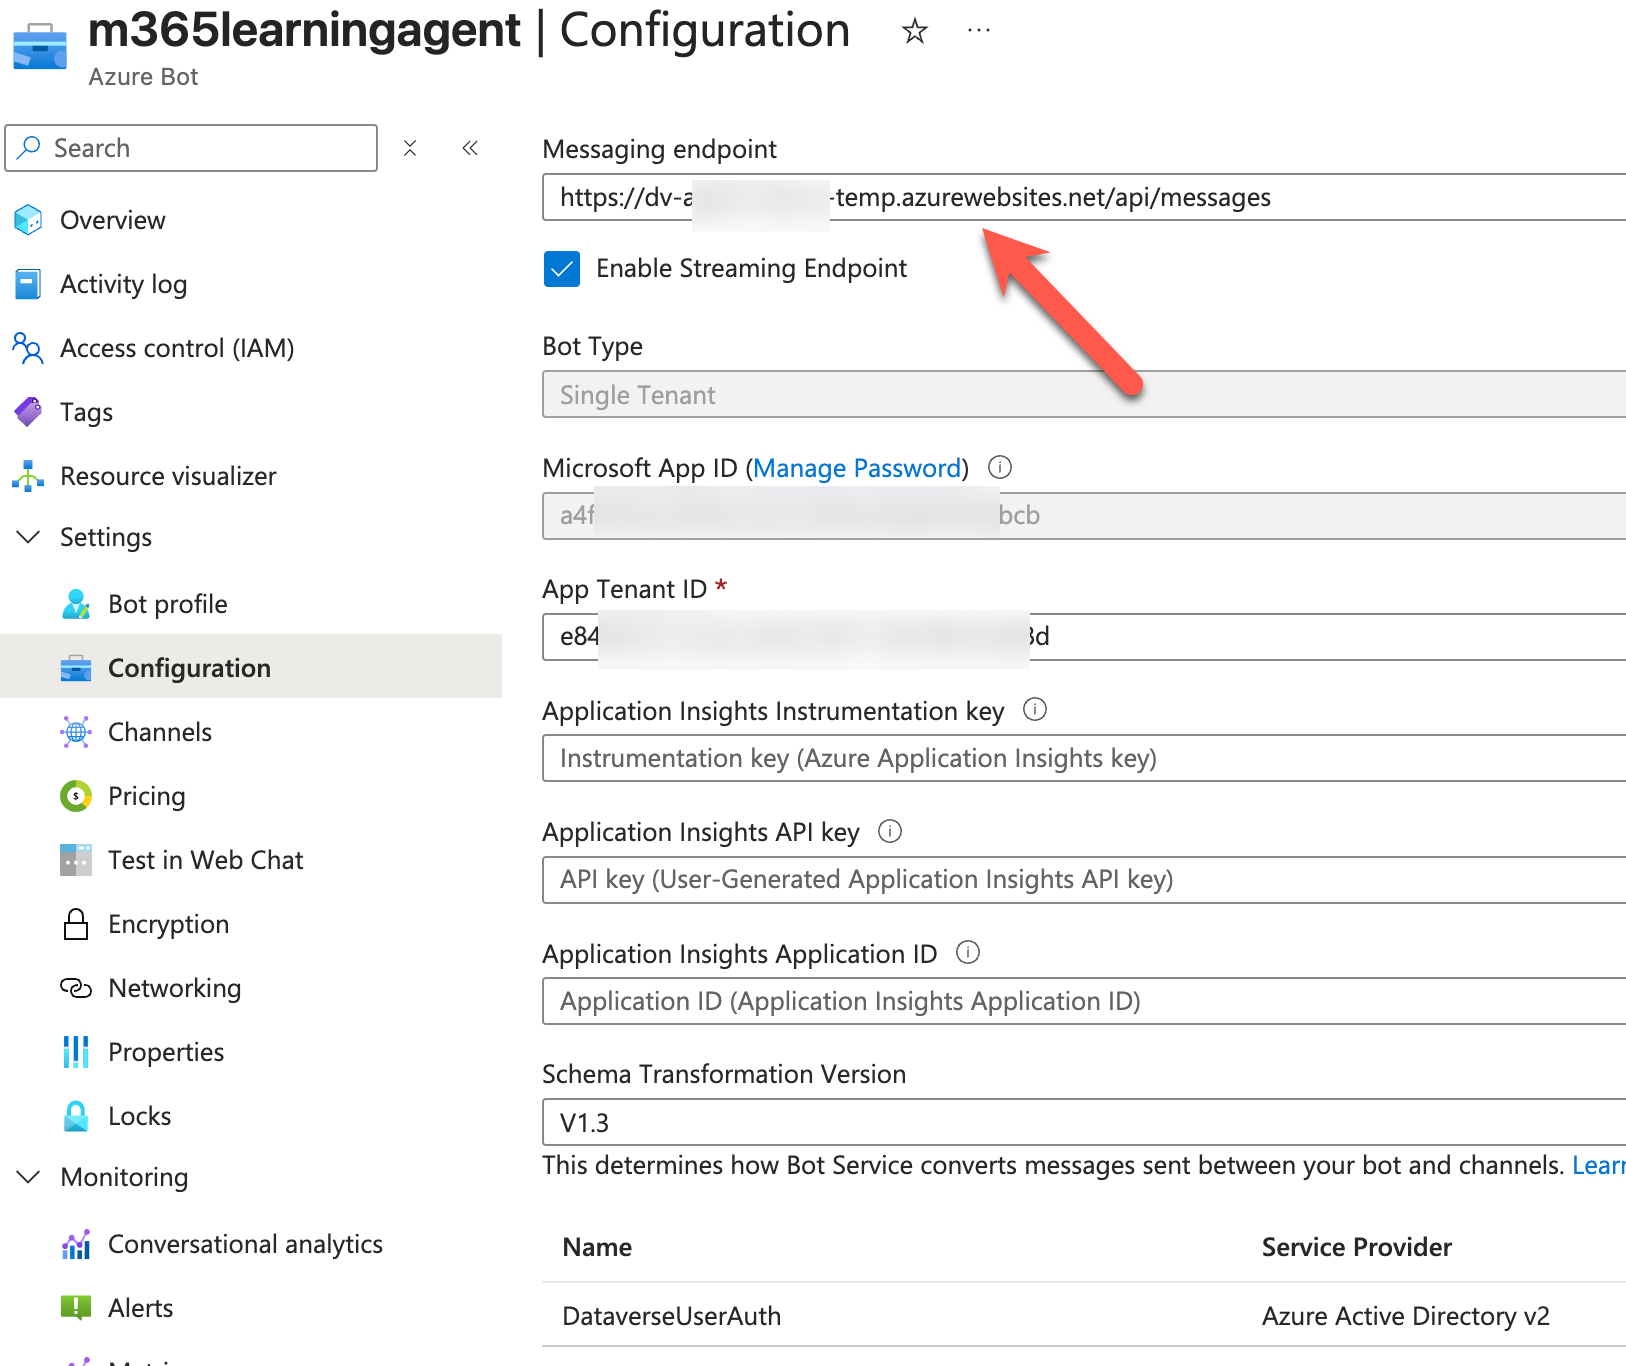
However, we cannot use the Agents Playground for this as it currently doesn't support attachments. To accomplish this, we would leverage the VS Code Tunnel feature to validate our locally running agent server directly against the Azure Bot Service.
Follow the instructions here, and we should now be able to test it. Here is how my agent configuration looks after copying the messaging endpoint provided by the VS Code tunnel
Testing with Azure App Service and Web Channel
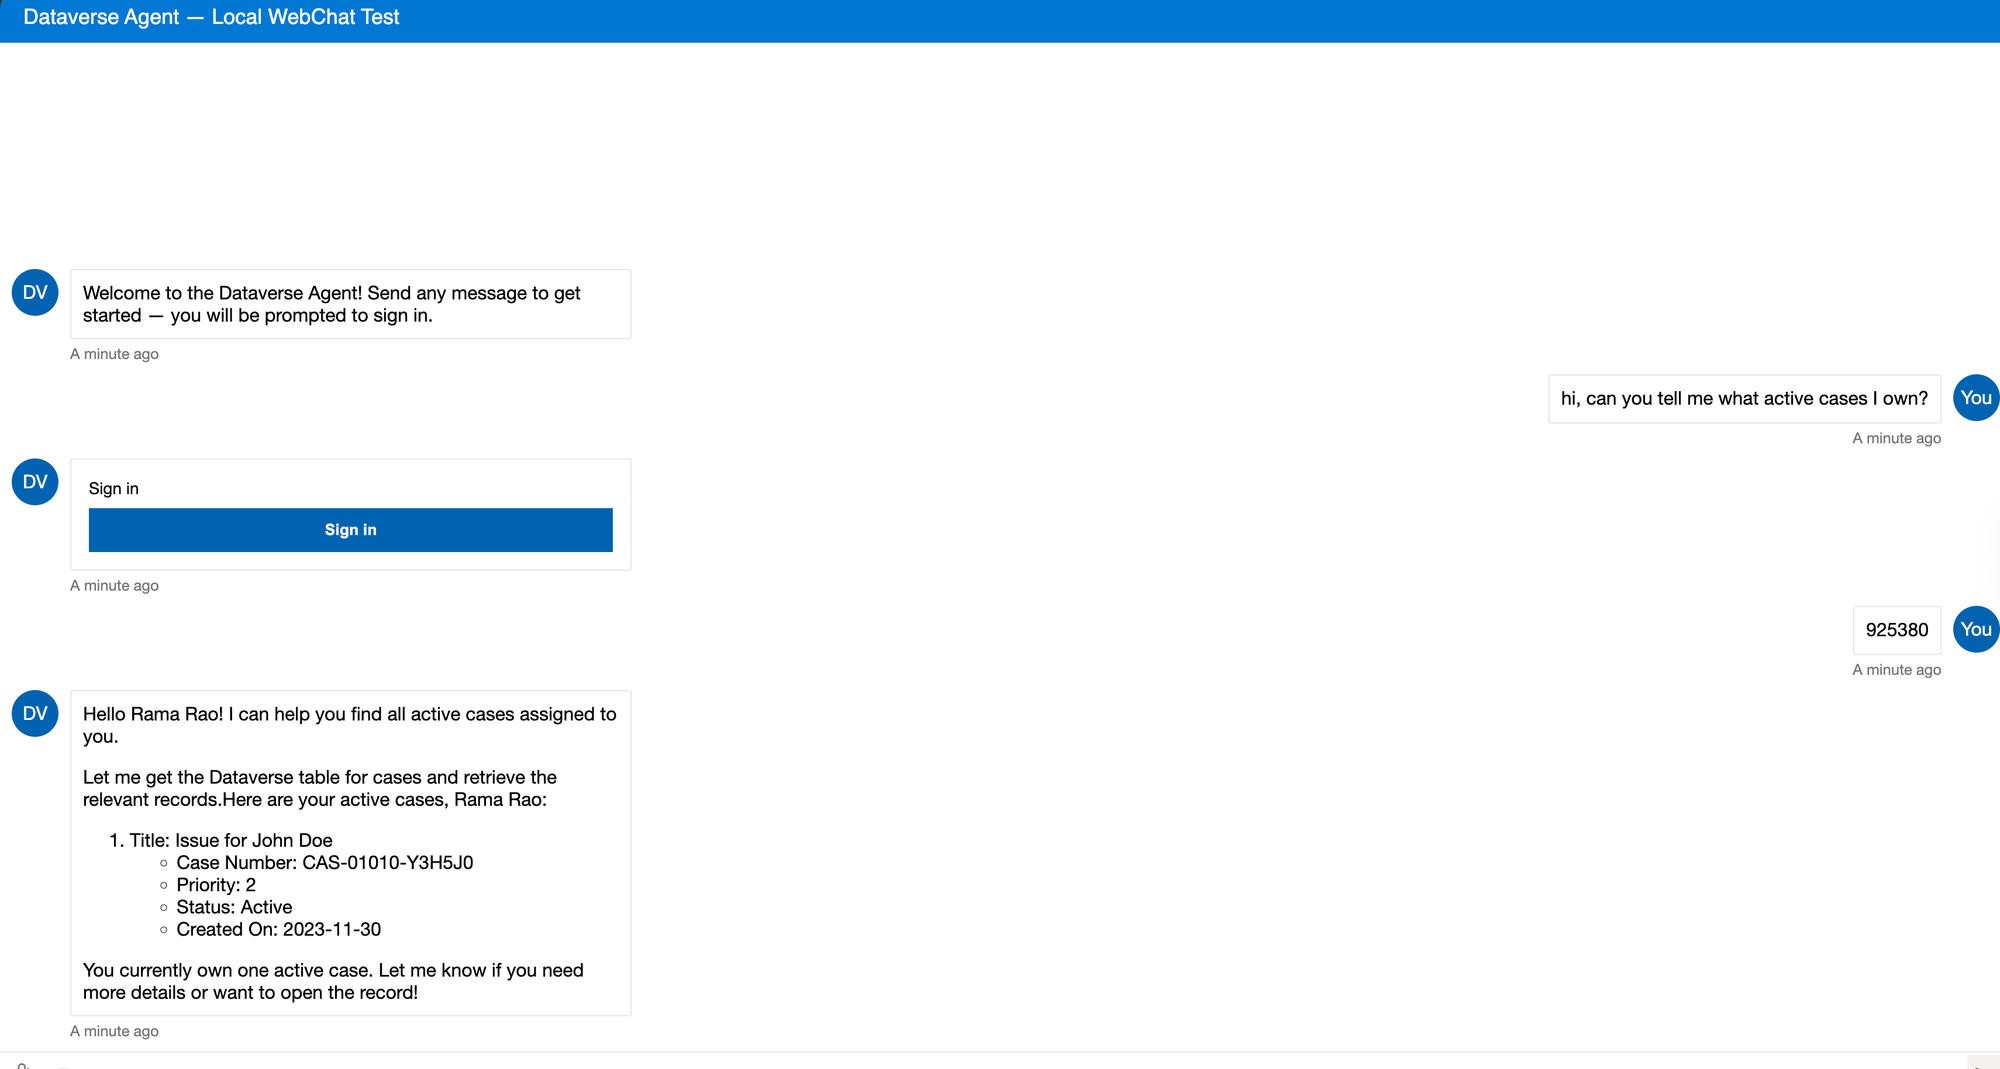
This is the preferred way of testing the agent for all its capabilities. In the previous web chat approach, we were able to test the attachments, but we still did not test the user login. This can be tested by deploying to an actual web service. I could not find other ways to make it work locally.
Ensure that you have deployed the app to Azure App Service and it's working. Next copy the url of the app. This would be the default domain on the Overview page of the app service.
Make sure to set the Auth mode in the environment variables to user_oauth.

Now, let's go to Settings->Channels and select the Web Channel
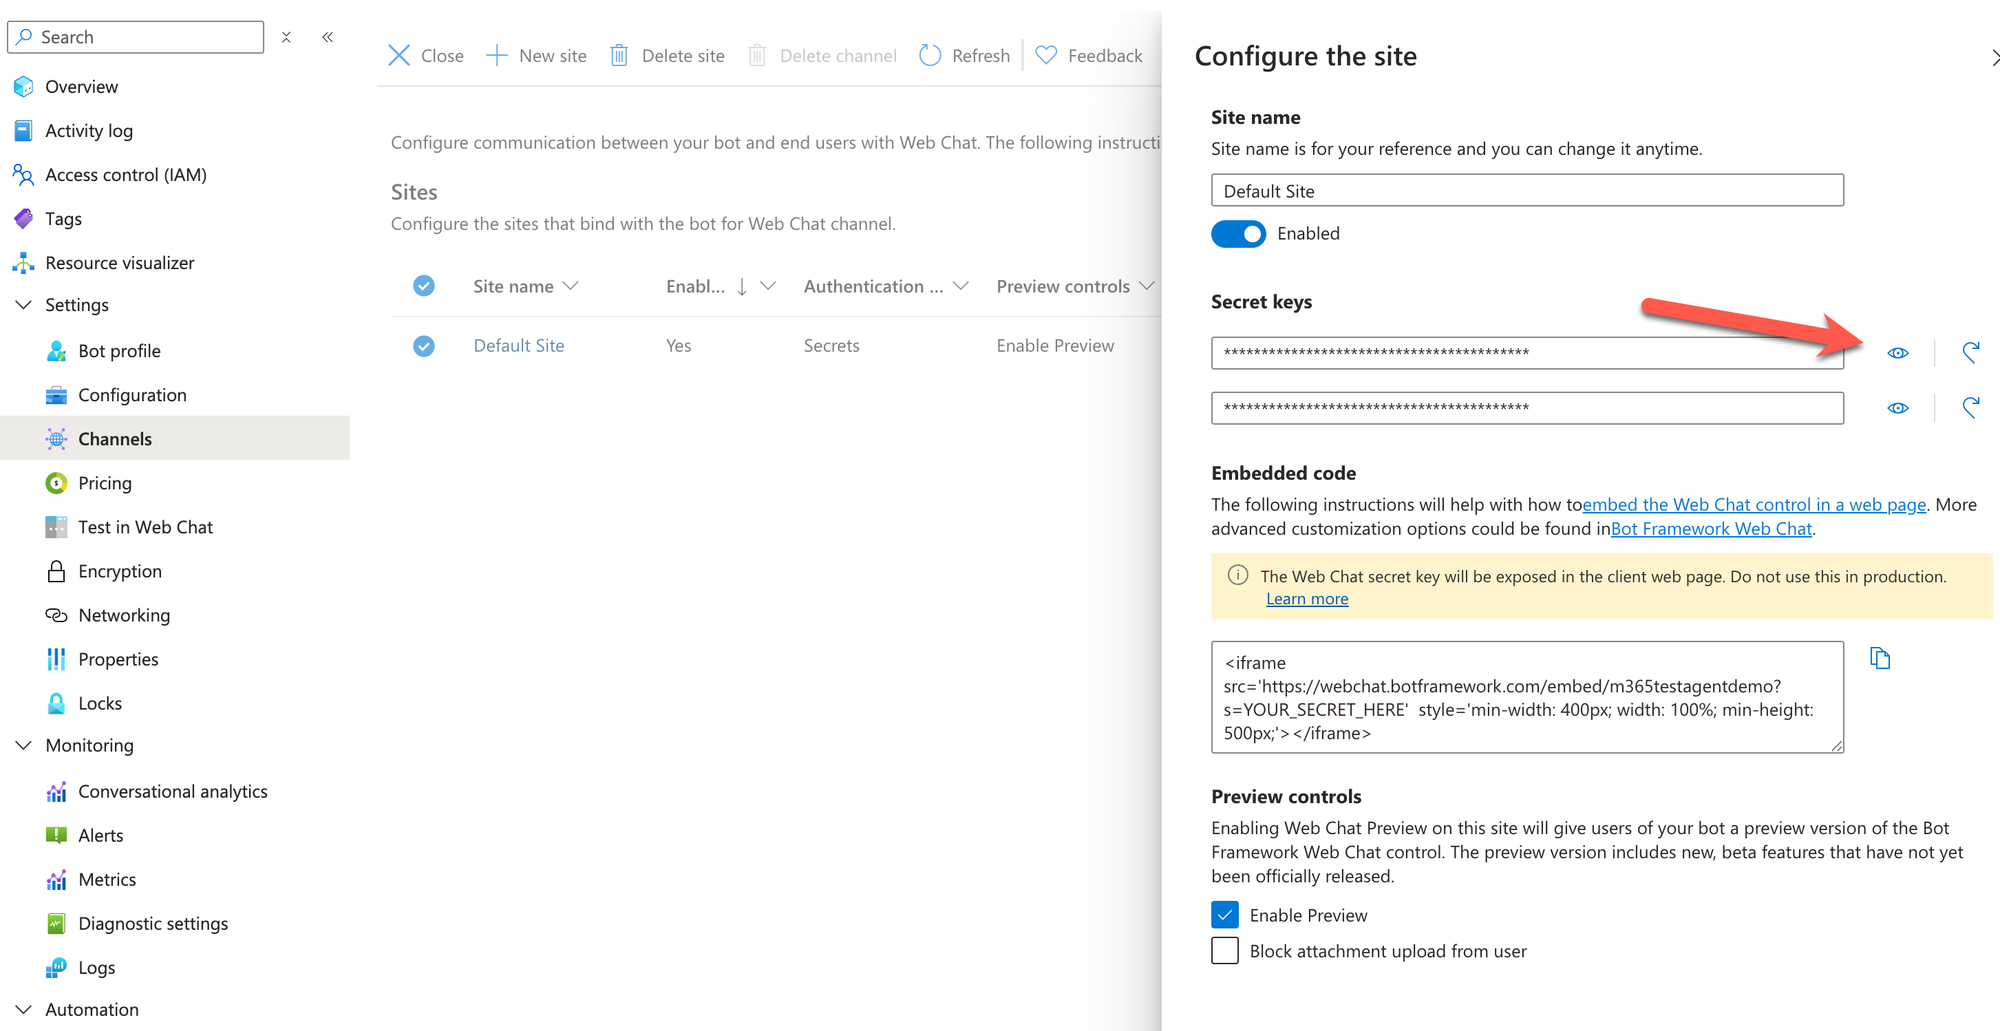
You can follow the instructions here to generate the token. But you can also use this sample HTML file from the repo. Update the direct line secret and load the web page in the browser. You should now see the Sign in behavior and once you click Sign in, it will open a new page with the code. Copy the code and send the message. You should now see the user is signed in and will use the user's security to perform operation in Dataverse.
Summary
- We looked at what makes up the activity protocol, how to manage state and build the agent and how to use the Agents SDK and implemented a simple use case using Dataverse. While this is a good start to using the M365 Agents SDK, this is an evolving topic and there are lot of things to take into consideration when building an agent.
- We haven't looked much into content safety and how to protect our agent but that is something we really need to evaluate our agent on. This is one advantage of using tools like Copilot Studio where all of this is handled for us.
- Based on implementing this agent, it provides a good understanding of the mechanis of how to engineer your agents and whats happening so you have more control on tuning your agent and optimizing it for your use case.
- Using a programming language like Python, C# or JS, you have a large access to a package eco system where most of the scnearios can be easily implemented. To leverage the same capability in Copilot Studio, you are relying on either Power Automate, MCP or other tools. In our use case we were able to just leverage the Power Platform Dataverse package without the need for a MCP server.
- The M365 Agents SDk is great for teams which are heavy on professional developers who have the necessary AI engineering skills to build and maintain agents. For small teams, I think tools like Copilot Studio are a better fit to build, manage and scale agents.
I would like to hear more about your agent building experience using pro code tools and SDK. If you have any questions or suggestions feel free to comment below.