Create a Model Context Protocol(MCP) Server With Azure Functions and Use It in Copilot Studio

If you've been working with AI agents lately, you've probably heard a lot about MCP. MCP stands for Model Context Protocol, an open standard created by Anthropic that enables AI assistants such as Claude, GitHub Copilot, and ChatGPT to connect with external data sources and tools.
In the MCP Architecture, we have three main components
- MCP Host: The AI application that coordinates and manages one or multiple MCP clients
- MCP Client: A component that maintains a connection to an MCP server and obtains context from an MCP server for the MCP host to use
- MCP Server: A program that provides context to MCP clients
For example, when using VS Code to interact with MCP servers such as the Azure MCP server and the Azure DevOps MCP server, VS Code is the host application that creates multiple MCP client objects, each of which maintains a one-to-one relationship with its respective MCP server.
In this post, we will look at how to build an MCP server securely using Azure Functions and OAuth 2.0, and connect to it using Copilot Studio.
If you are new to MCP and want to understand it in more detail, I highly recommend starting with the official documentation.
What is the MCP Server
But before we build an MCP Server, let's look at understanding it in detail and how it works. If you are already familiar with this, you can skip this section.
MCP servers are programs that expose specific capabilities to AI applications through standardized protocol interfaces. This could be reading data, performing actions, or processes. For example, using the Dataverse MCP server, we can create, read, and update records on any table.
An MCP Server provides functionality using three building blocks: Tools, Resources, and Prompts.
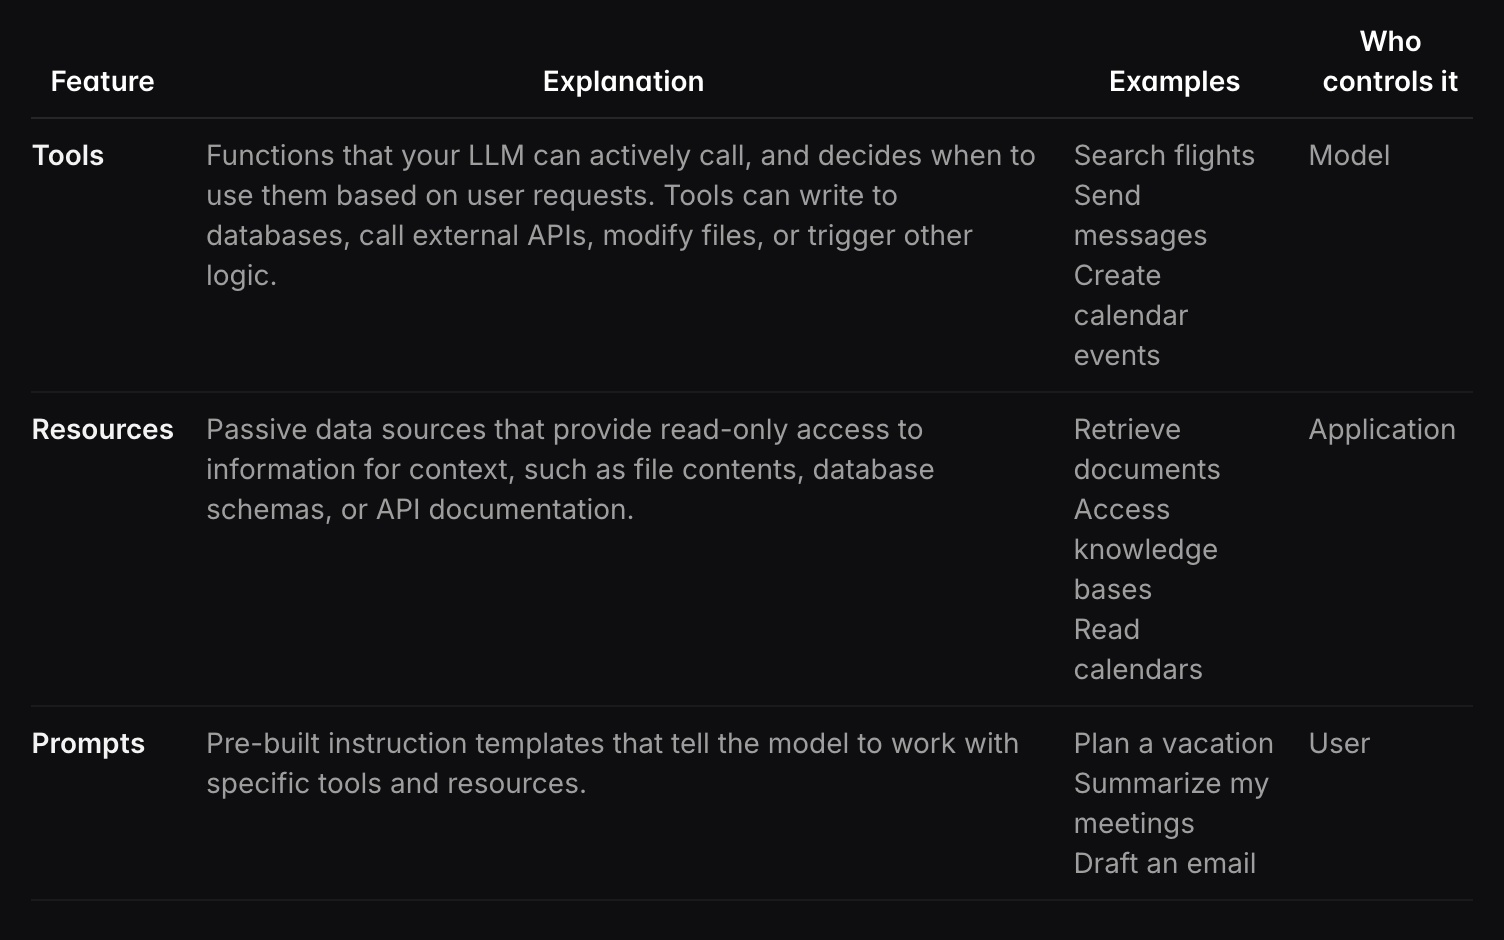
Currently, Tools and Resources are supported in Copilot Studio. Resources are still in preview at the time of this writing.
For the MCP server we will build, we will only leverage Tools.
Tools
Tools let AI models take actions beyond just answering questions. Each tool is like a specific function with clear inputs (what you give it) and outputs (what it returns). The AI decides when to use a tool based on what you're asking for.
MCP uses a standard format(JSON Schema) to describe exactly what information each tool needs and what it will return. Each tool does one specific job with a clear structure.
Before a tool actually runs, it may ask for your permission, which keeps you in control of the actions the AI takes on your behalf.
The protocol provides two operations for tool discovery and execution.
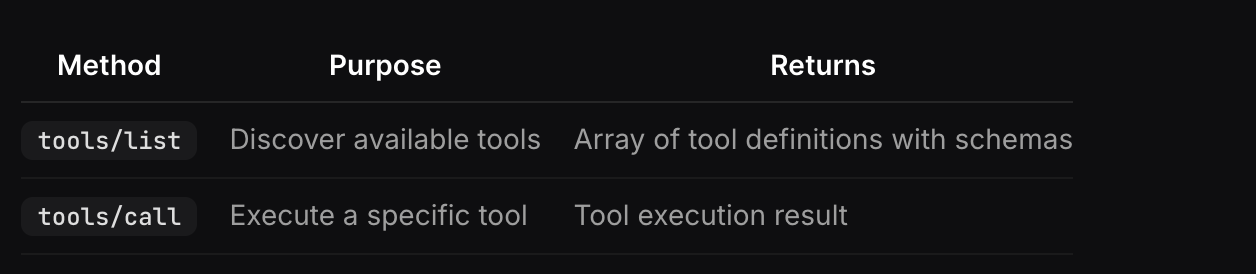
The list method returns all tools exposed on the server. The LLM can call the available tools based on the context and the current interaction with the user.
Let's look at these using the tools available on the MCP server we are going to build. We will go into more detail on them in the next section.
Tools List
Request:
{
  "method": "tools/list",
  "params": {}
}
Response:
{
  "tools": [
    {
      "name": "GetProductReviews",
      "description": "Get product reviews for a product using the product ID in the product catalog.",
      "inputSchema": {
        "type": "object",
        "properties": {
          "ProductId": {
            "type": "integer",
            "description": "The ID of the product to get reviews for."
          }
        },
        "required": [
          "ProductId"
        ]
      }
    },
    {
      "name": "ListProducts",
      "description": "List all products from the product catalog.",
      "inputSchema": {
        "type": "object",
        "properties": {},
        "required": []
      }
    }
  ]
}
Notice the schema above, which defines the name, descriptions, and input parameters.
Tool Call
The LLM knows what each tool does from the tools list, and when the user prompts for the reviews tied to a product, it knows it can leverage the GetProductReviews tool to get the response the user is looking for.
Here is the sample request and response to a tool call.
Request
{
  "method": "tools/call",
  "params": {
    "name": "GetProductReviews",
    "arguments": {
      "ProductId": 1
    },
    "_meta": {
      "progressToken": 0
    }
  }
}
Response
{
  "content": [
    {
      "type": "text",
      "text": "[{\"ProductID\":1,\"Title\":\"Excellent ultrabook for business\",\"Description\":\"The Dell XPS 13 is incredibly portable and perfect for business travel. Battery life is outstanding and the build quality is top-notch.\",\"Rating\":5},{\"ProductID\":1,\"Title\":\"Great performance, minor keyboard issues\",\"Description\":\"Love the speed and display quality, but the keyboard feels a bit cramped for long typing sessions.\",\"Rating\":4}]"
    }
  ]
}
Building the MCP Server
Prerequisites
To implement the MCP server, we need to have the following
- VS Code(preferred) or code editor of your choice
- An active Azure subscription
- Environment with Copilot Studio access. Would need Power Platform administrator access.
- C# extension installed in VSCode
- Azure Functions Core Tools
Use Case
We will use a straightforward use case. Imagine you have a digital store and need an agent to answer questions about your products and their reviews. We will build these as two different tools on our MCP server.
- ListProducts: lists all the products in a product catalog.
- GetProductReviews: retrieve product reviews using the product ID from the product catalog.
We will use the Azure Functions app to create the MCP server. You can choose the language you prefer, but I will be using C#. The concepts should be similar across different languages.
Creating the MCP Azure Functions Project
First, let's create the project in VS Code. Select the folder where you want to create the project. I made mine as mcp-server.
Press F1 to open the command Palette and search for Azure Functions: Create New Project... We must use the isolated process with .NET 8 because the Azure Functions MCP extension currently only supports C#. You can skip the template selection as the MCP template is still not visible.
At this point, we have a basic function app that resembles the following.
Now, let's add the Azure Function MCP extension NuGet package.
dotnet add package Microsoft.Azure.Functions.Worker.Extensions.Mcp --version 1.0.0
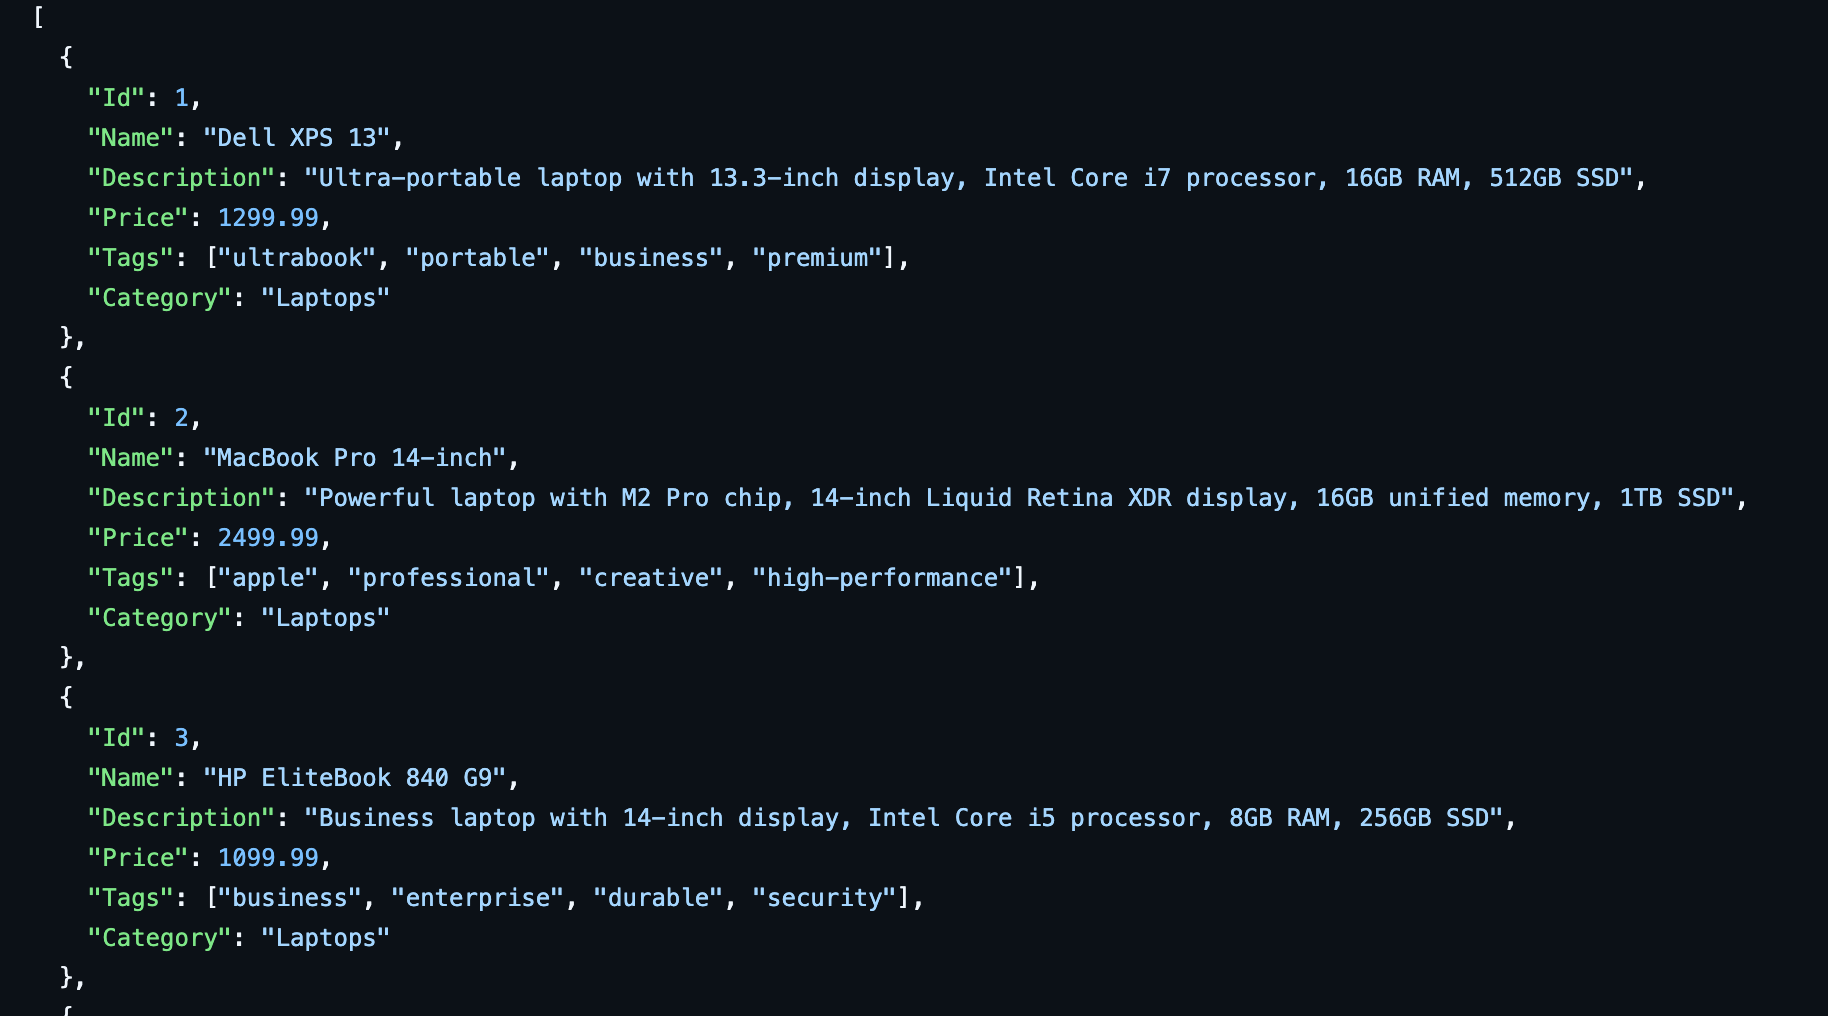
Now that we have added the package, the next step is to add the logic to fetch product information. To keep this simple, I will use some AI-generated fake data and store it in JSON files.
In a real-world scenario, this data might be stored in a database or another storage system. You can create a data folder and add the JSON files from here.
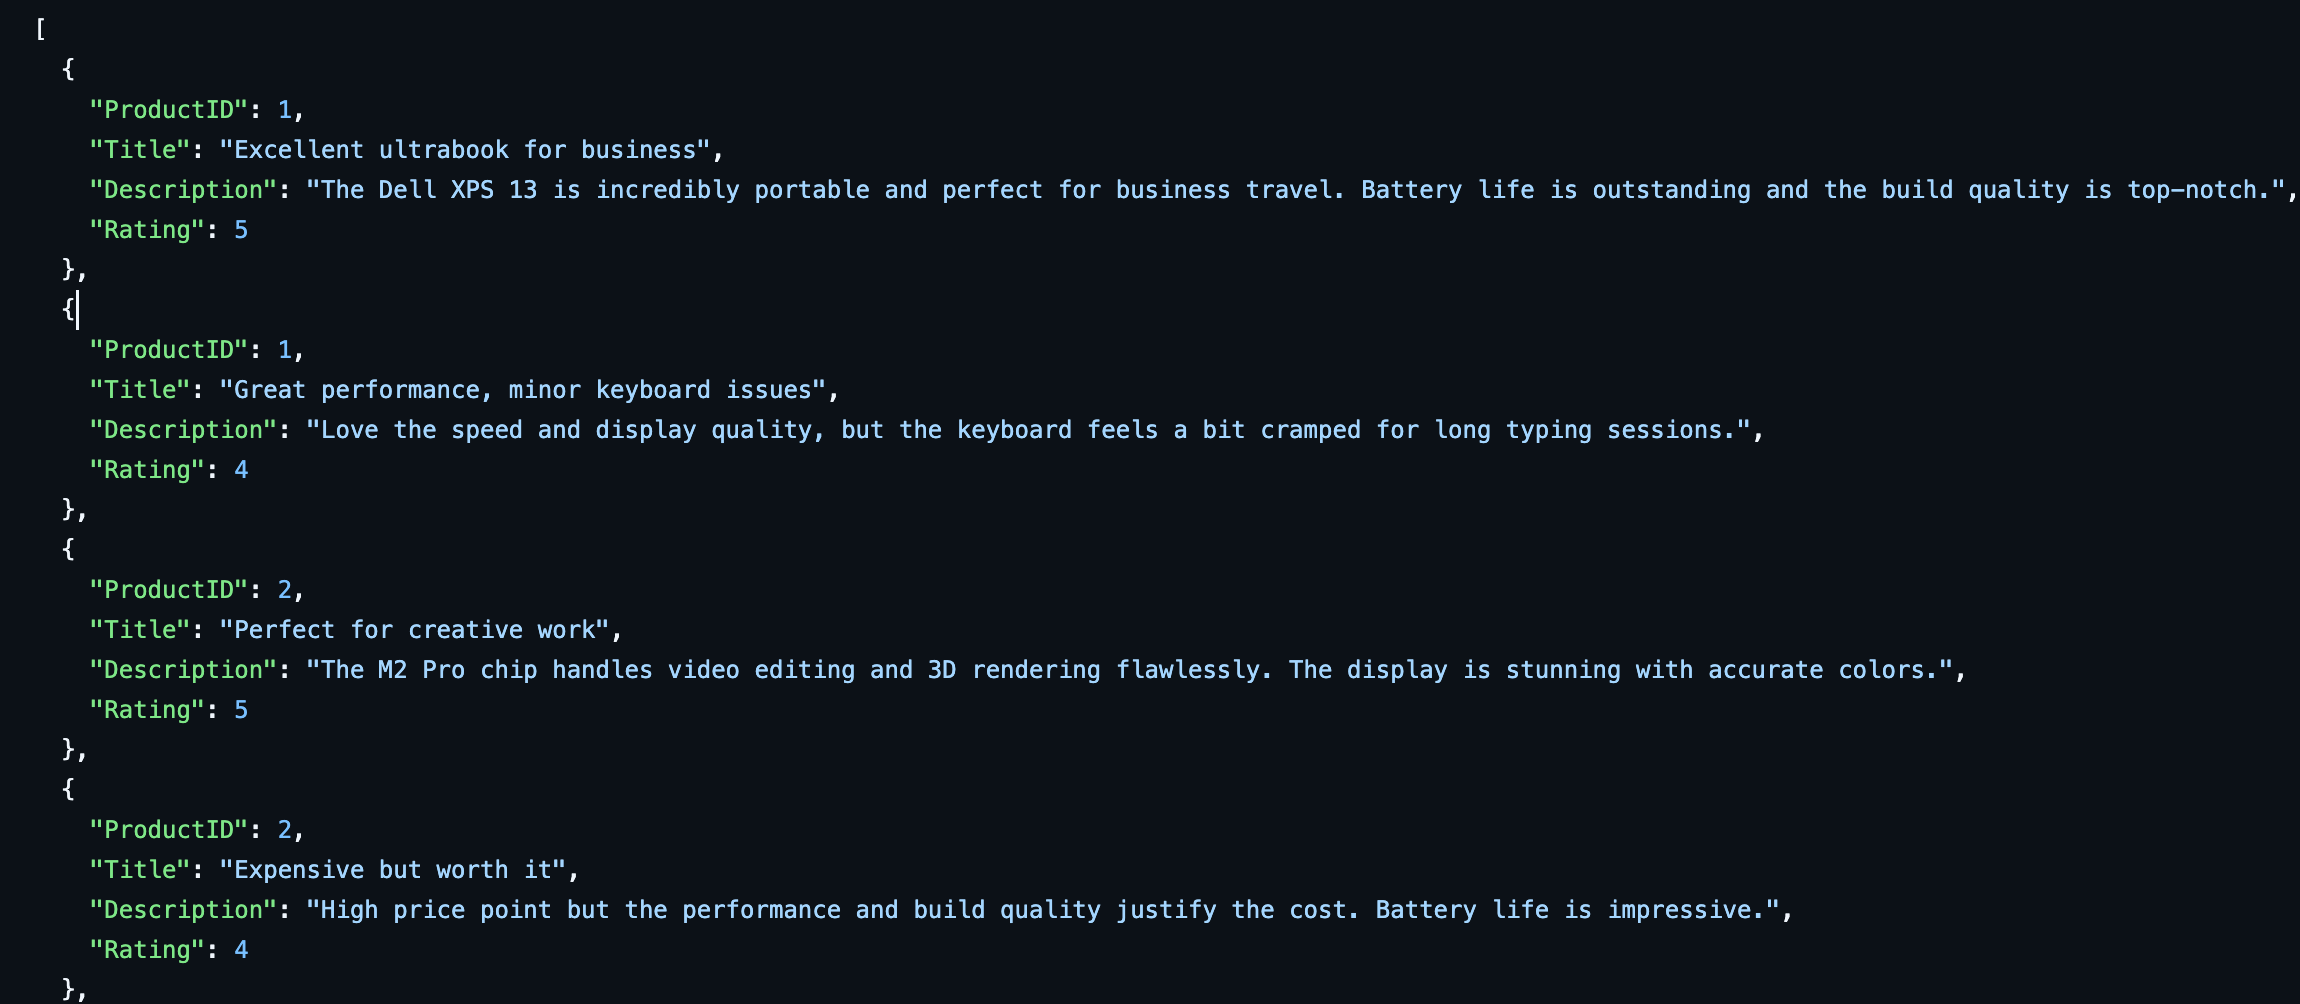
Here is a quick glimpse into the data files that we will use from our repo.
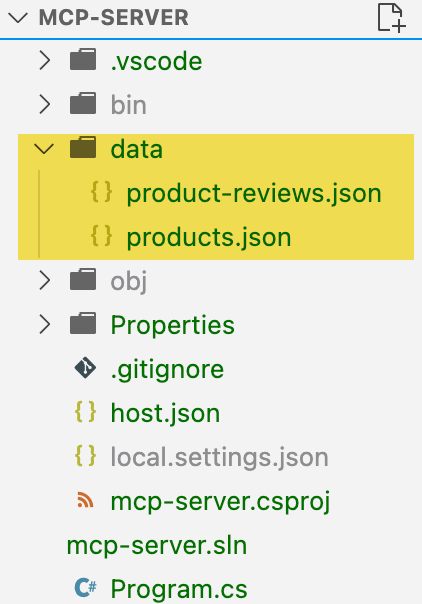
At this point, we should have the following files added to our project.
Next, let's add some services that actually retrieve the data from these files, which our tools can leverage.
We have added two services that retrieve the necessary data from these data files.
- ProductReviewService: Methods to retrieve all the product reviews or reviews tied to a specific product from the product-reviews.json file.
- ProductService: Retrieves all the products from the products.json file
Here is the code at the time of this writing; however, please refer to the repo for the most up-to-date code.
public class ProductReviewService : IProductReviewService
{
    private readonly List<ProductReview> _productReviews;

    public ProductReviewService()
    {
        _productReviews = GetAllProductReviews();
    }

    public List<ProductReview> GetProductReviews(int productId)
    {
        return _productReviews.Where(r => r.ProductID == productId).ToList();
    }

    public List<ProductReview> GetAllProductReviews()
    {
        var path = Path.GetFullPath(Path.GetDirectoryName(Assembly.GetExecutingAssembly().Location));
        var reviewsJsonPath = Path.Combine(path, "data", "product-reviews.json");

        if (!File.Exists(reviewsJsonPath))
        {
            throw new FileNotFoundException("product-reviews.json file not found", reviewsJsonPath);
        }

        var jsonContent = File.ReadAllText(reviewsJsonPath);
        var reviews = JsonSerializer.Deserialize<List<ProductReview>>(jsonContent, new JsonSerializerOptions
        {
            PropertyNameCaseInsensitive = true
        });

        return reviews ?? new List<ProductReview>();
    }
}
ProductReviewService.cs
public class ProductService : IProductService
{
    public List<Product> GetAllProducts()
    {
        var path = Path.GetFullPath(Path.GetDirectoryName(Assembly.GetExecutingAssembly().Location));
        var productsJsonPath = Path.Combine(path, "data", "products.json");

        if (!File.Exists(productsJsonPath))
        {
            throw new FileNotFoundException("products.json file not found", productsJsonPath);
        }

        var jsonContent = File.ReadAllText(productsJsonPath);
        var products = JsonSerializer.Deserialize<List<Product>>(jsonContent, new JsonSerializerOptions
        {
            PropertyNameCaseInsensitive = true
        });

        return products ?? new List<Product>();
    }
}
ProductService.cs
Similarly, you can find the supporting files for the Interfaces and the Models.
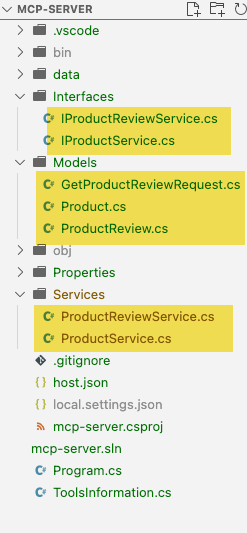
Our project should now appear as follows, with all the changes implemented.
Now here comes the actual fun part. So far, we have focused on setting up our code to fetch the data, but we have not yet addressed configuring the tools for the MCP protocol.
Adding the Tools
To add the tools mentioned previously in the Use Case, we first need to add the functions they require. These Azure functions will serve as the tools that the LLM triggers based on the parameters below, which we configure in our function using the MCPToolTriggerAttribute.
- ToolName(required): name of the tool that is being exposed by the MCP trigger endpoint.
- Description(optional): Friendly description of what the tool does that helps the MCP clients choose the right tool. Although it's optional, it's highly recommended to provide this information.
We will create a simple sealed class, ToolsInformation, that describes our tools.
internal sealed class ToolsInformation
{
    public const string ListProductsToolName = "ListProducts";
    public const string ListProductsToolDescription = "List all products from the product catalog.";

    public const string GetProductReviewsToolName = "GetProductReviews";
    public const string GetProductReviewsToolDescription = "Get product reviews for a product using the product ID in the product catalog.";

}
Next, let's add a function that serves as a tool to list products. This code creates an endpoint that exposes a tool named ListAllProducts, which retrieves data for all products.
[Function(nameof(ListAllProducts))]
public string ListAllProducts([McpToolTrigger(ListProductsToolName, ListProductsToolDescription)]
            ToolInvocationContext context
            )
    {
        _logger.LogInformation("ListProducts function processed a request.");

        var products = _productService.GetAllProducts();
        var jsonResponse = JsonSerializer.Serialize(products, new JsonSerializerOptions
        {
            PropertyNameCaseInsensitive = true
        });

        return jsonResponse;
    }
Similarly, the code snippet below creates an endpoint that retrieves product reviews using the ProductReviewService.
[Function(nameof(GetProductReviews))]
public string GetProductReviews([McpToolTrigger(GetProductReviewsToolName, GetProductReviewsToolDescription)] ProductReviewRequest request,
            ToolInvocationContext context
            )
    {

        int productId = request.ProductId;

        _logger.LogInformation("GetProductReviews function received a request for Product ID: {ProductId}.", productId);

        var filteredReviews = _productReviewService.GetProductReviews(productId);
        var jsonResponse = JsonSerializer.Serialize(filteredReviews);

        return jsonResponse;
    }
Notice the ProductReviewRequest parameter in our function signature. This is how we pass the ProductId. Let's look at how this works behind the scenes.
Tool Properties
MCP clients use tools by supplying arguments that deliver the necessary data and context for execution. They determine how to gather and transmit these arguments by referencing the properties each tool exposes through the protocol.
We can define these properties that our endpoints need in multiple ways when using Azure Functions. Which style you choose is a matter of preference. We used the CustomBinding for our tool.
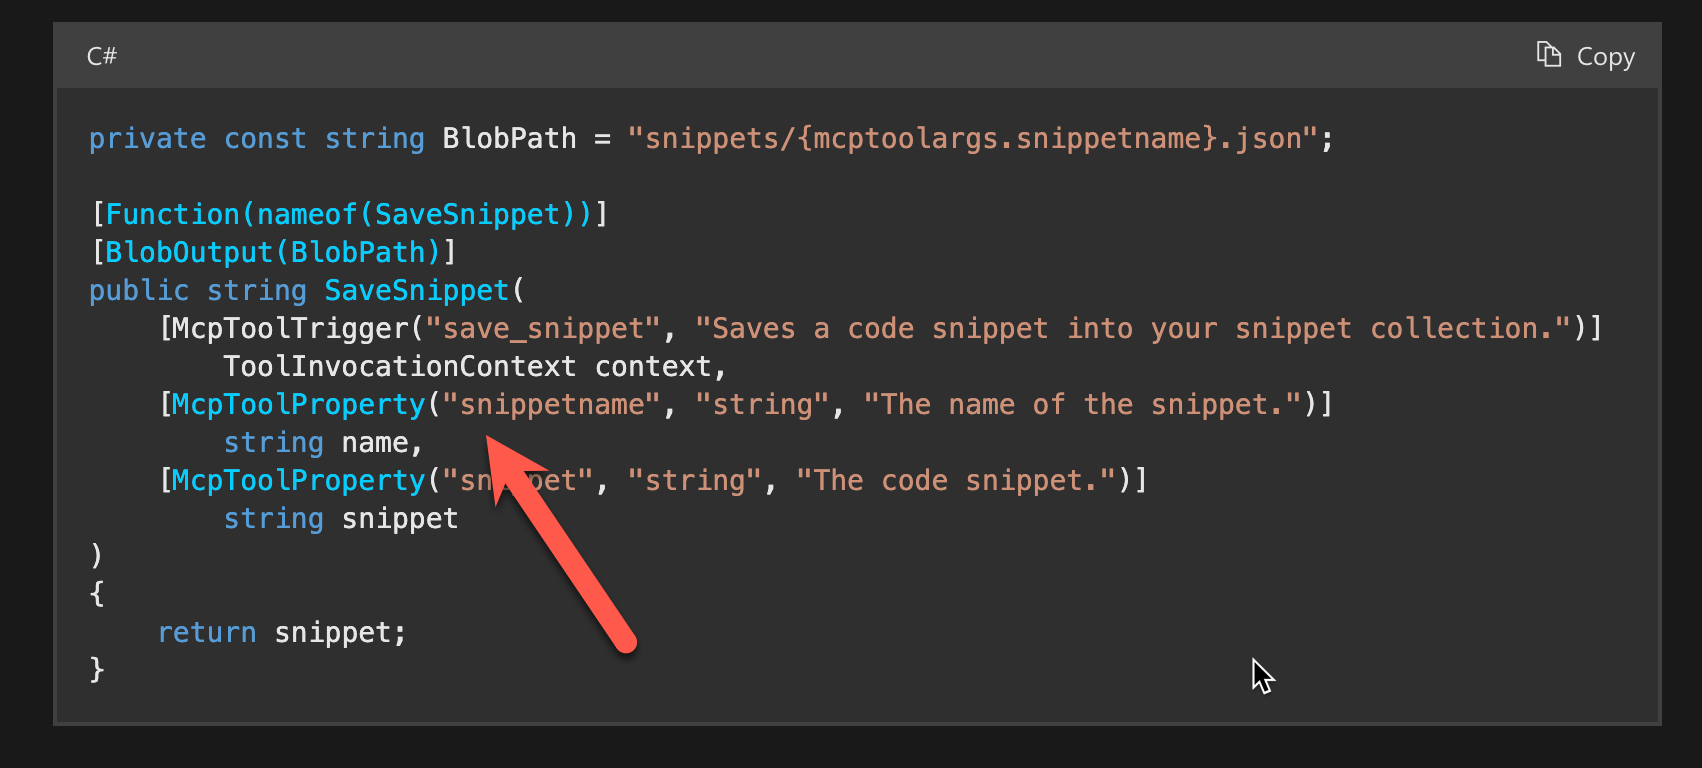
- McpToolPropertyAttribute: We can provide this attribute and define the properties our tool uses in the function itself. For example, you can use the McpToolProperty as below.
- Custom Type Binding: If you prefer not to pass parameters, we can instead bind it to a custom type, like we did, and use it.
public class ProductReviewRequest
{

    [Description("The ID of the product to get reviews for.")]
    public required int ProductId { get; set; }
}
- FunctionApplicationsBuilder: Using the ConfigureMcpTool in the FunctionsApplication builder and passing the parameters using the WithProperty method. You can call this method multiple times as needed to provide all the properties that your tool uses.
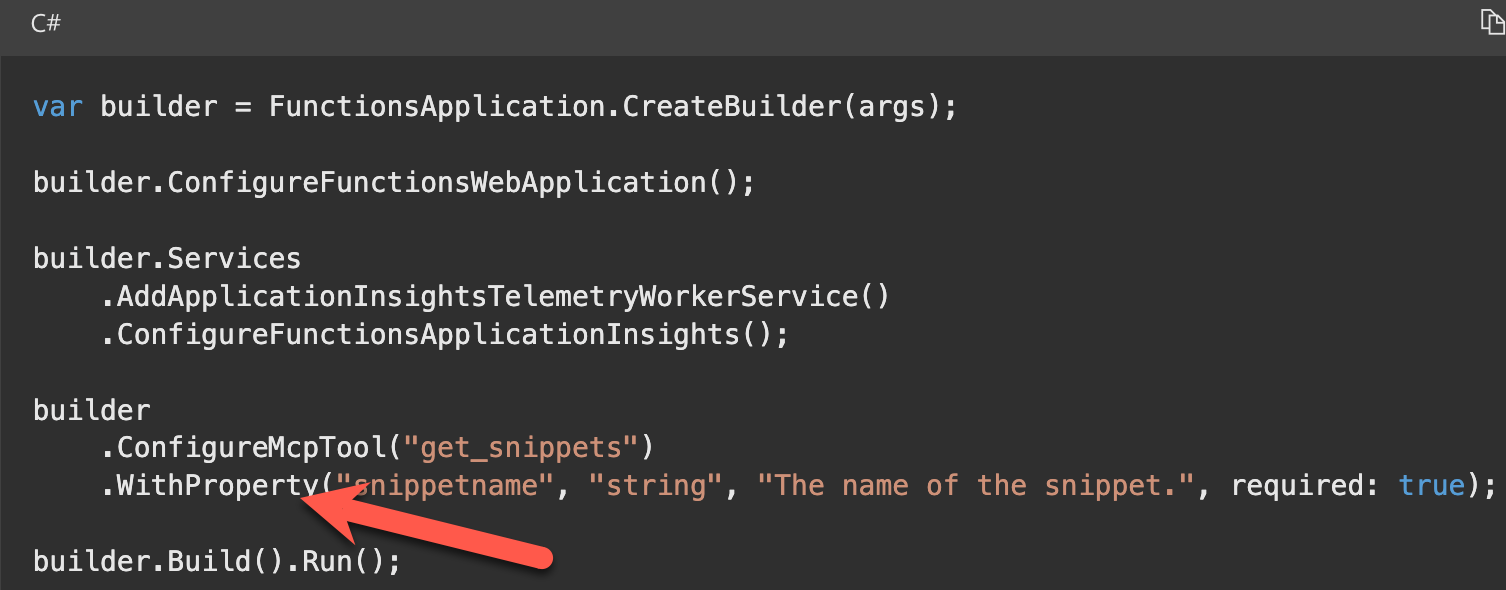
Start-up and Configuration of the Tools
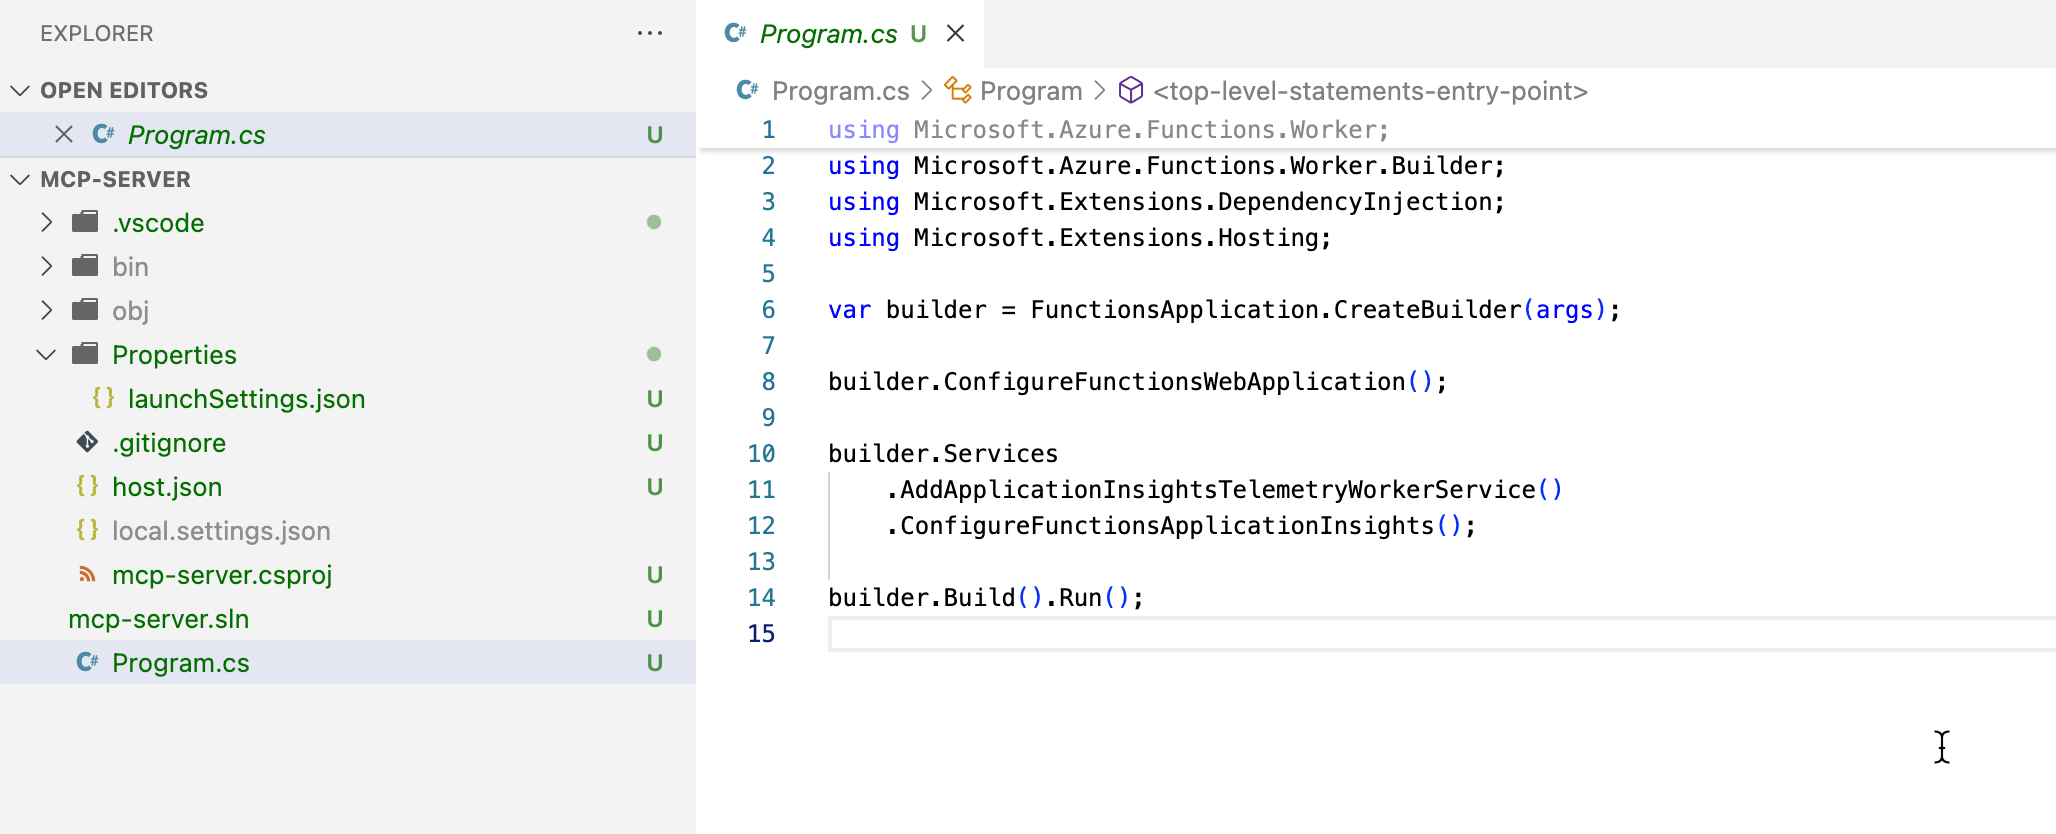
We are in the final stages of finishing up our function app. All that is left is to ensure we configure our tools during startup in the Program.cs file.
var builder = FunctionsApplication.CreateBuilder(args);

builder.ConfigureFunctionsWebApplication();

builder.Services
    .AddApplicationInsightsTelemetryWorkerService()
    .ConfigureFunctionsApplicationInsights()
    .AddSingleton<IProductService, ProductService>()
    .AddSingleton<IProductReviewService, ProductReviewService>();


builder.Build().Run();
Let's break down the above snippet.
- Create Builder: This initializes our function app using command-line arguments.
- Configure the Web Application: Sets up the web environment for the function app(e.g., routing, middleware, etc.)
- Register Services:
- Application Insights: Adds telemetry for monitoring and diagnostics
- Custom Services: Registers IProductService and IProductReviewService as singletons for use by our tools.
- Build and Run: Finalizes the setup and starts the application.
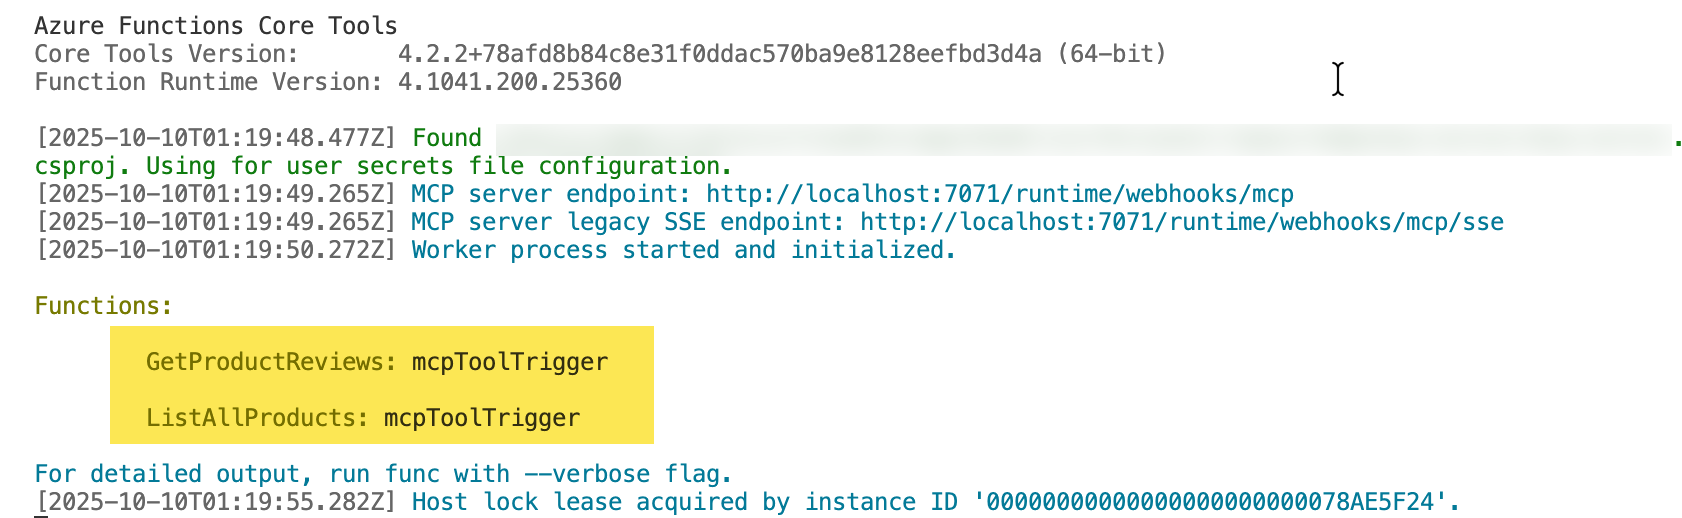
Run dotnet build, and our function app should compile without errors.
Finally, let's run func start to run the function app and make sure you are not running into any errors. If you do run into errors, most likely you do not have the AzureWebJobsStorage app setting configured in local.settings.json
It should look like this
{
  "IsEncrypted": false,
  "Values": {
    "AzureWebJobsStorage": "UseDevelopmentStorage=true",
    "FUNCTIONS_WORKER_RUNTIME": "dotnet-isolated",
    "AzureWebJobsSecretStorageType": "files"
  }
}
If you are now seeing a connection refused error, make sure you have Azurite, installed. An Azure Function app tries to connect to a storage emulator, and if it's not running, you might see this error.
npm install -g azurite

//Run azurite in Terminal
azurite
If all goes well, you should now see the function app started successfully and the MCP tool triggers listed.
Testing the MCP Server Locally
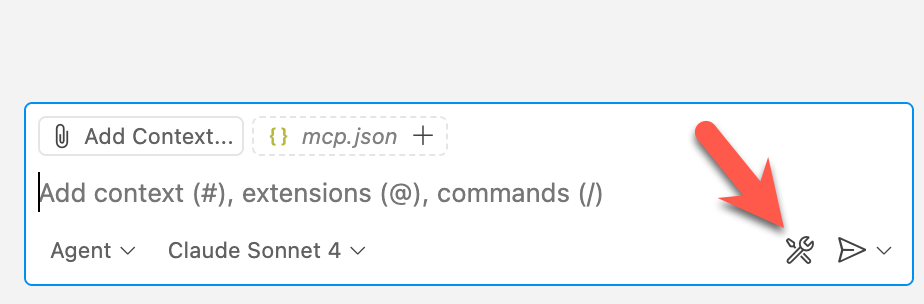
Let's create a new folder in some other location and open it in VS Code. The reason for this is to ensure that the Copilot agent in VSCode doesn't use the JSON files containing our product data and instead provides us with the data directly from the MCP server.
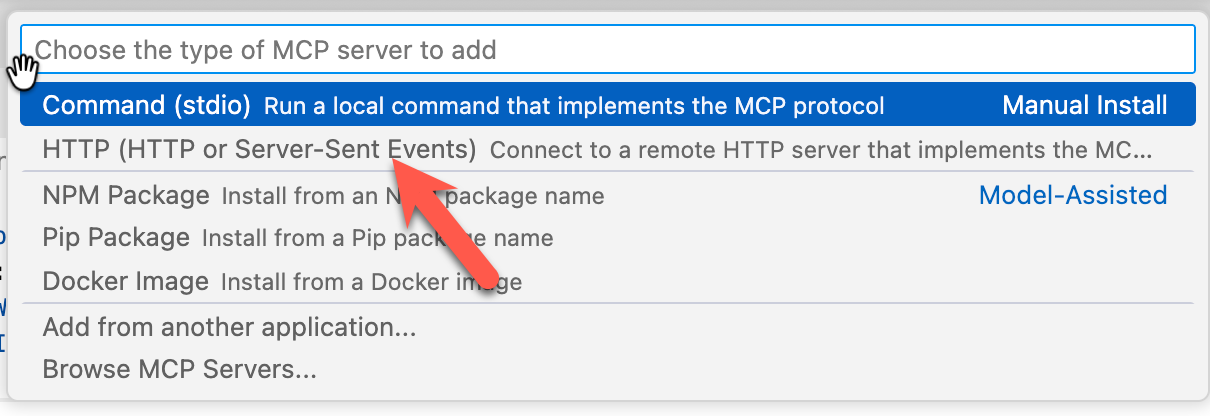
Next, open the command palette in VS Code using ctrl+shift+p and search for MCP and select Add Server.

Click connect to HTTP, SSE is legacy and not recommended
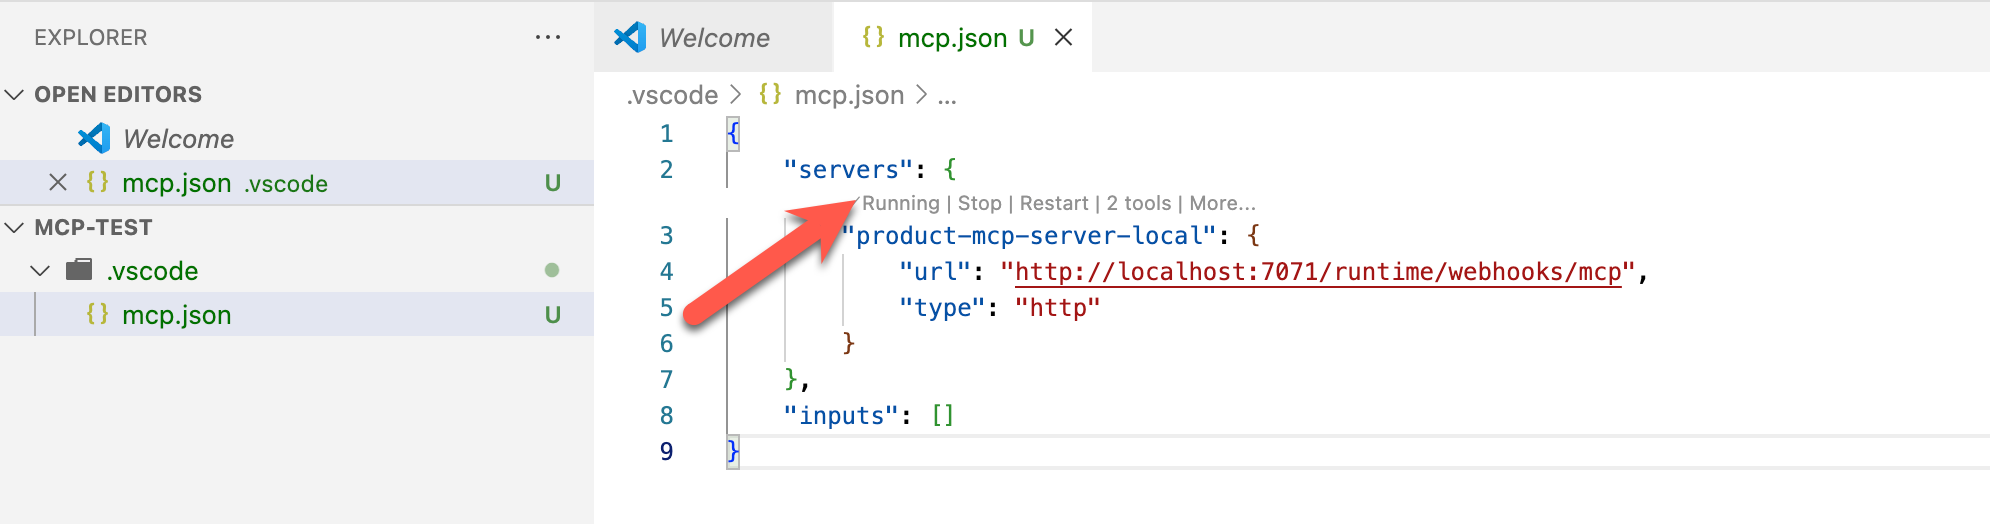
Specify the URL of the function app for the MCP server. This will be listed in the output of the function start

Next, please specify the name of the local MCP server. I have selected it to be available only in the current workspace, not globally.
You should finally land with the below config in the .vscode folder. You can also skip all the manual steps and add the configuration file directly. You should see the status as running.
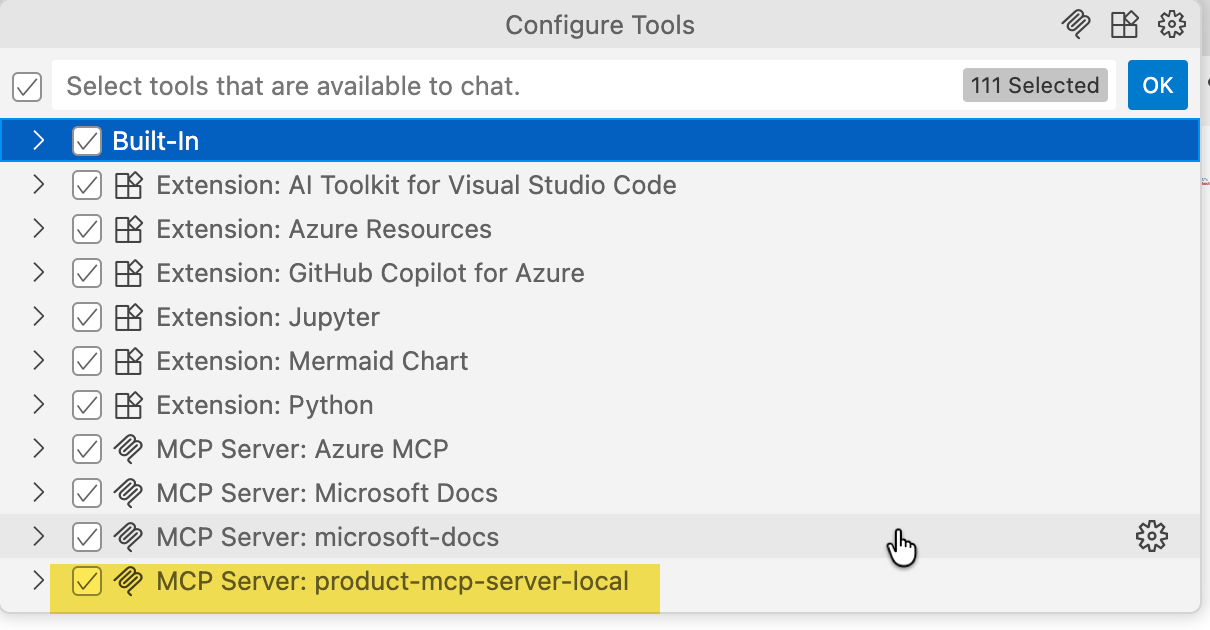
Now open GitHub Copilot and ensure you are in agent mode. Select the MCP servers, and you should also see that our MCP server is selected.
Now, let's ask a question: for the first time, you can choose your preferred setting. I chose Workspace as I'm specifically focused on testing.
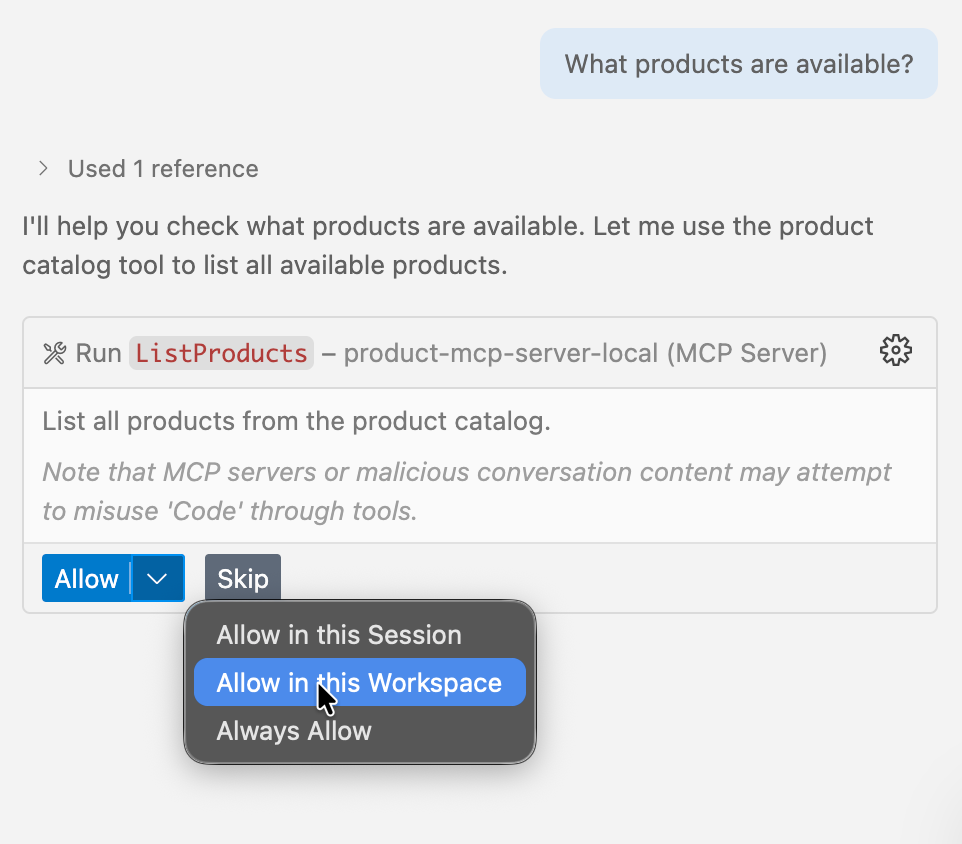
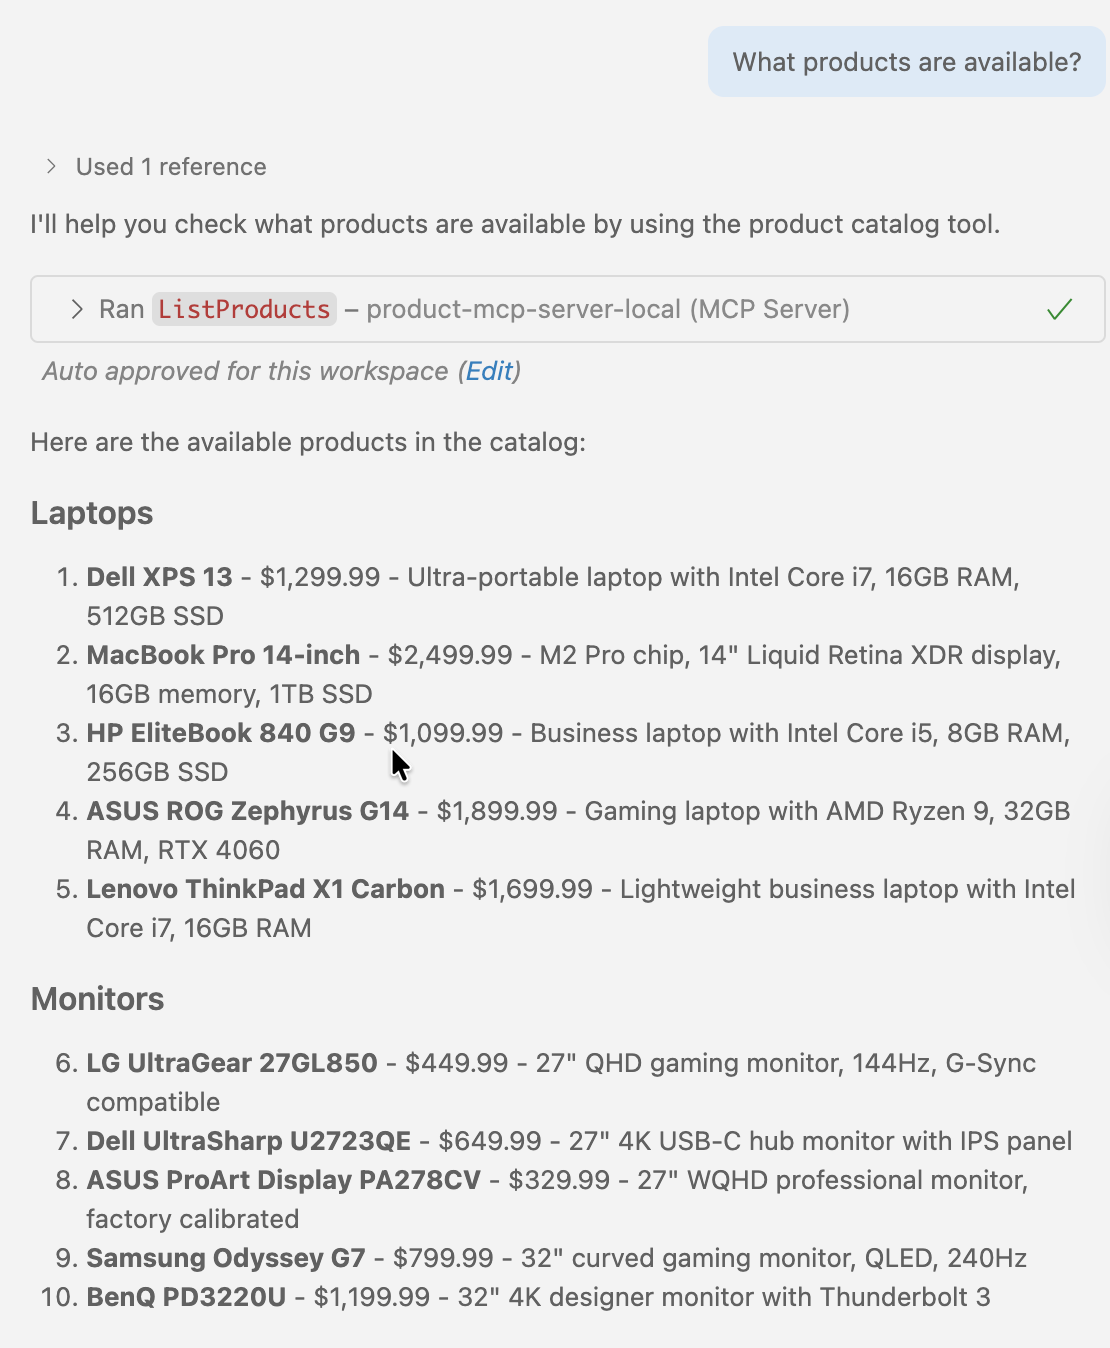
We should now see the data being returned. You can start interacting with the server and see it smartly identify the tools and arguments it needs to pass the parameters.
Alternatively, you can use the official MCP Inspector tool for testing and debugging the MCP servers. In a new terminal in the same workspace, run the command below, and it should open the MCP Inspector in your browser.
npx @modelcontextprotocol/inspector node build/index.js
Here is a quick glimpse into the tool
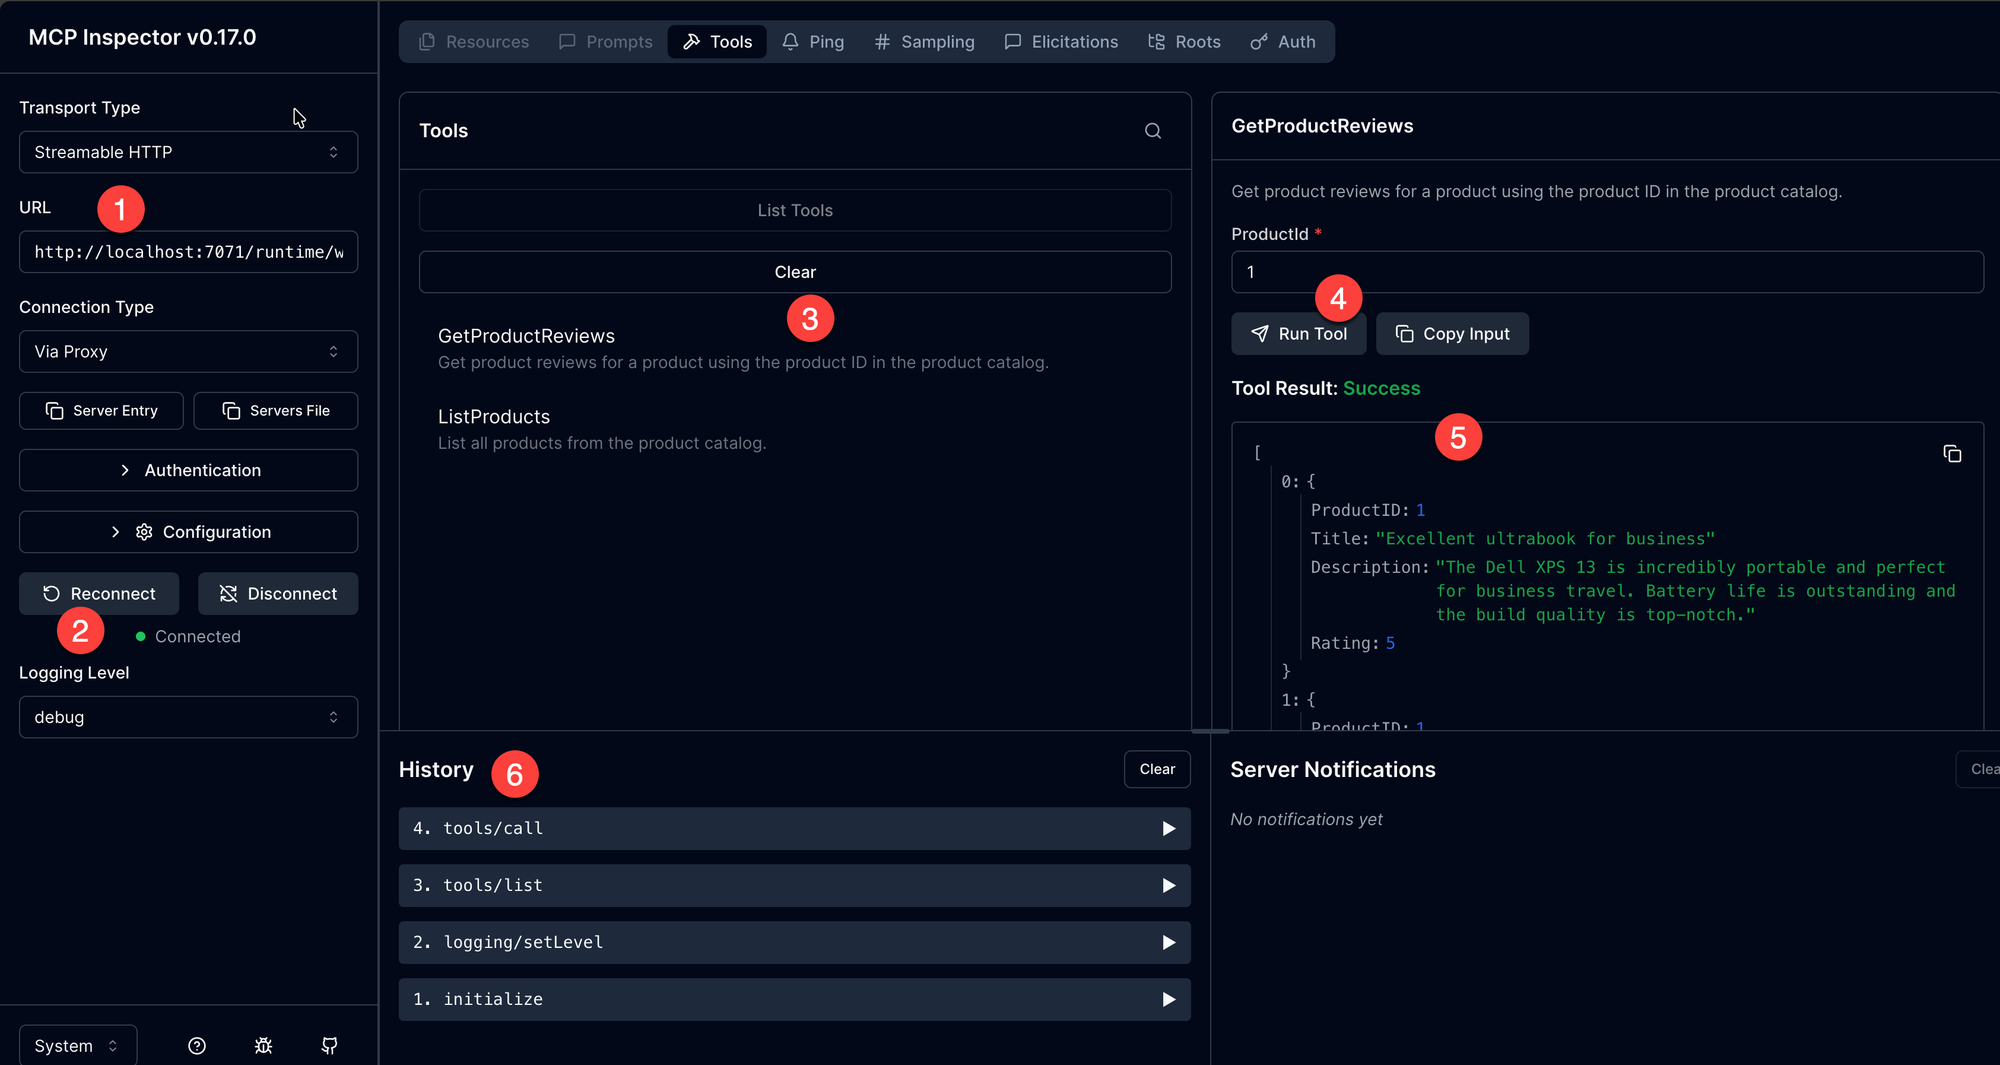
URL: The URL of your local MCP server.Connect/Reconnect/Disconnect: Allows you to connect, reconnect, and disconnect from the server.Tools: Lists all the available tools on our MCP server.Run Tool: Run a selected tool from the list of tools. In the above example, we are testing the tool that returns a product by using the ID.Tool Result: We can see the output of the tool executionHistory: List of all calls that have been made to the MCP server.
Deploying to Azure
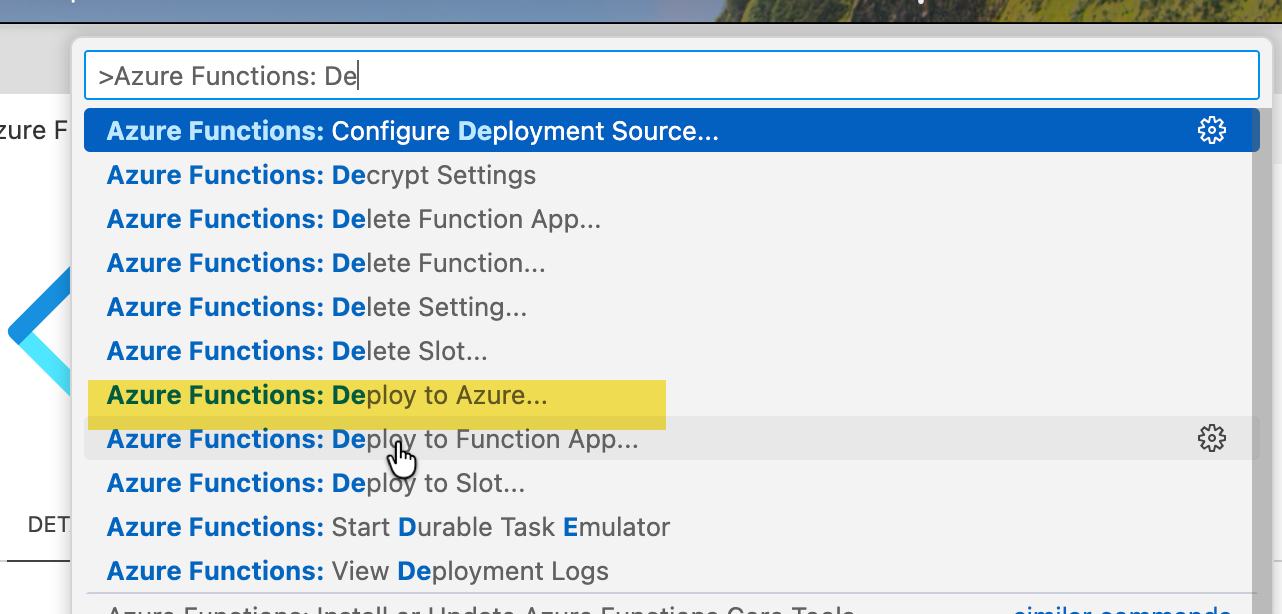
I'm going to keep this very simple and deploy it directly from VS Code. However, you might have to use build pipelines for production use cases.
I am going to use the Azure Functions VS Code extension. Once installed, open the command palette using ctrl+shift+p and select Azure Functions: Deploy to Azure..
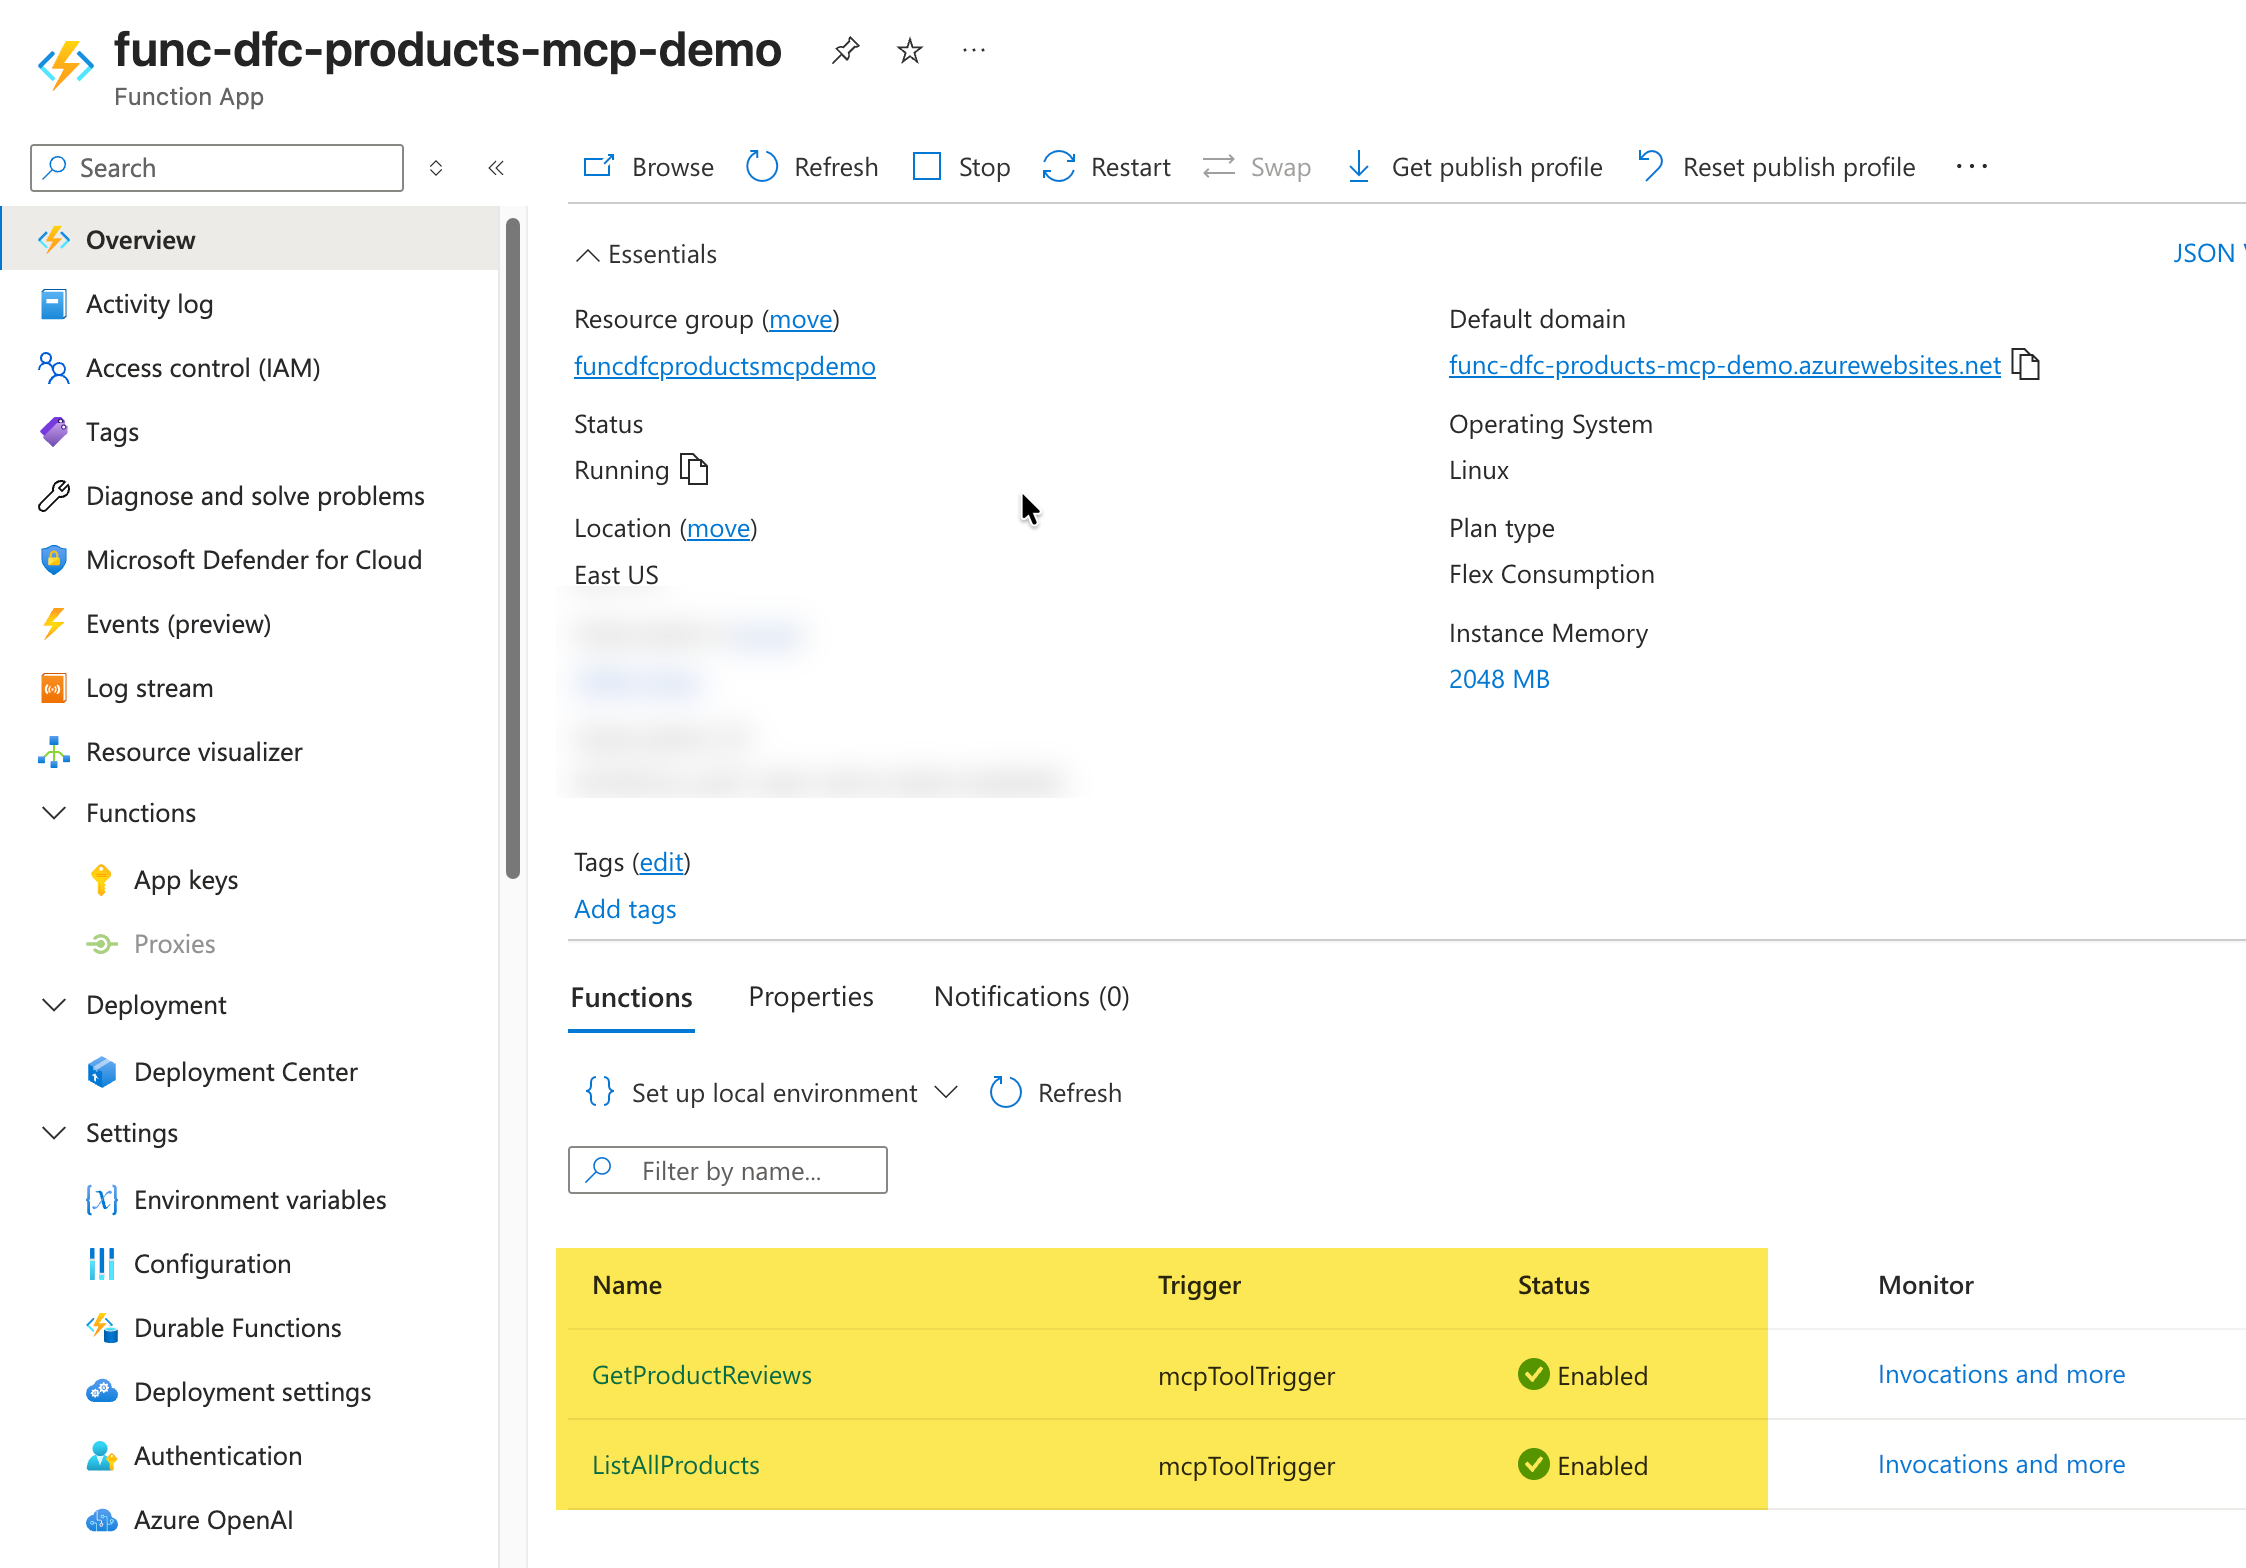
Create a new function app and provide a name. I have used func-dfc-products-mcp-demo

Select a region and choose .NET 8 isolated as the runtime stack. For authentication, use Managed Identity. This will take a few minutes, and we should see our function app deployed after that. By default, the extension uses the Flex Consumption plan.
When using the Flex Consumption plan, we need to ensure we have the Always-ready instance count set to 1.

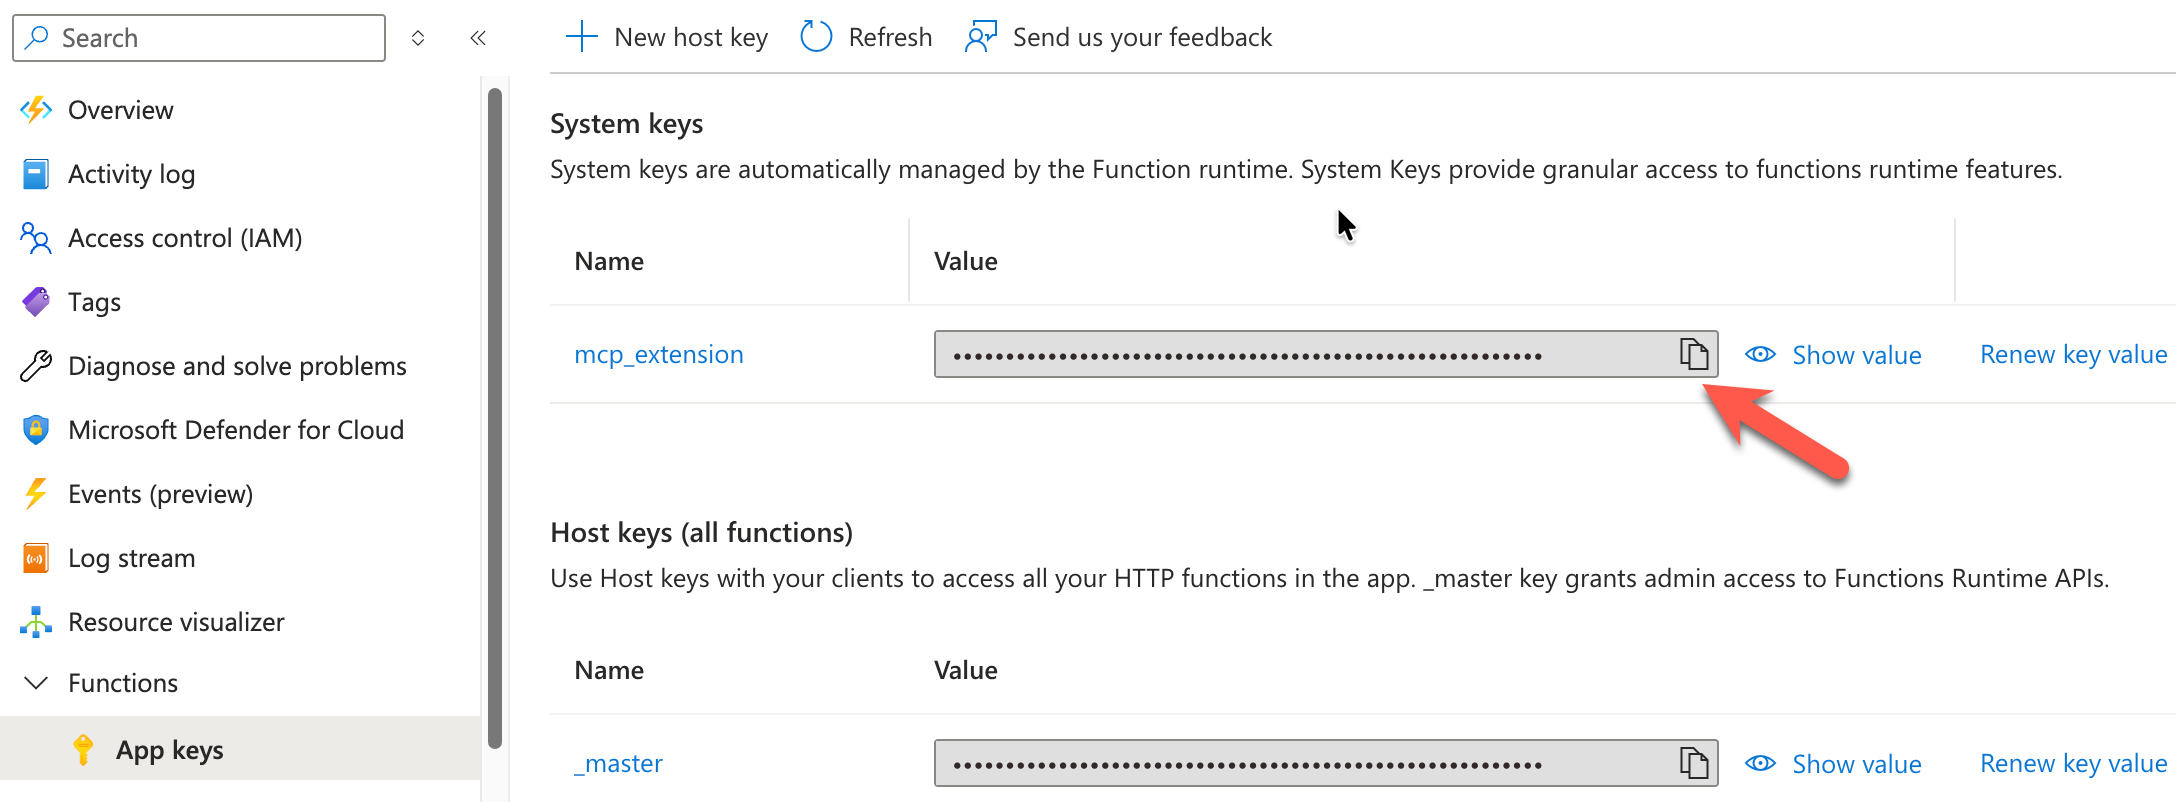
Under App Keys, copy the mcp_extension key. We will need this when connecting to the MCP server running on the function app.
Enabling Managed Identity on Function App
We will be using OAuth 2.0 authentication and leveraging the managed identity access.

Next, let's enable authentication on our function app by adding Microsoft as an Identity Provider.
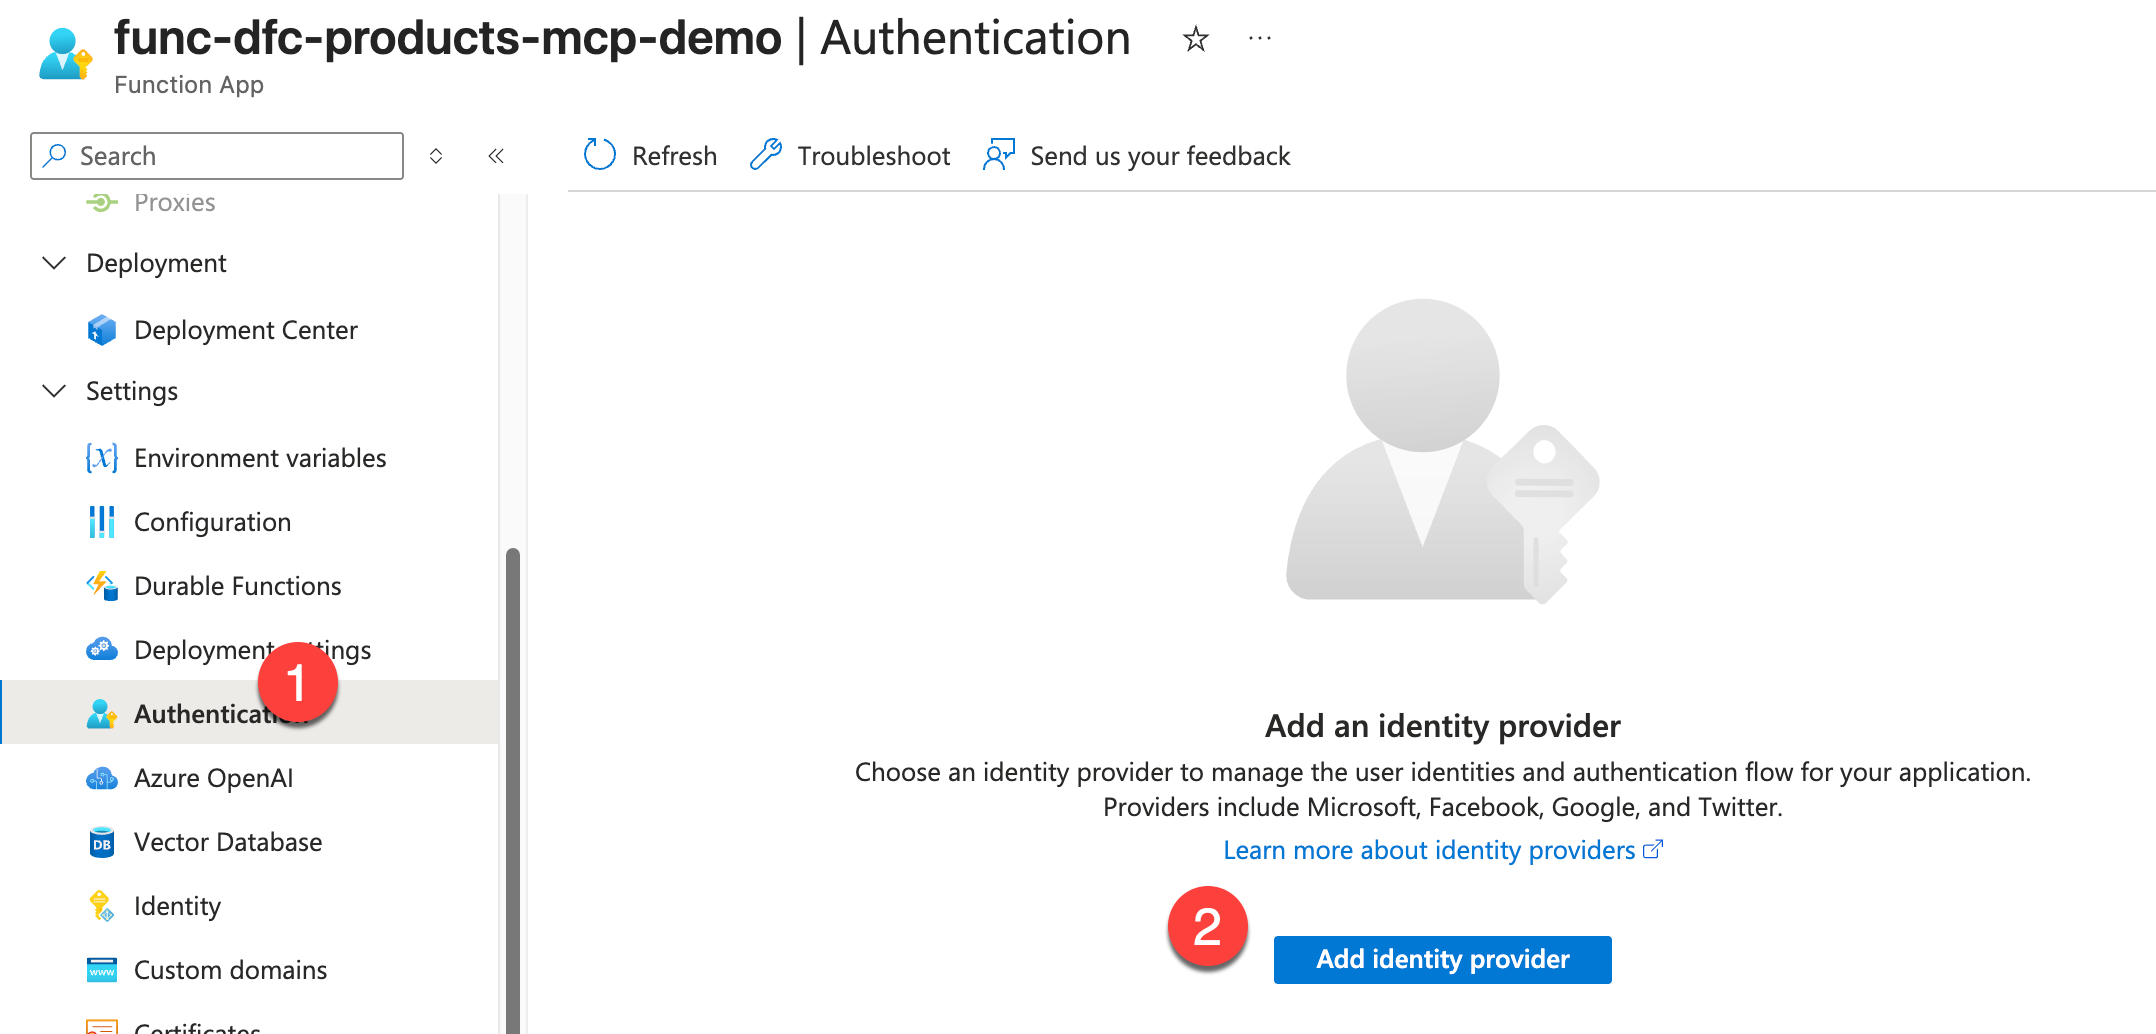
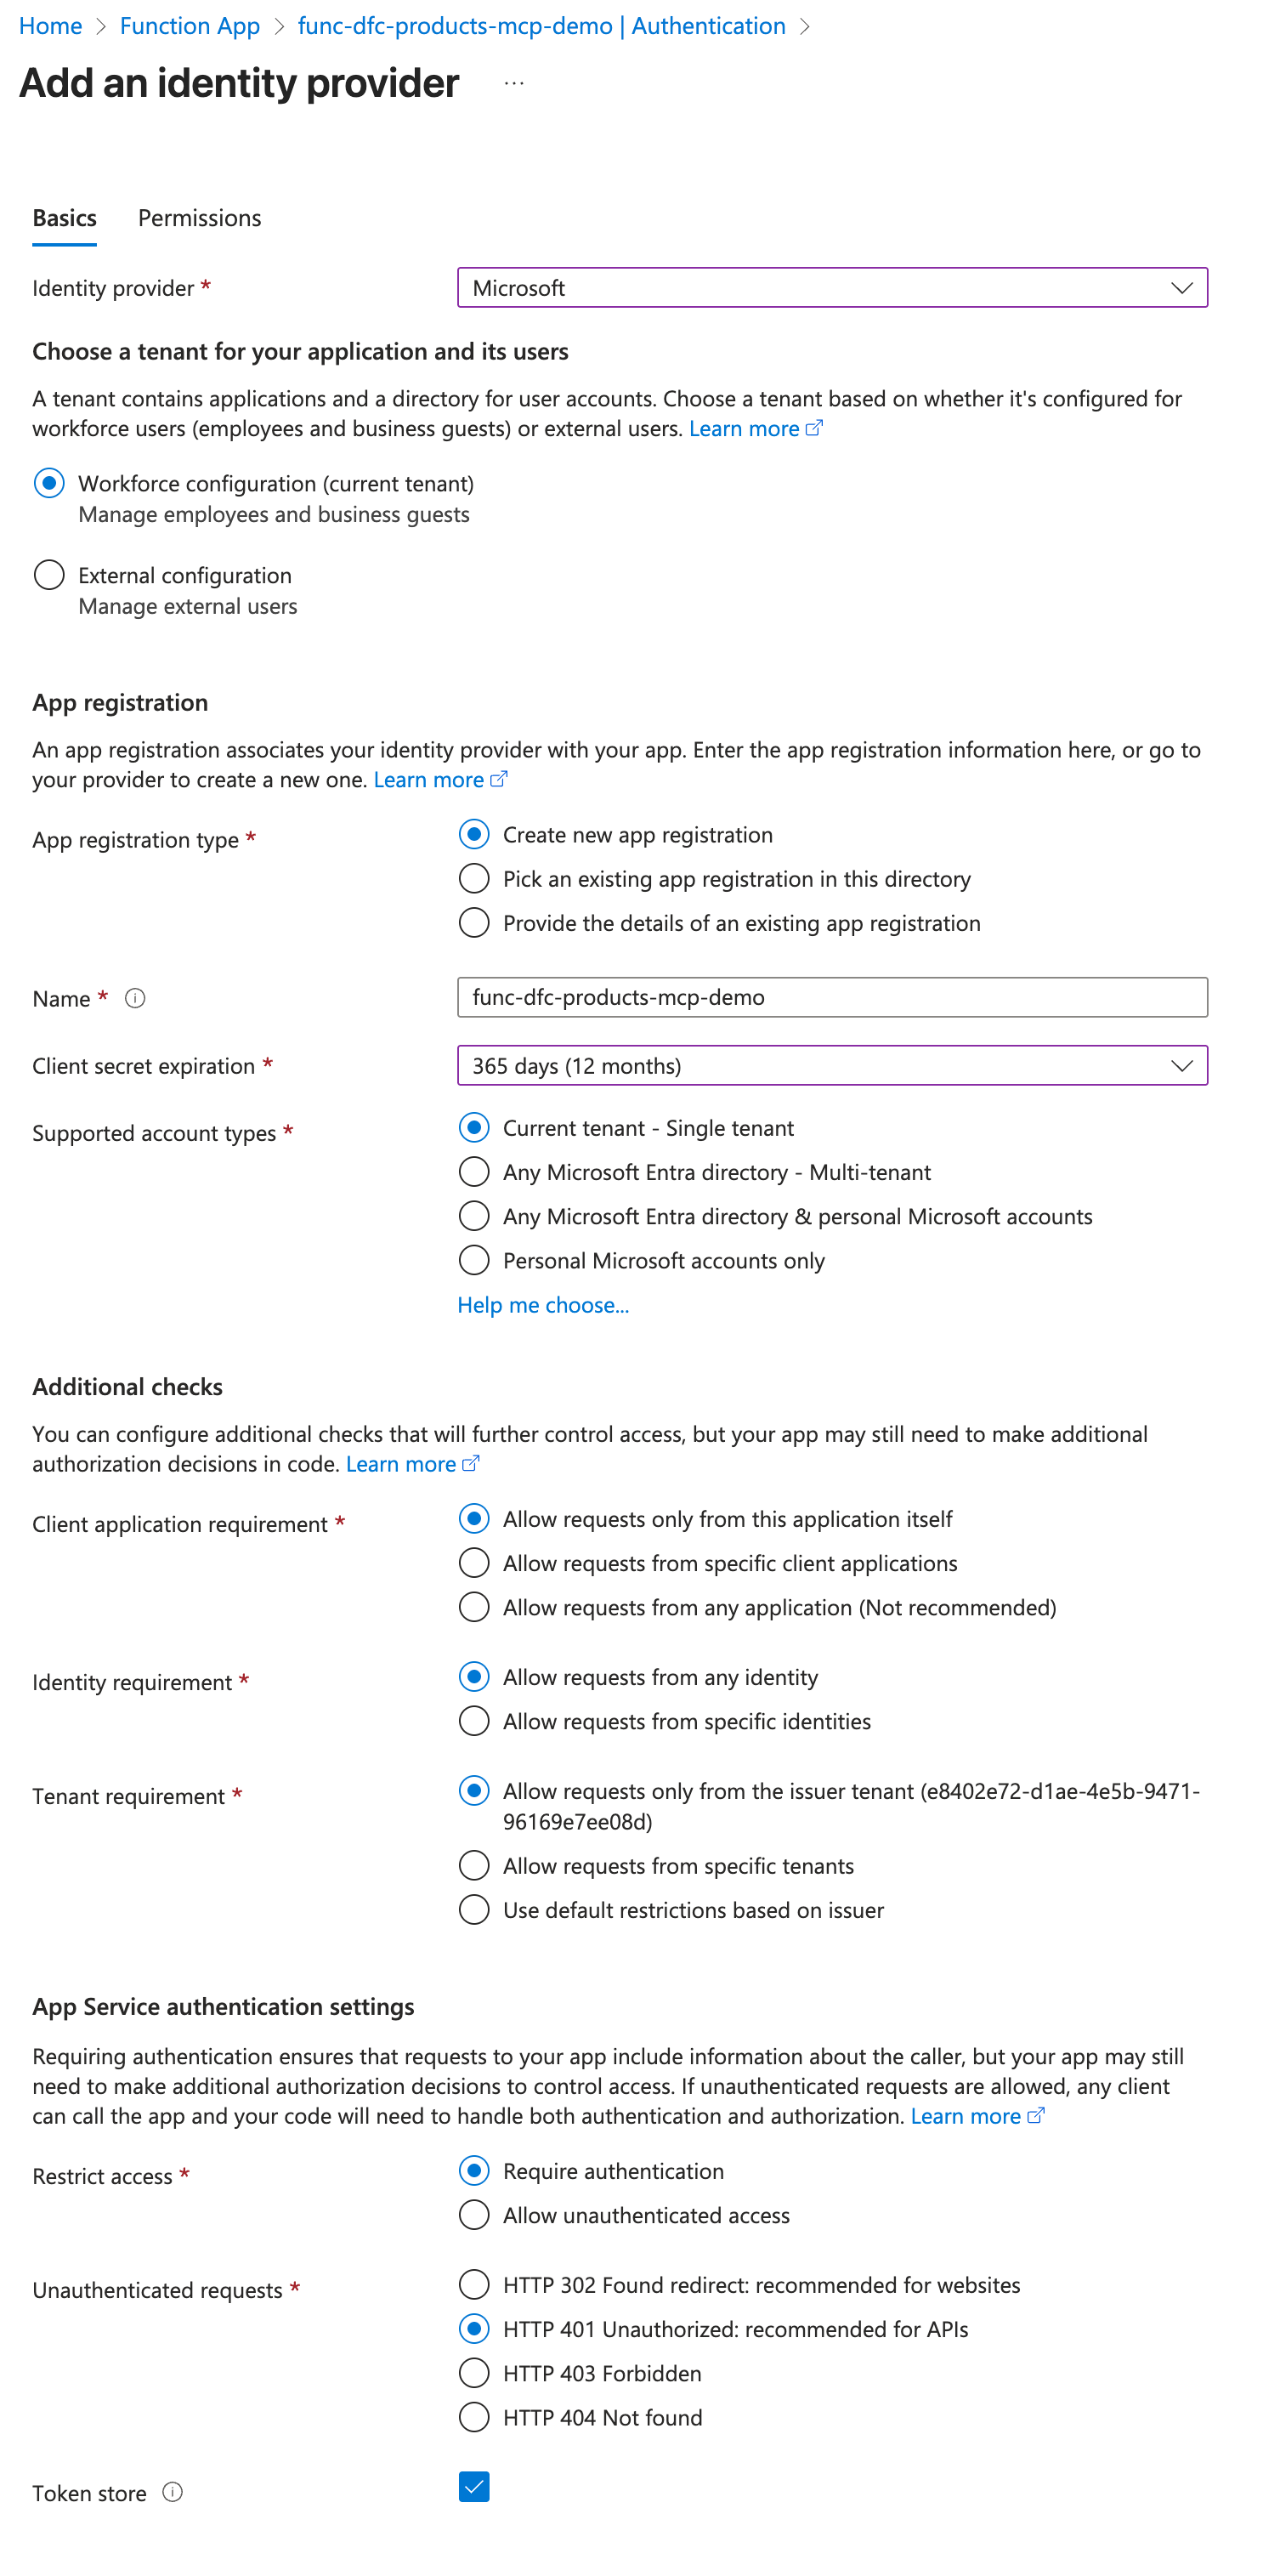
Specify the preferences below, then click Add. This will now create a new app registration in Entra ID.
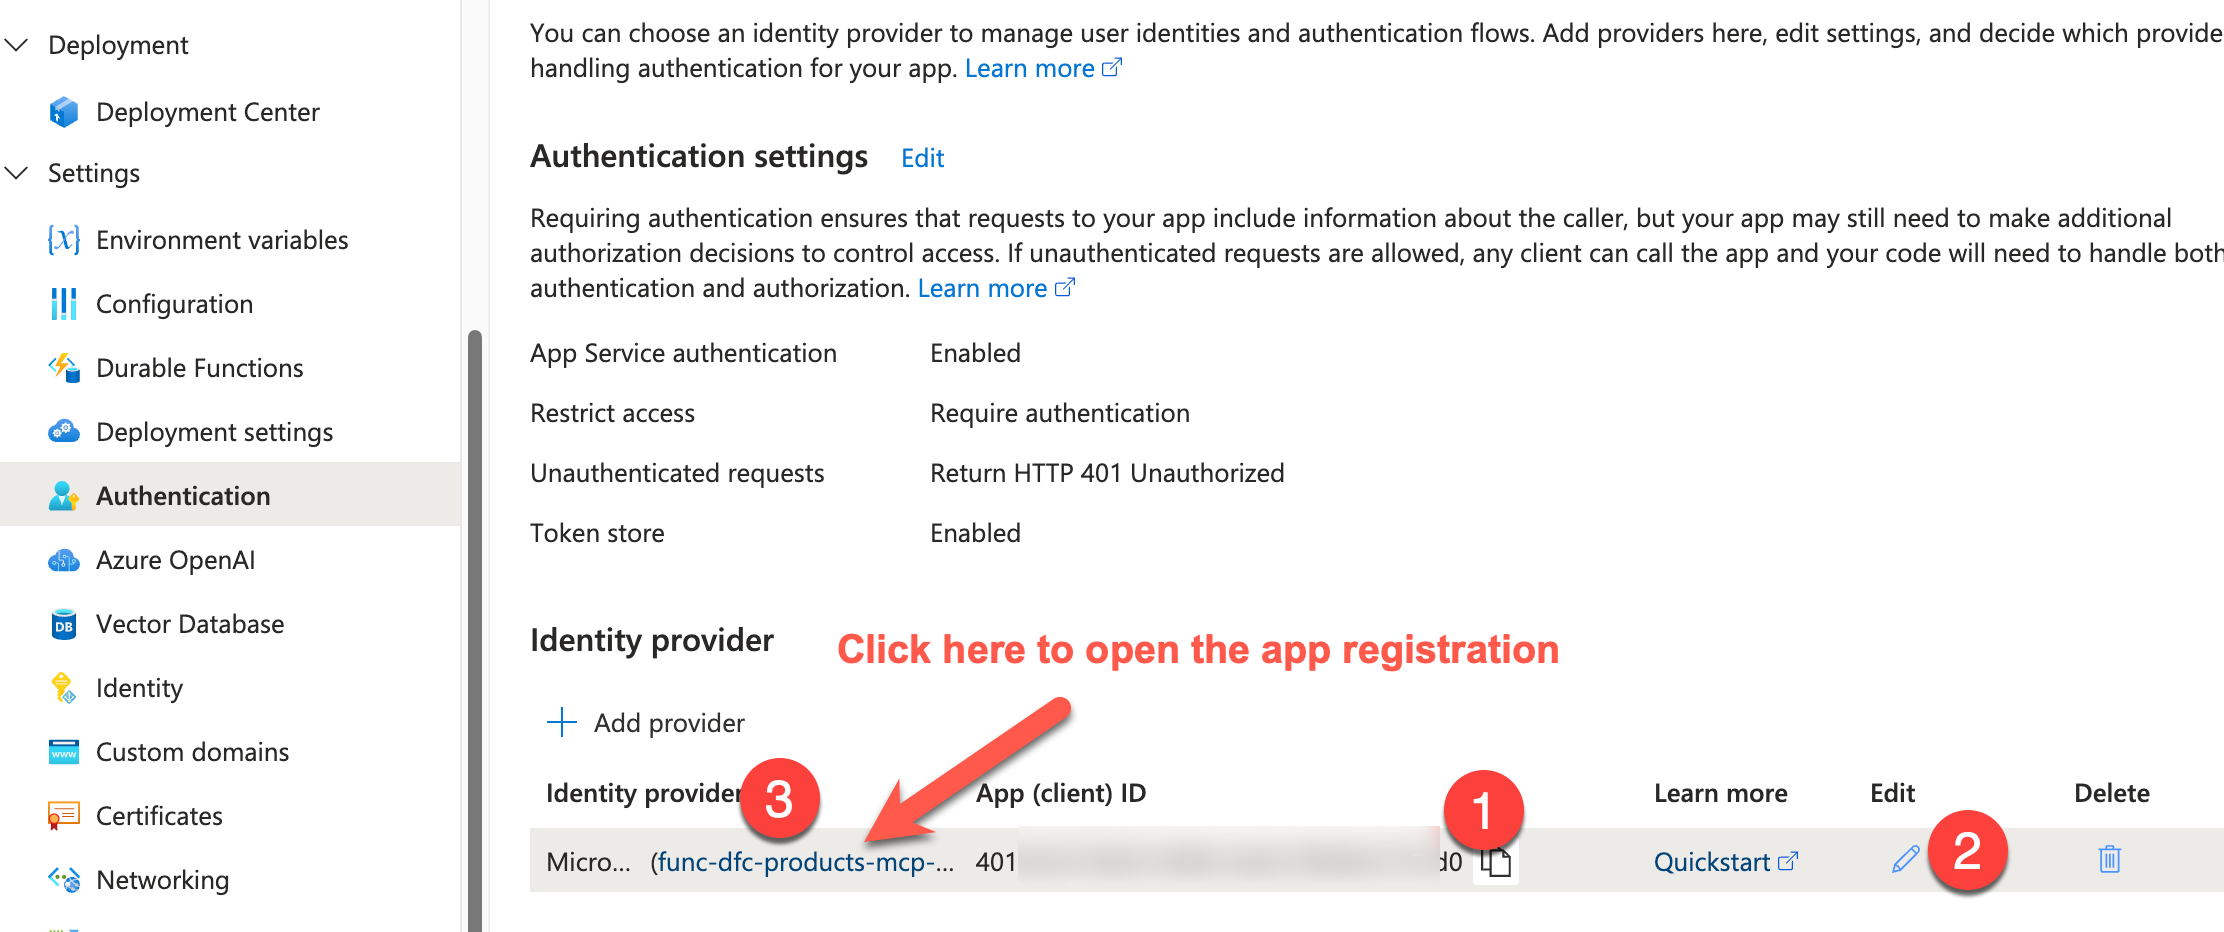
Once created, you should see the below UI. Copy the Client ID, then click Edit to access the client secret.
You should then be able to click on the "click to edit secret value". The secret is stored in the MICROSOFT_PROVIDER_AUTHENTICATION_SECRET app setting. Copy the Client Secret.
While you are there, also navigate to the app registration by clicking the link under step #3
Copy the highlighted items and store them temporarily along with the previously copied Client ID and Client Secret. We will need them to create our custom connector.
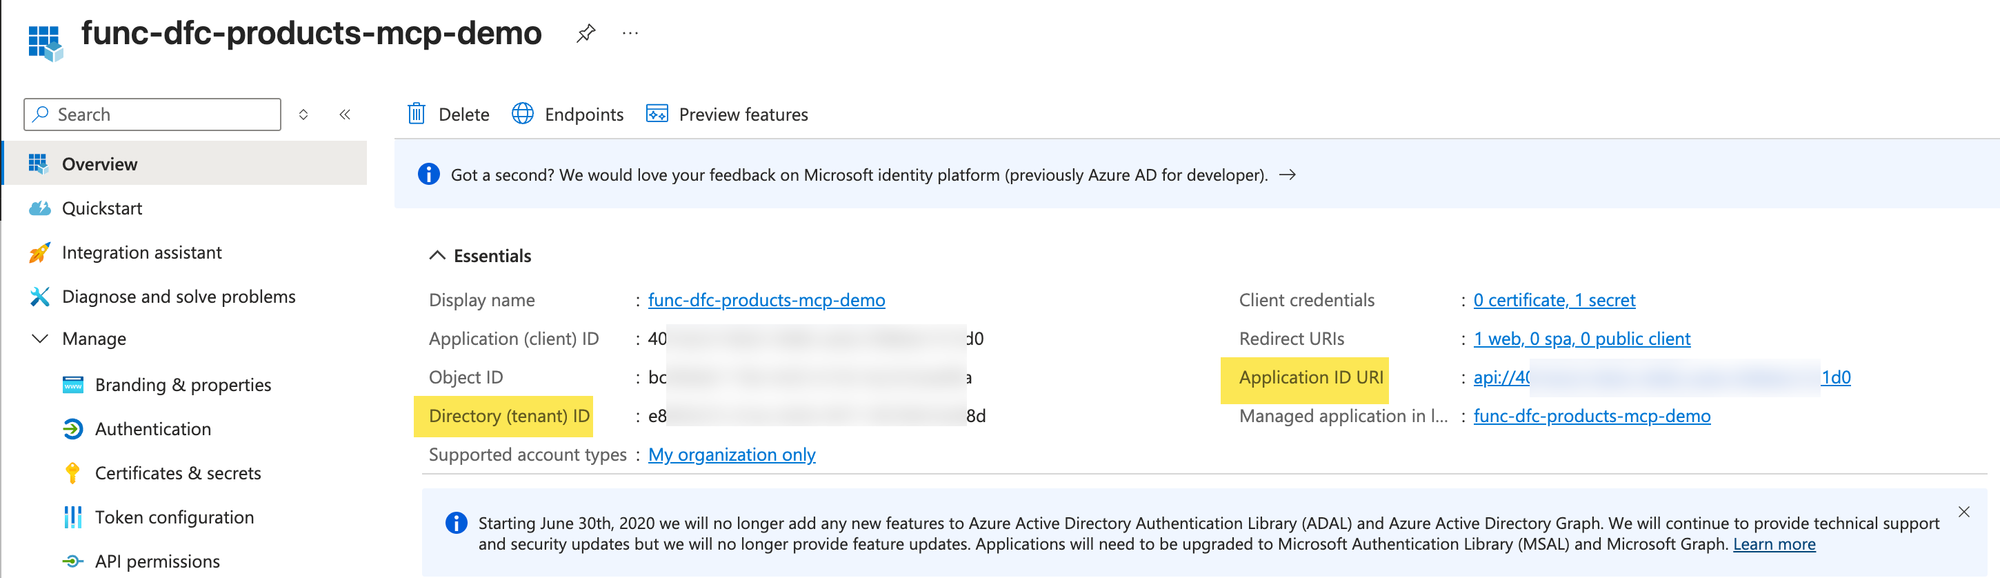
So you should now have these items ready for the next section.
Function App URL: The URL of your function appFunction Key: the mcp_extension function key we copied from Functions->App KeysClient ID: The ID of your app that was set up as part of the managed identity.Client SecretTenant IDApplication ID URI
Creating Custom Connector
I was hoping to configure the MCP server in Copilot Studio directly, as you usually do. In our case, since we are using the function app, we must pass the function app key in the HTTP header as described in the documentation; otherwise, we would see an Unauthorized error.

We are using this in addition to OAuth authentication. The OAuth authentication in the MCP onboarding wizard doesn't allow adding headers.
As a result, we would need to create a Custom Connector in Power Apps and add it as a tool to our agent.
Here are the steps to create the custom connector
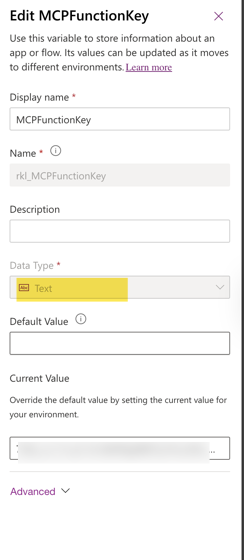
- Create a solution and add a new environment variable for MCPFunctionKey. We will store our function app key here and access it on our custom connector. To keep it simple, I'm just using Text for this demo, but you would use a secret in production.
- Copy the openapi.yaml file from the repo and replace the below fields
- FUNC_NAME: the name of your function app
- CLIENT_ID: The Client/App ID we copied in the previous section
For example, this is how it would look.
swagger: '2.0'
info:
  title: Product MCP Server Demo
  description: >-
    MCP Server to retrieve product catalog and reviews.
  version: 1.0.0
host: func-dfc-products-mcp-demo.azurewebsites.net
basePath: /runtime/webhooks/mcp
schemes:
  - https
consumes: []
produces: []
paths:
  /:
    post:
      summary: Product MCP Server
      x-ms-agentic-protocol: mcp-streamable-1.0
      operationId: InvokeMCP
      responses:
        '200':
          description: Success
definitions: {}
parameters: {}
responses: {}
securityDefinitions:
  oauth2-auth:
    type: oauth2
    flow: accessCode
    tokenUrl: https://login.windows.net/common/oauth2/authorize
    scopes:
      0054f7bc-c6a2-4f82-9dc6-7231d9b151f3/.default: 0054f7bc-c6a2-4f82-9dc6-7231d9b151f3/.default
    authorizationUrl: https://login.microsoftonline.com/common/oauth2/authorize
  oAuthClientCredentials:
    type: oauth2
    flow: application
    tokenUrl: https://login.windows.net/common/oauth2/authorize
    scopes:
      0054f7bc-c6a2-4f82-9dc6-7231d9b151f3/.default: 0054f7bc-c6a2-4f82-9dc6-7231d9b151f3/.default
  certOauth:
    type: oauth2
    flow: application
    tokenUrl: 'https://login.windows.net/common/oauth2/authorize'
    scopes:
      0054f7bc-c6a2-4f82-9dc6-7231d9b151f3/.default: 0054f7bc-c6a2-4f82-9dc6-7231d9b151f3/.default
security:
  - oauth2-auth:
      - 0054f7bc-c6a2-4f82-9dc6-7231d9b151f3/.default
  - oAuthClientCredentials:
      - 0054f7bc-c6a2-4f82-9dc6-7231d9b151f3/.default
  - certOauth:
      - 0054f7bc-c6a2-4f82-9dc6-7231d9b151f3/.default
tags: []
openapi.yaml
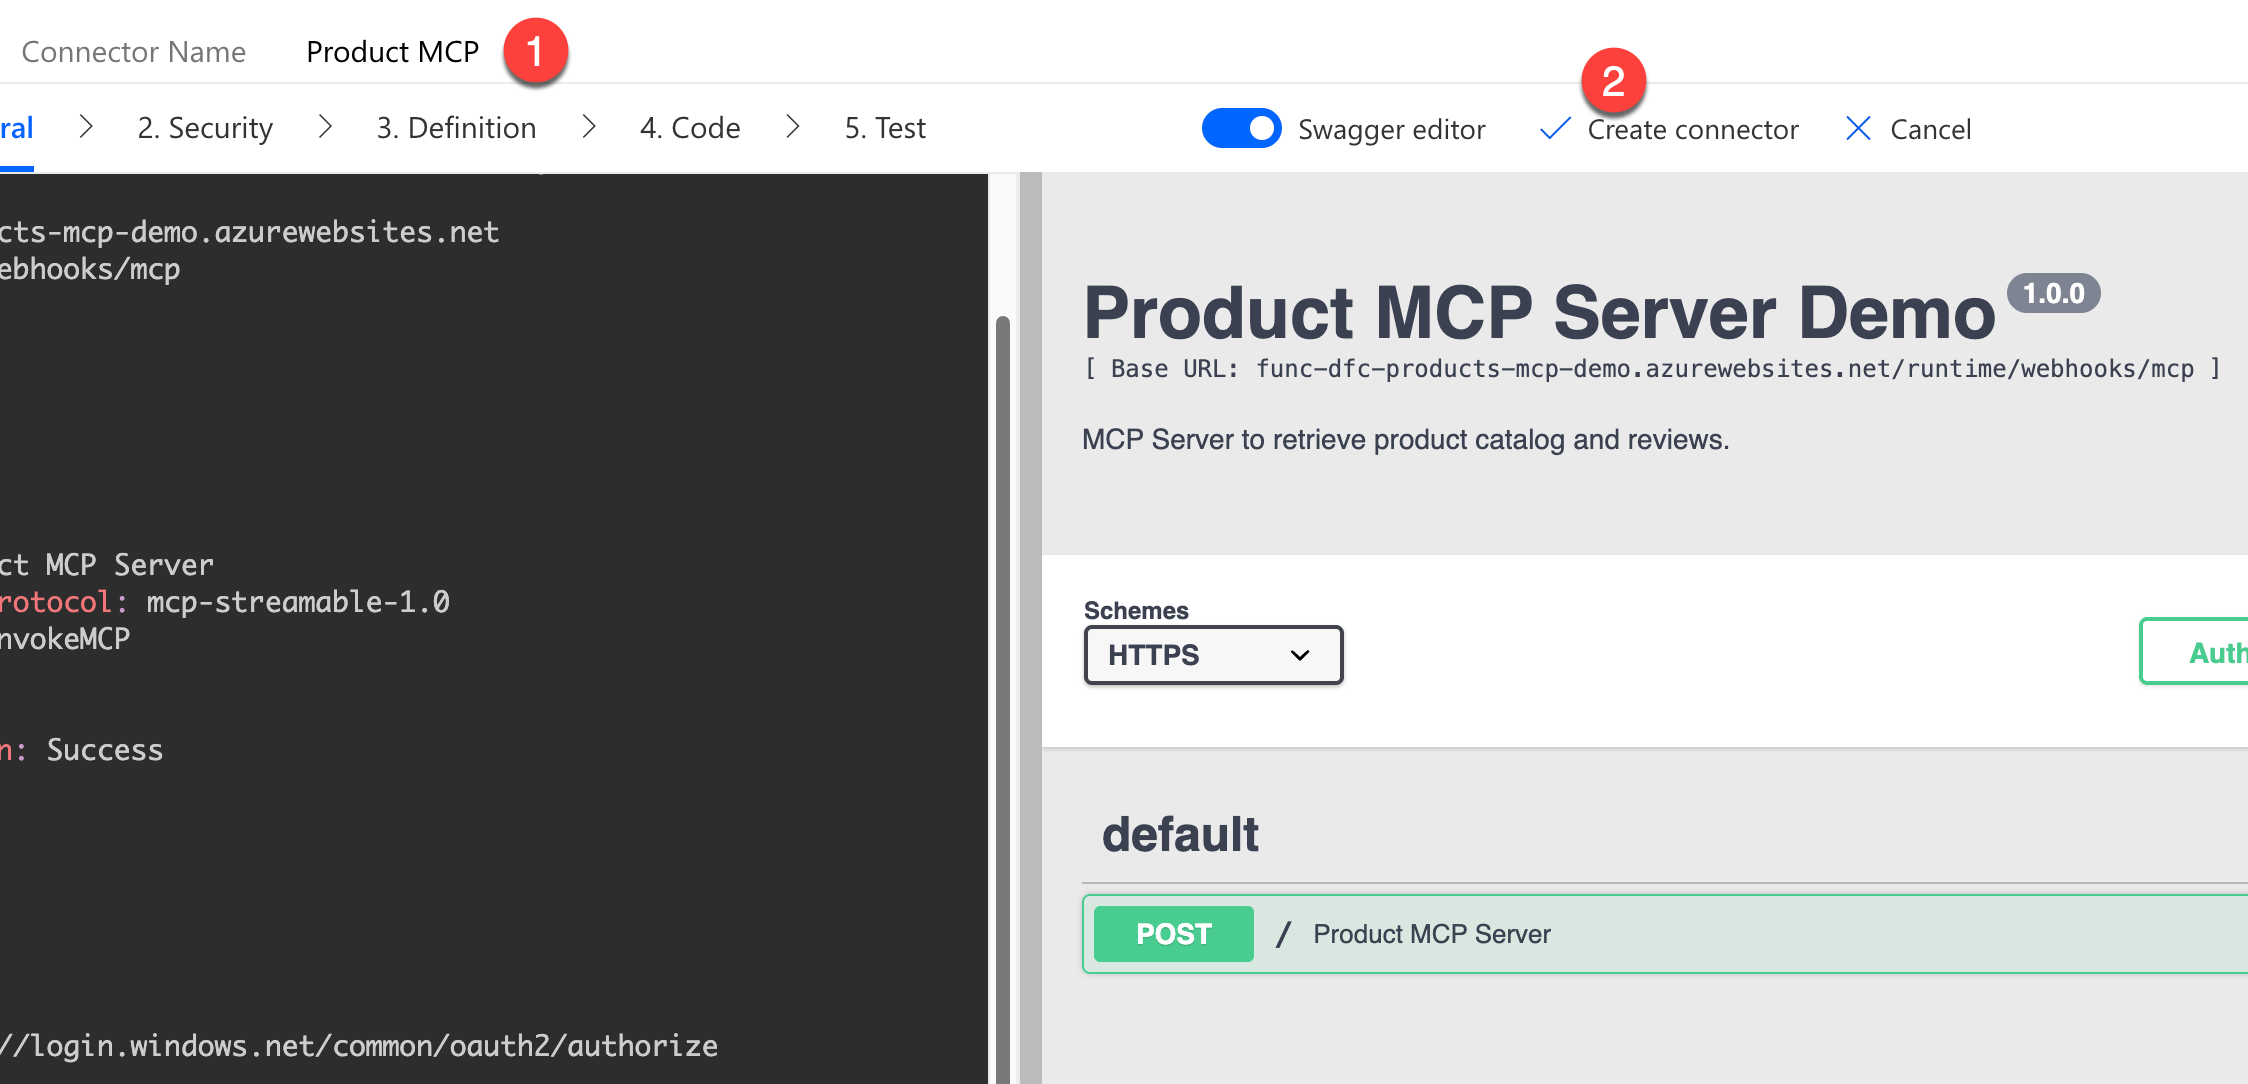
- Please create a new custom connector from our solution. Switch to the Swagger editor and paste your updated YAML file. You should now see the default action. Give the connector a name and create it.
- Once the connector is created, let's go to the Security tab. We need to enter the following information. Once that's done, update the connector. Below is an example of how the configuration might look.

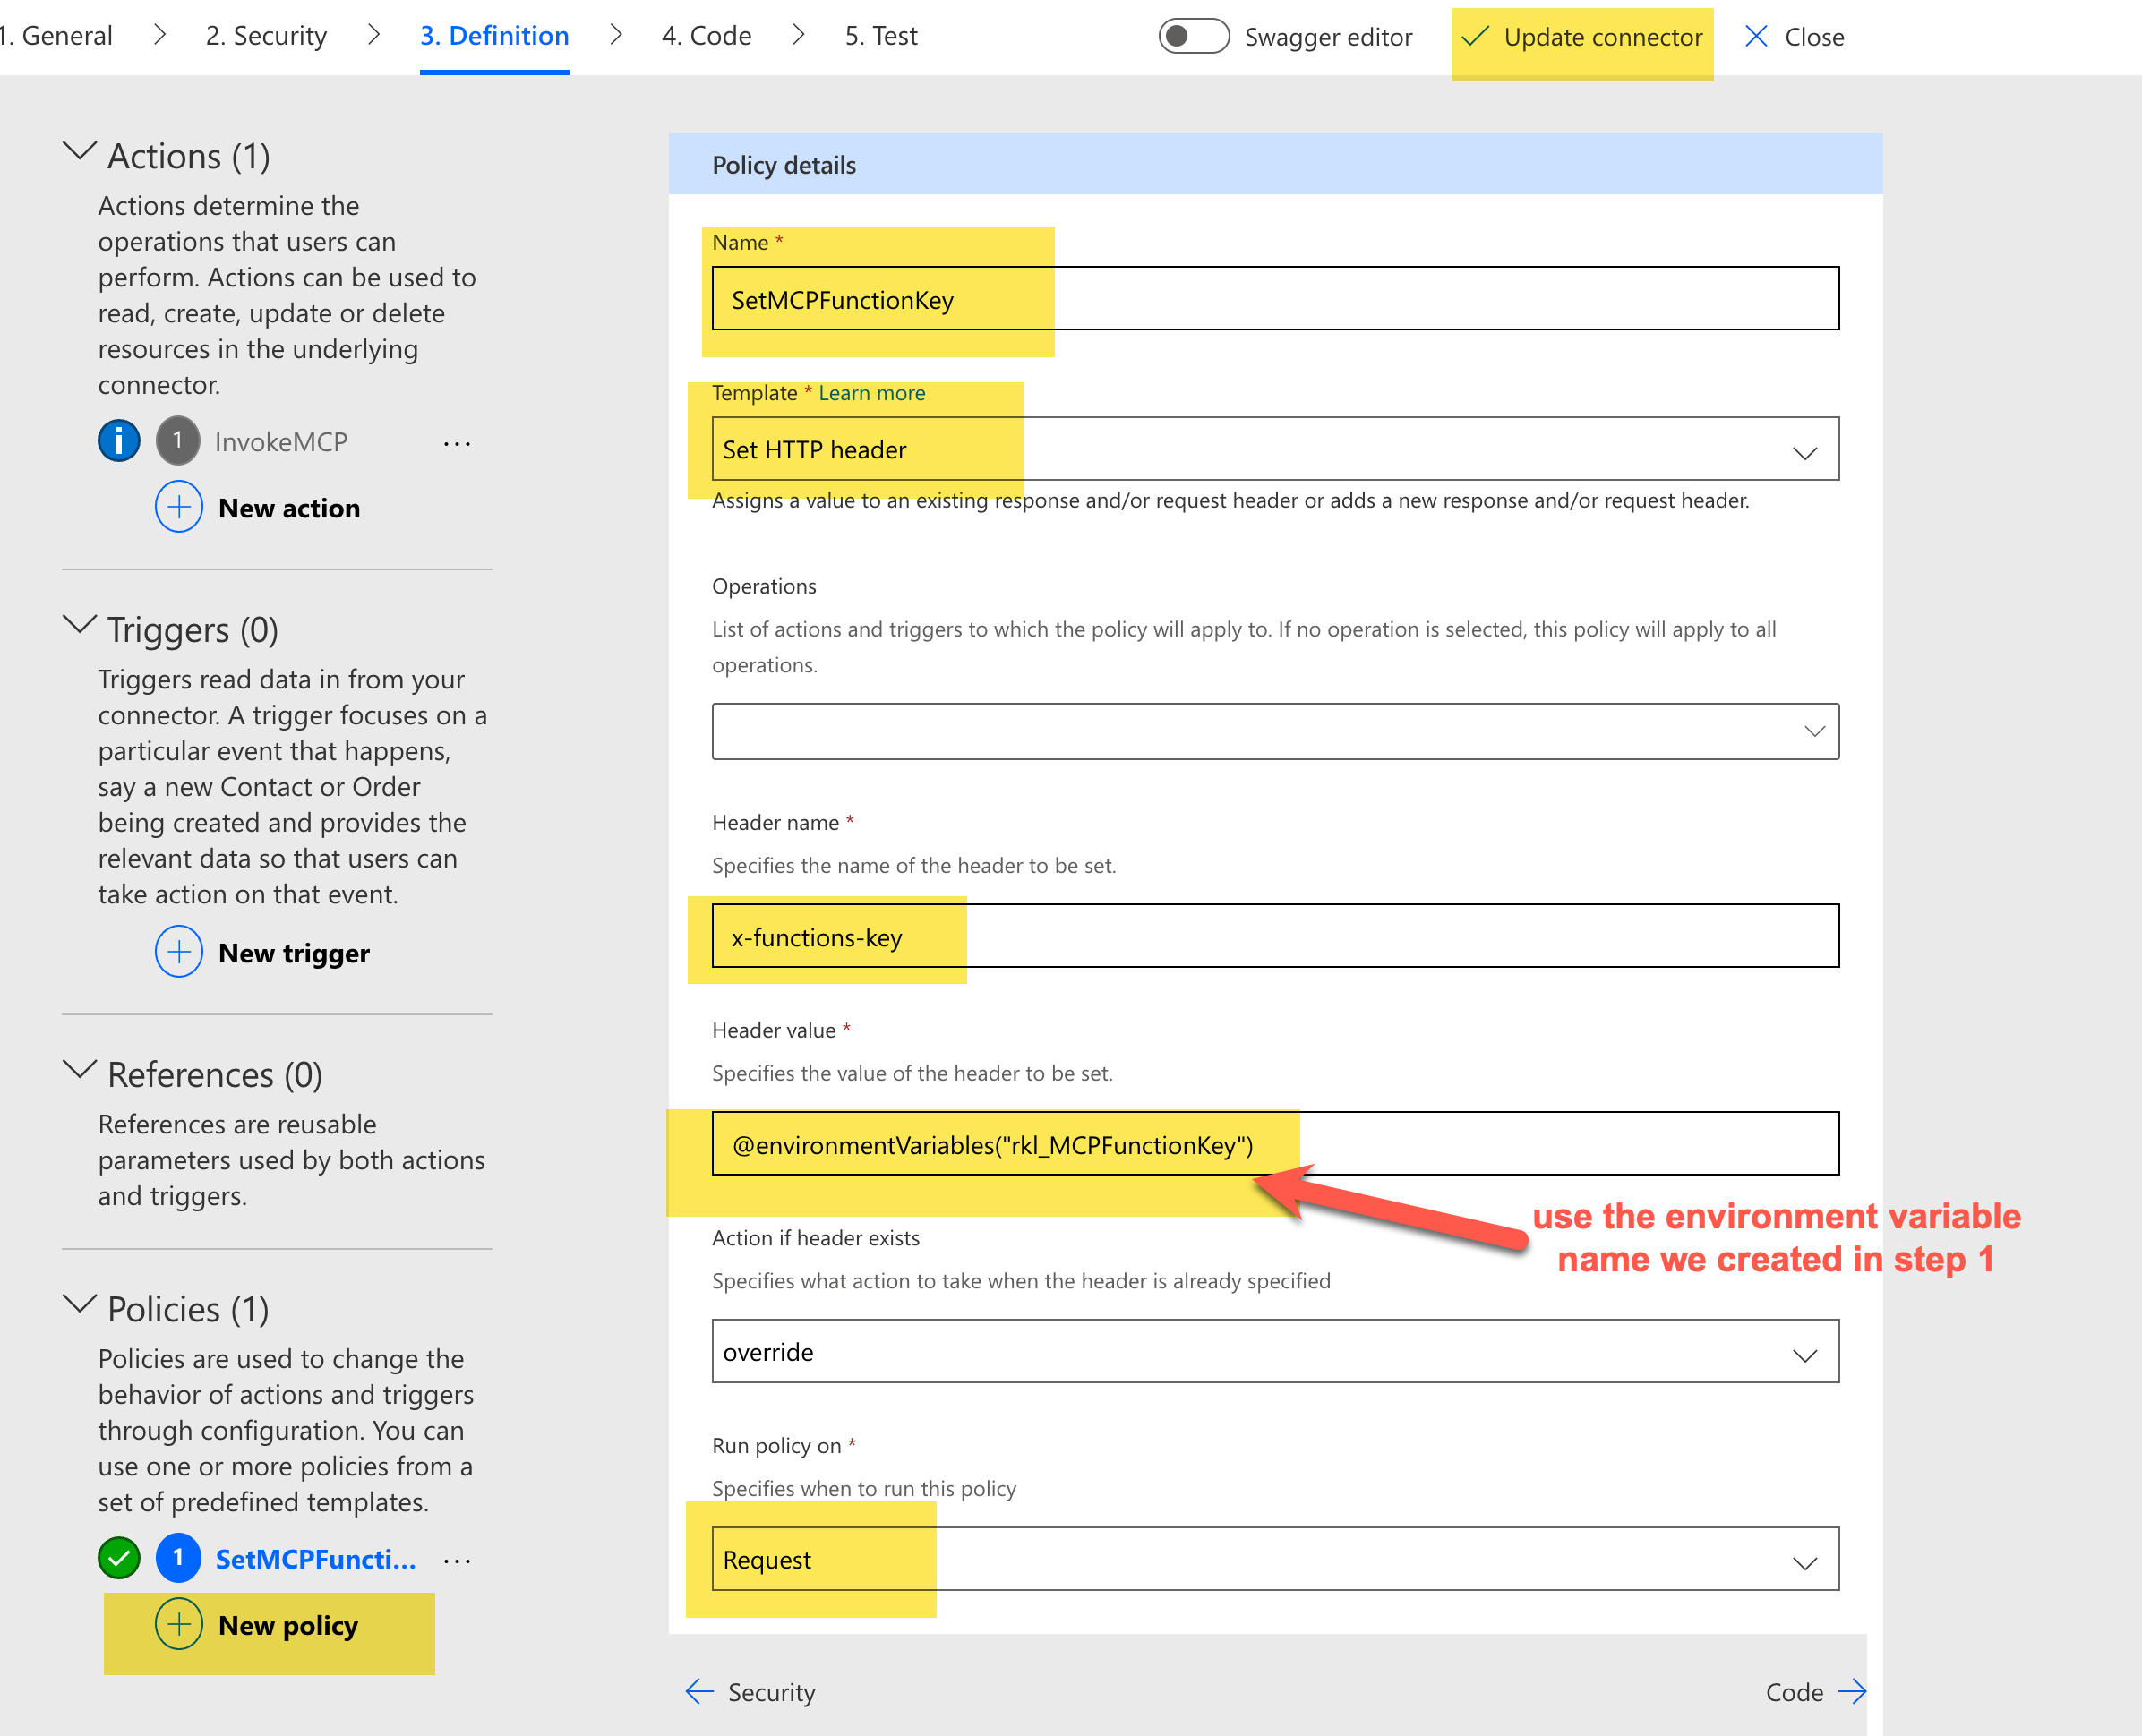
- Next, set a policy to put the Function key in the header on every request the MCP client makes to the MCP server and update the connector.
That sets up our custom connector for consumption. We can now use the Custom Connector in Copilot Studio.
Adding the MCP Custom Connector in Copilot Studio
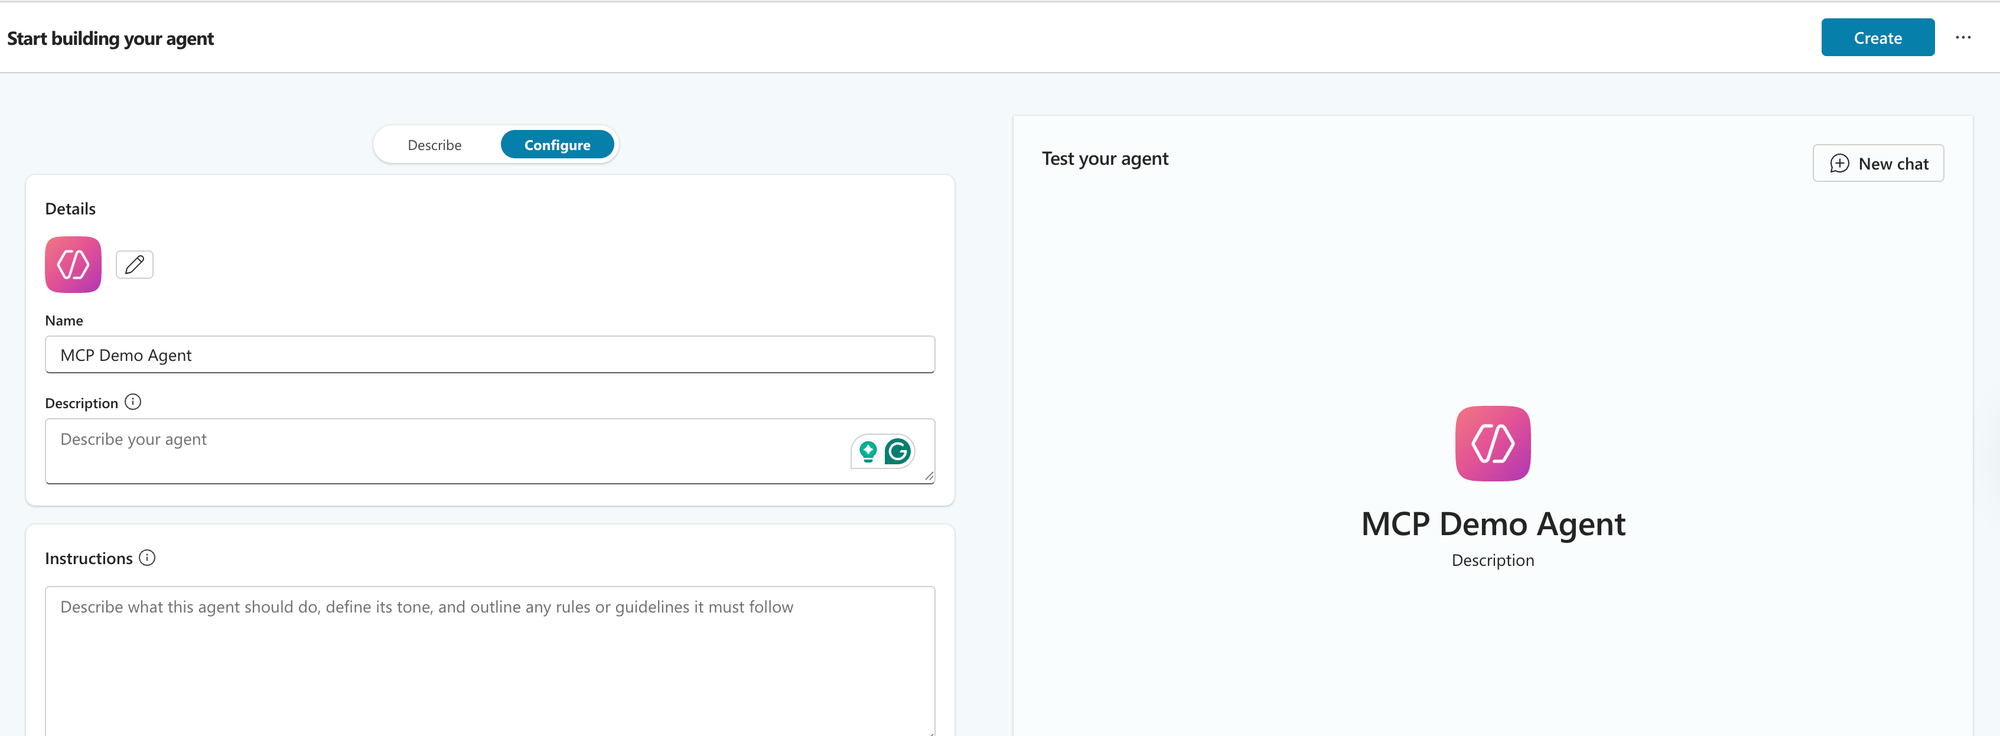
In our same solution, let's create a new agent named MCP Demo Agent. I'm going to configure it directly, without any additional details for simplicity, and create it.
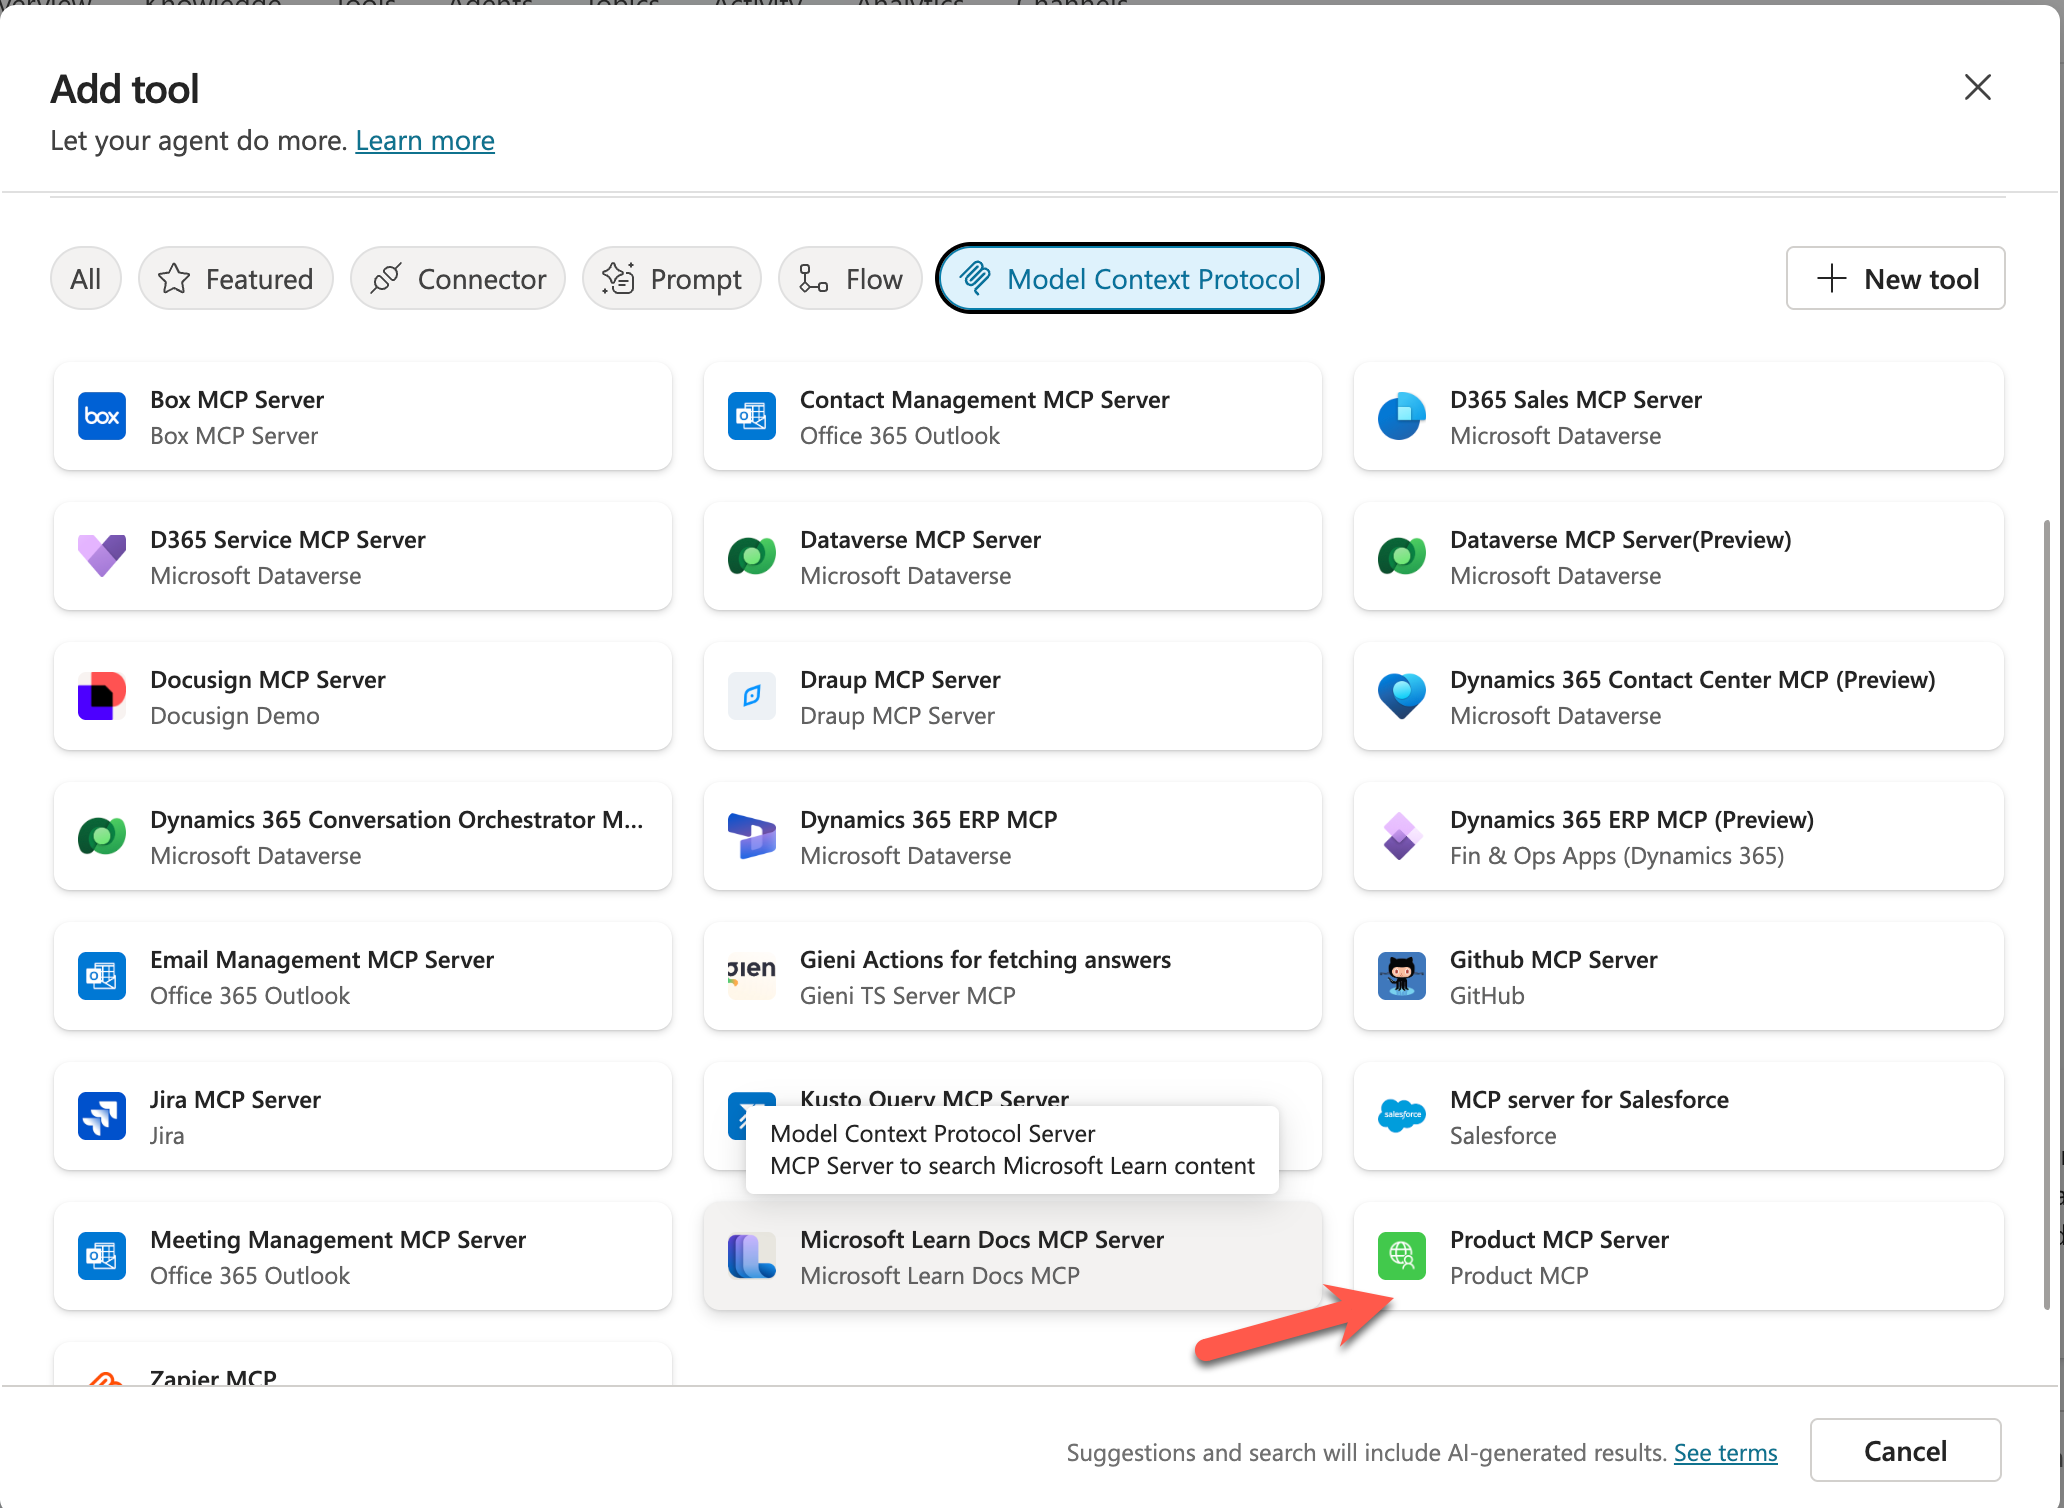
Next, navigate to Tools. Click Add a Tool and select our MCP Server.
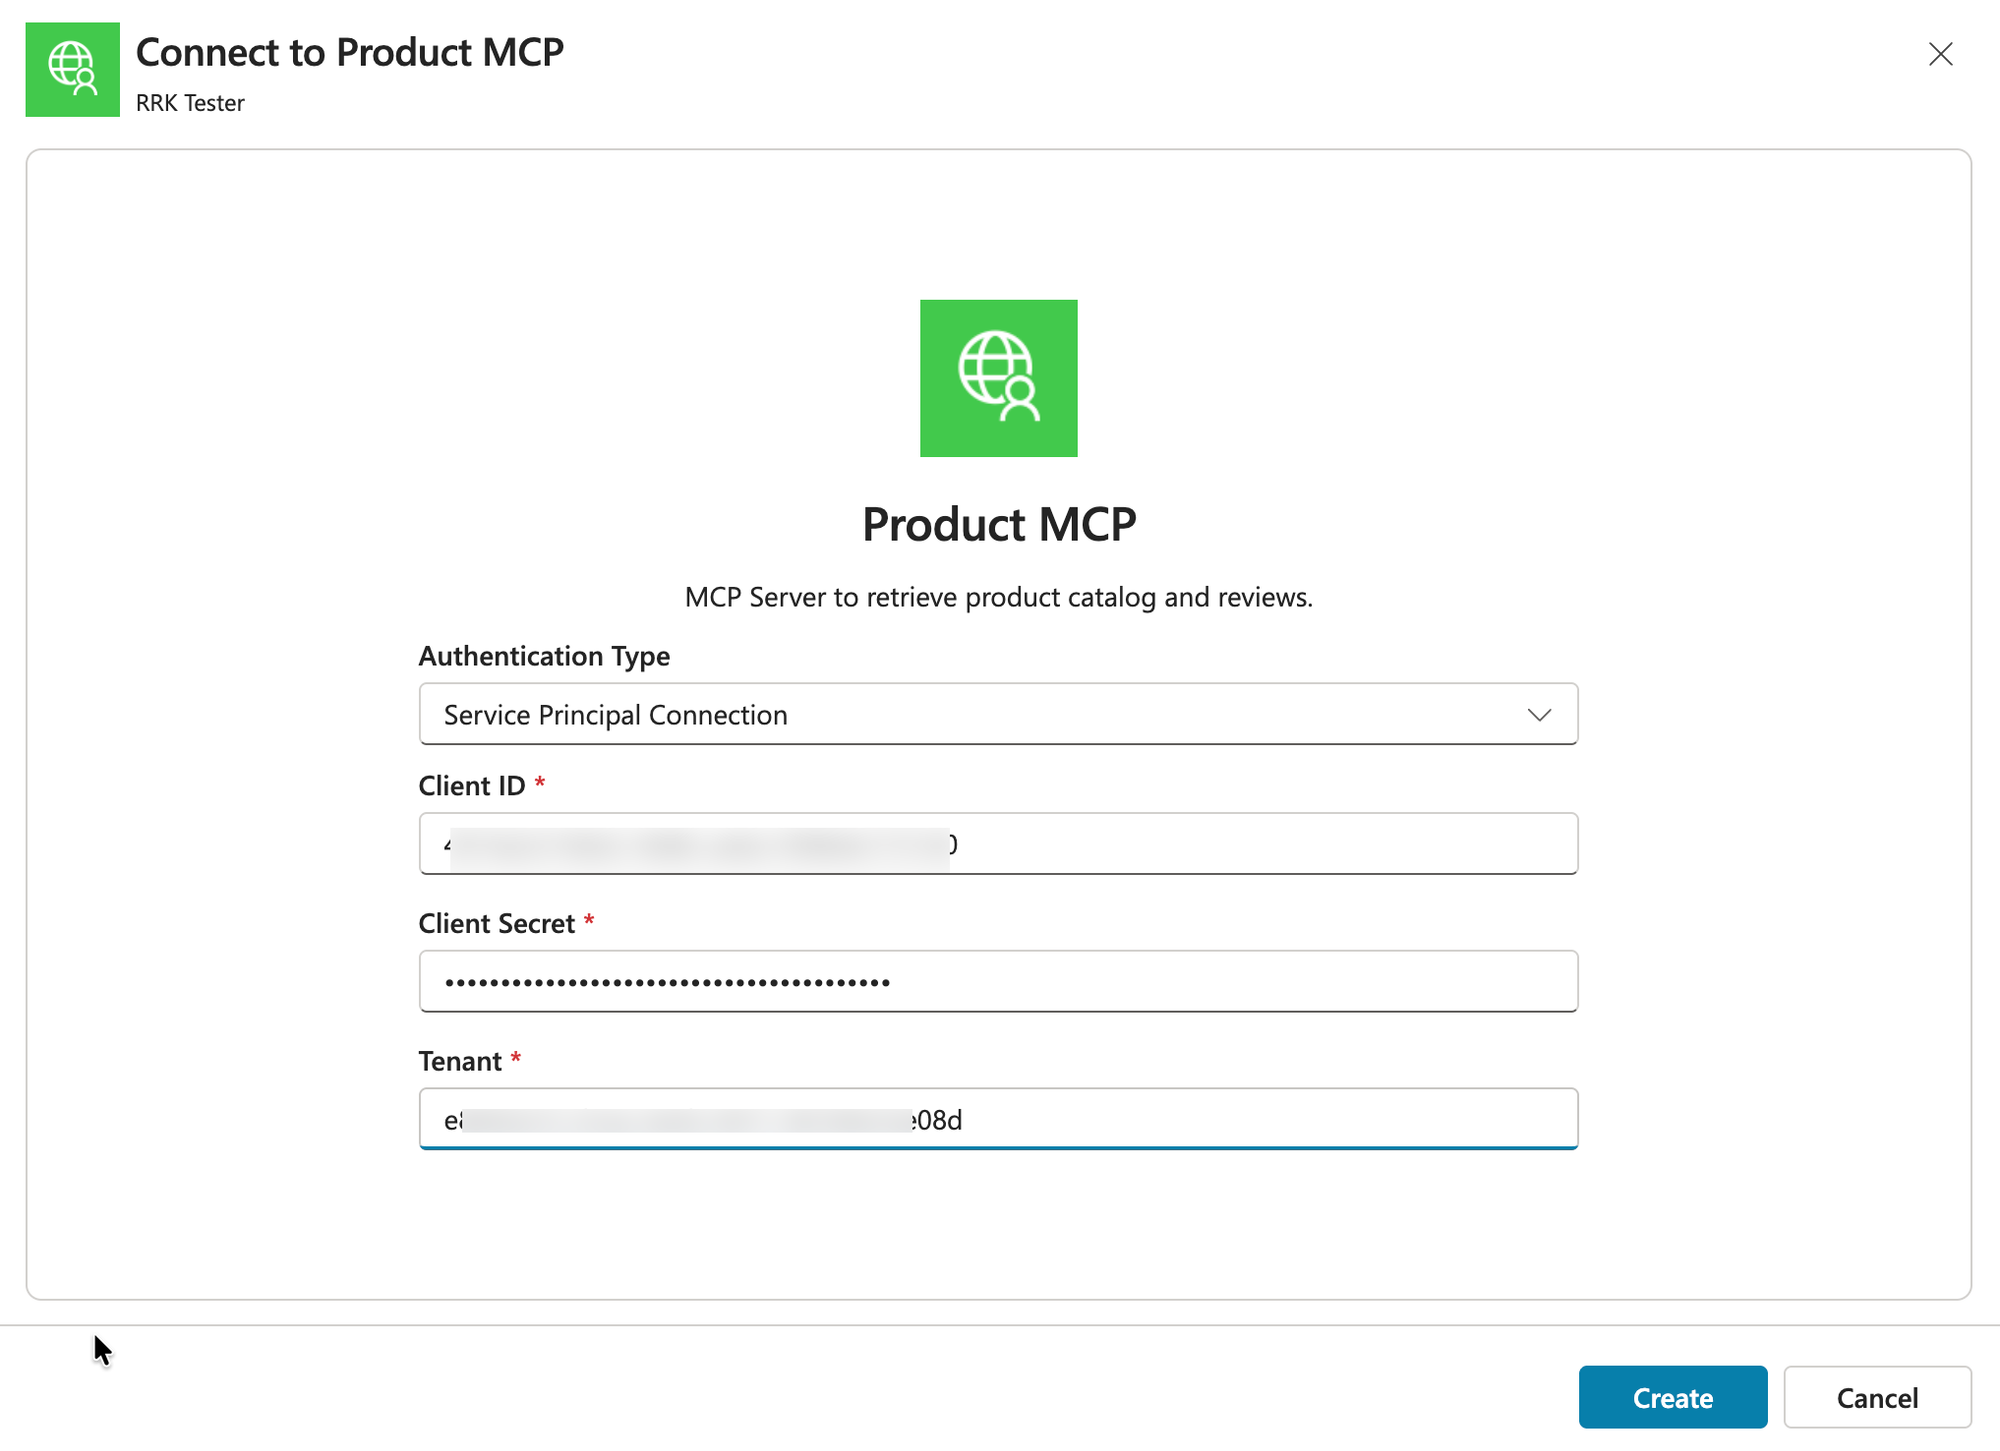
Create a new connection using the Service Principal Connection.
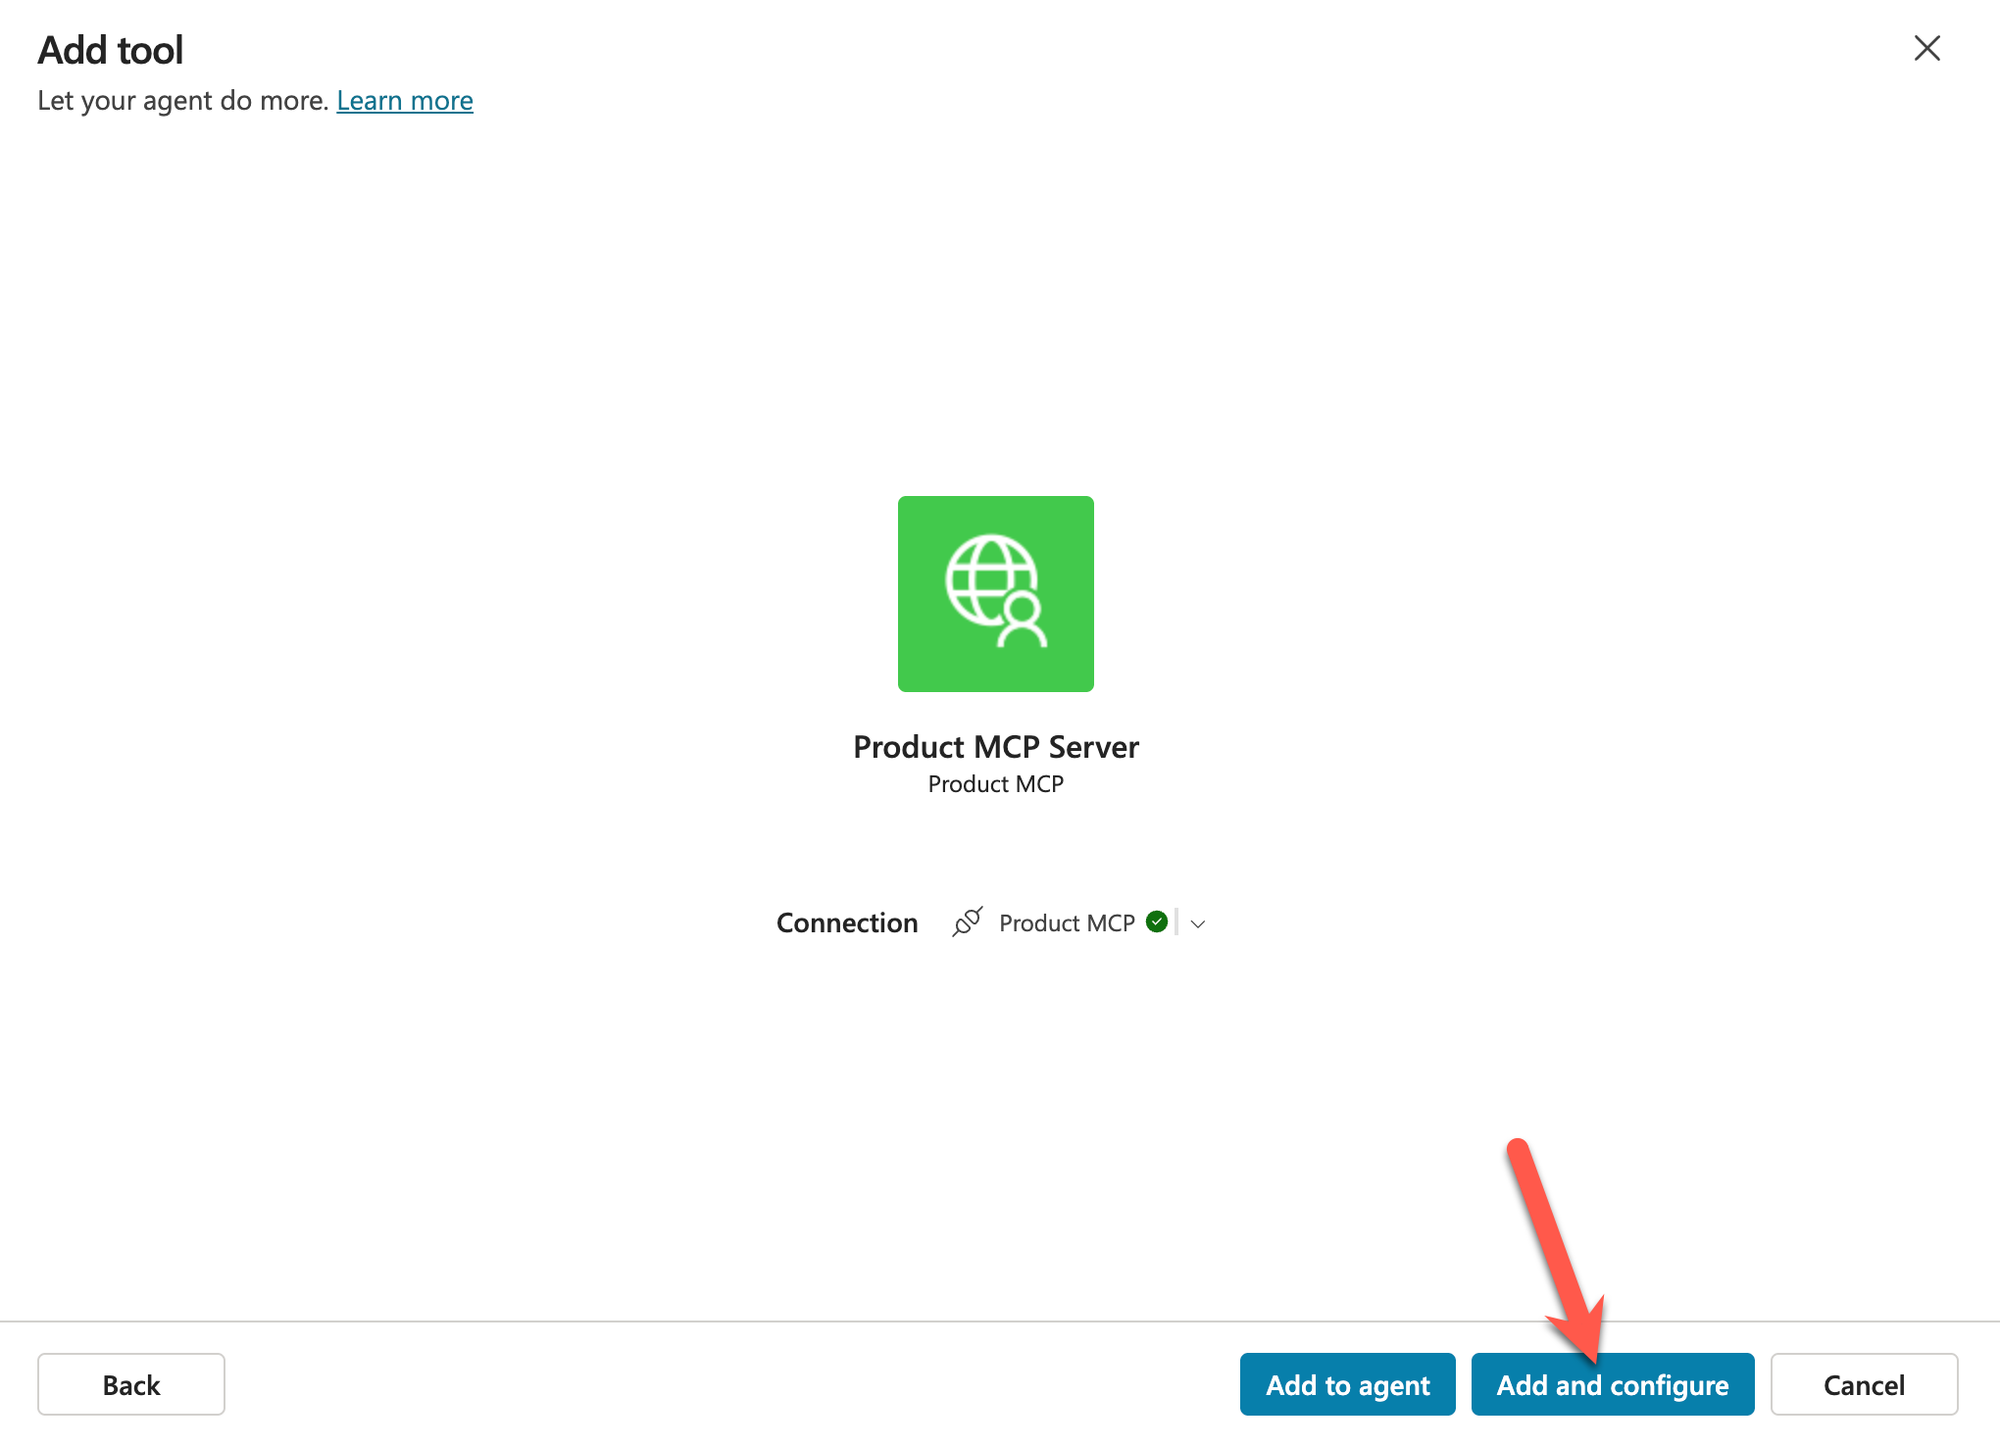
Finally, add the tool to the agent.
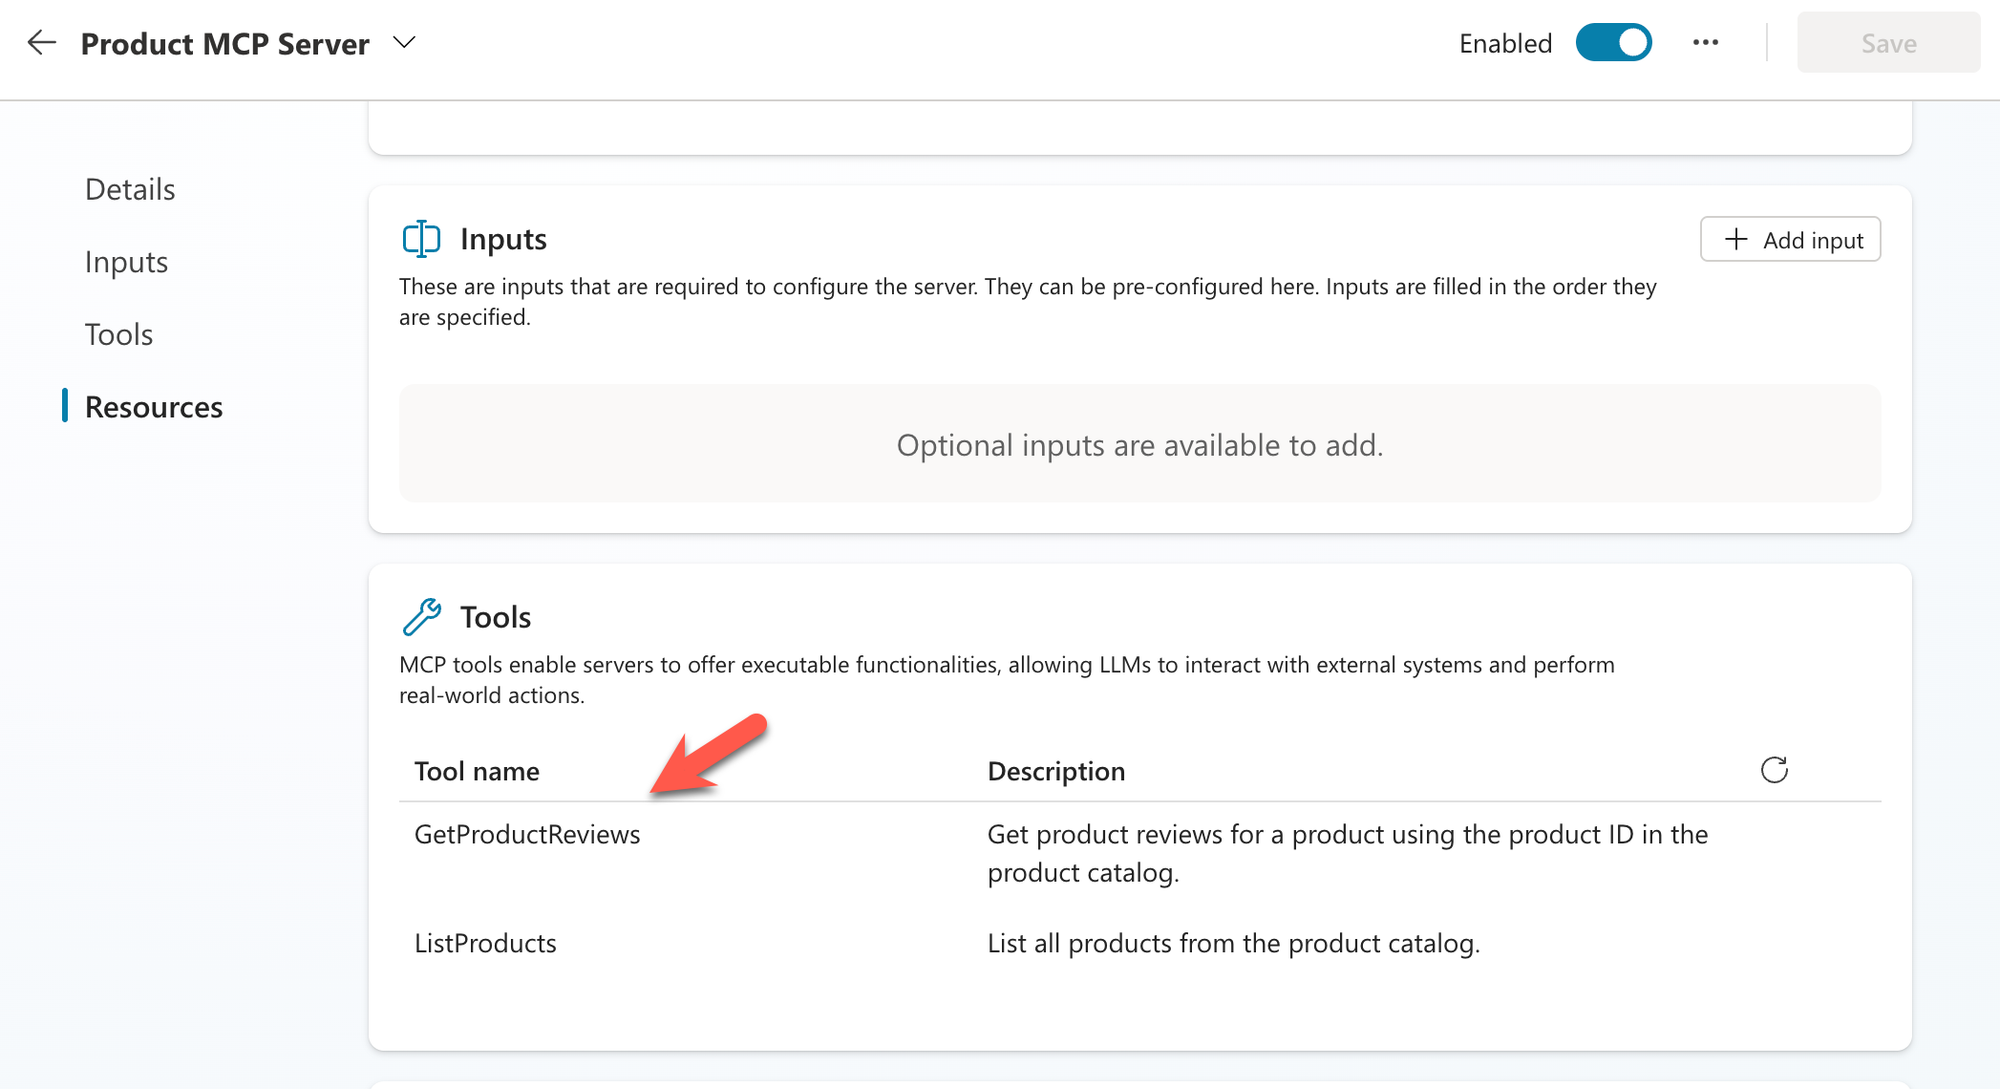
If we scroll down, we should see our Tools. At this point, our MCP Server is ready for use.
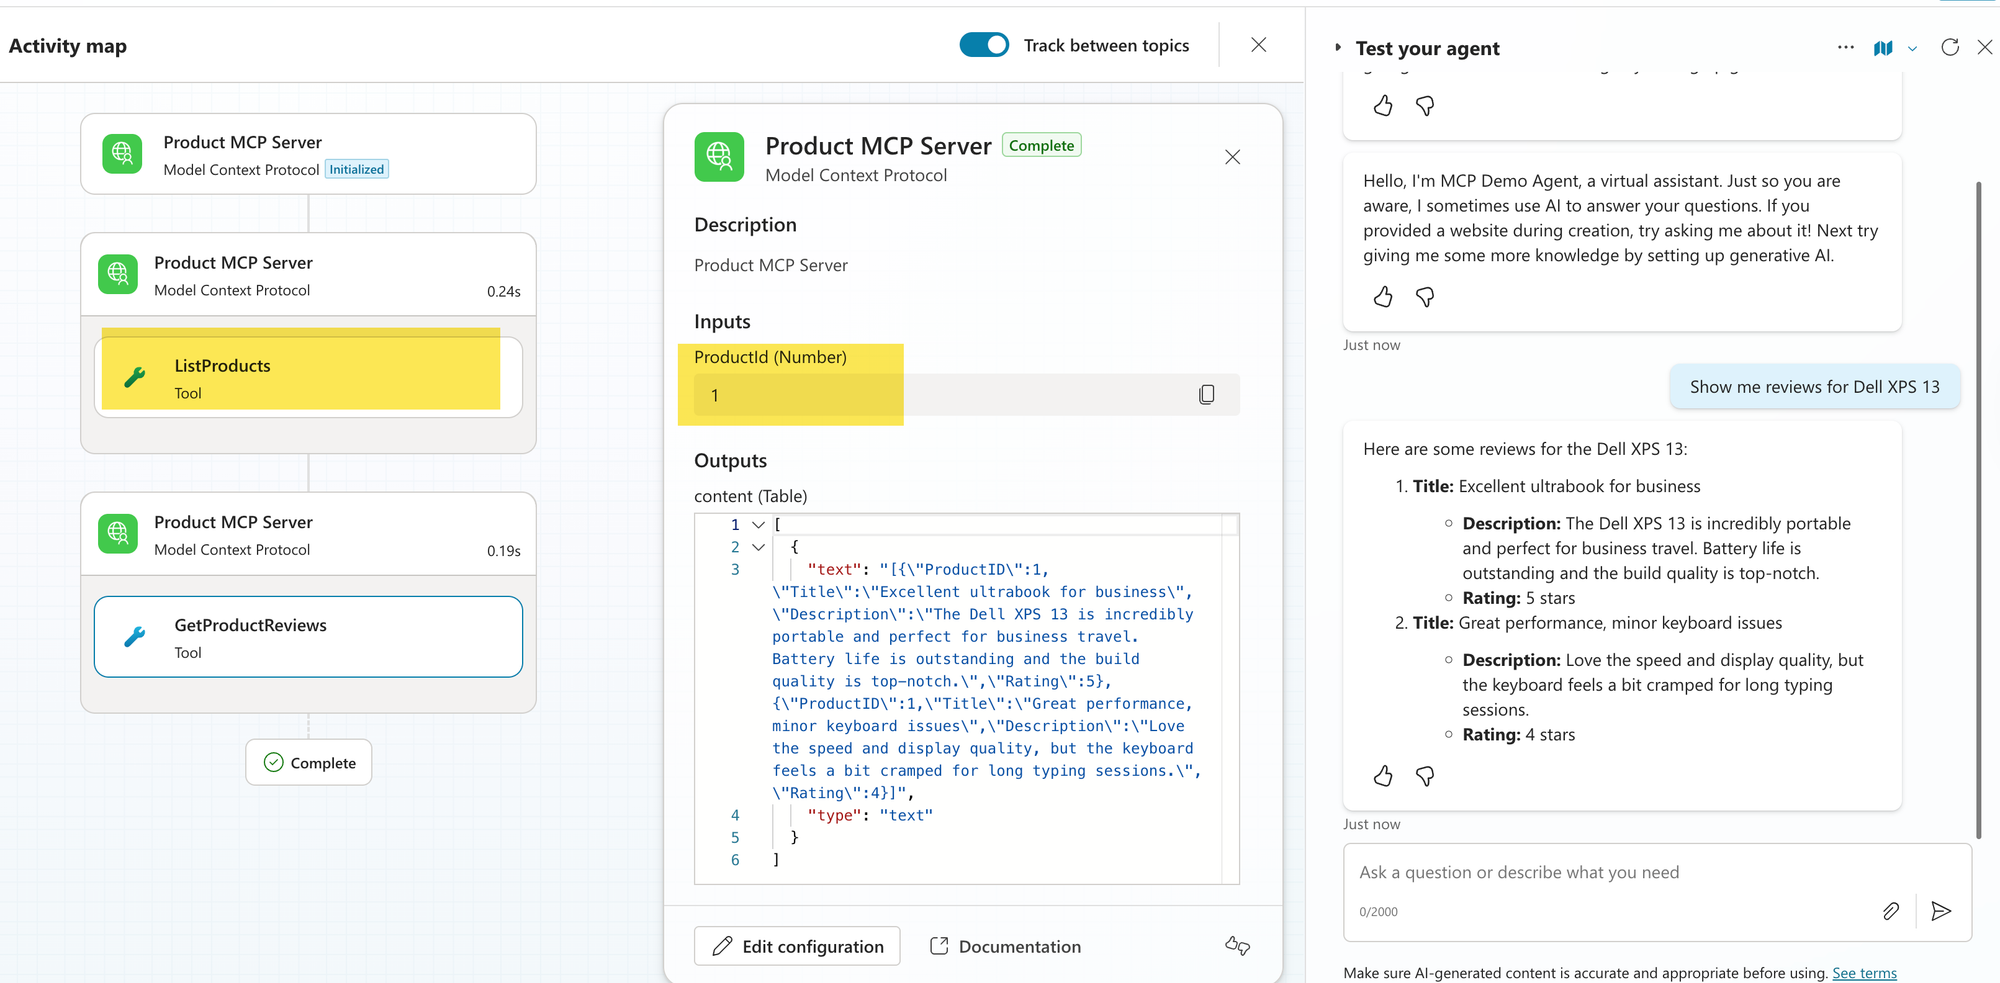
Testing the MCP Server in Copilot Studio
If you are still here, thank you and congratulations! You finally made it to the most exciting part: testing the MCP server. Start asking the agent some questions, and it should start responding with product-related queries.
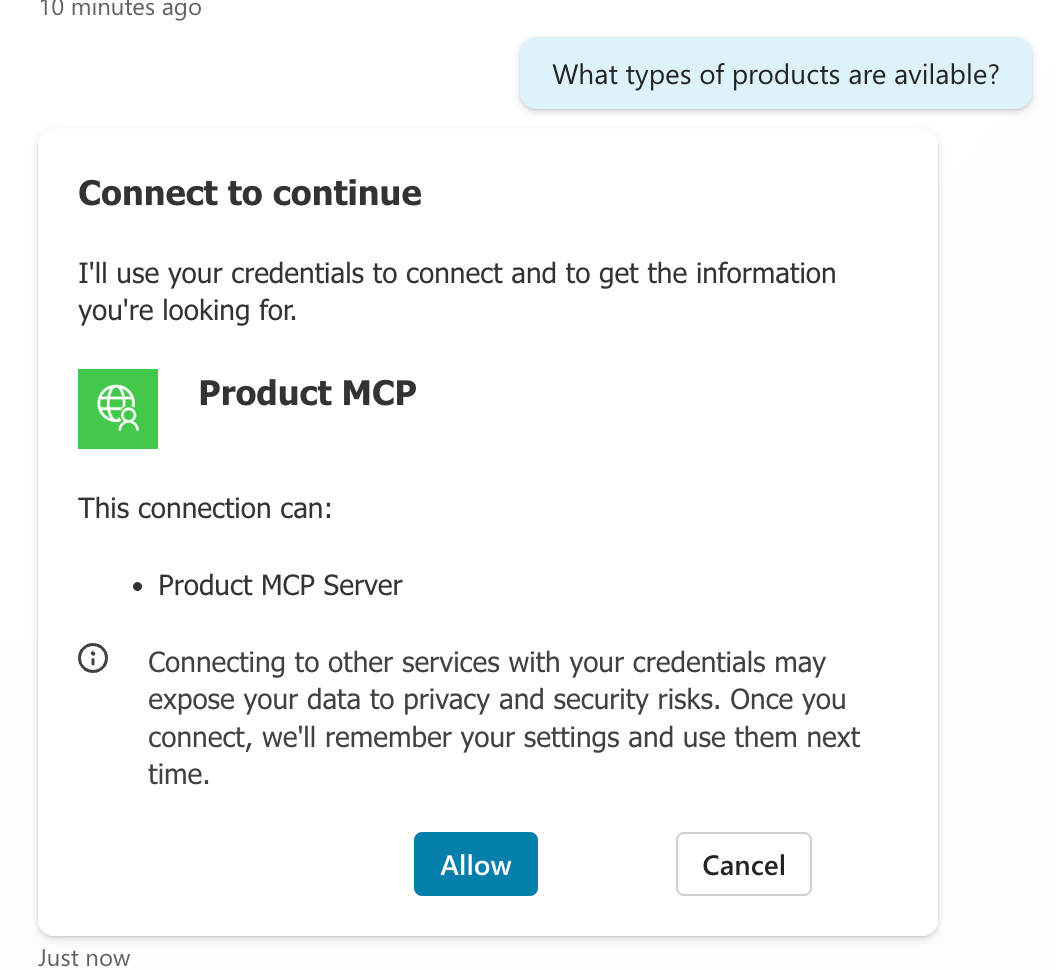
The first time you connect, it will ask for permission.
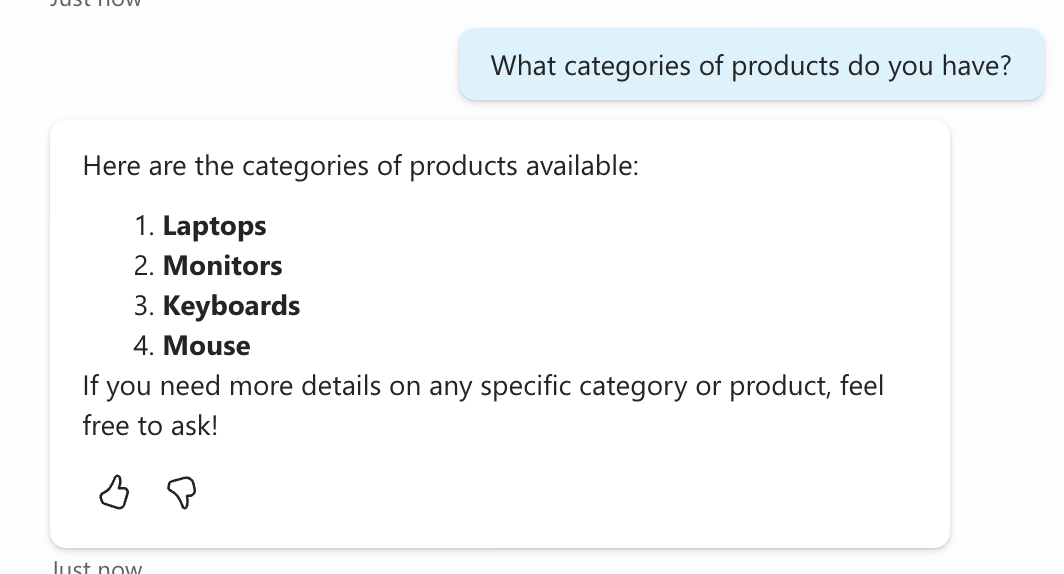
Product Categories
Question about laptops
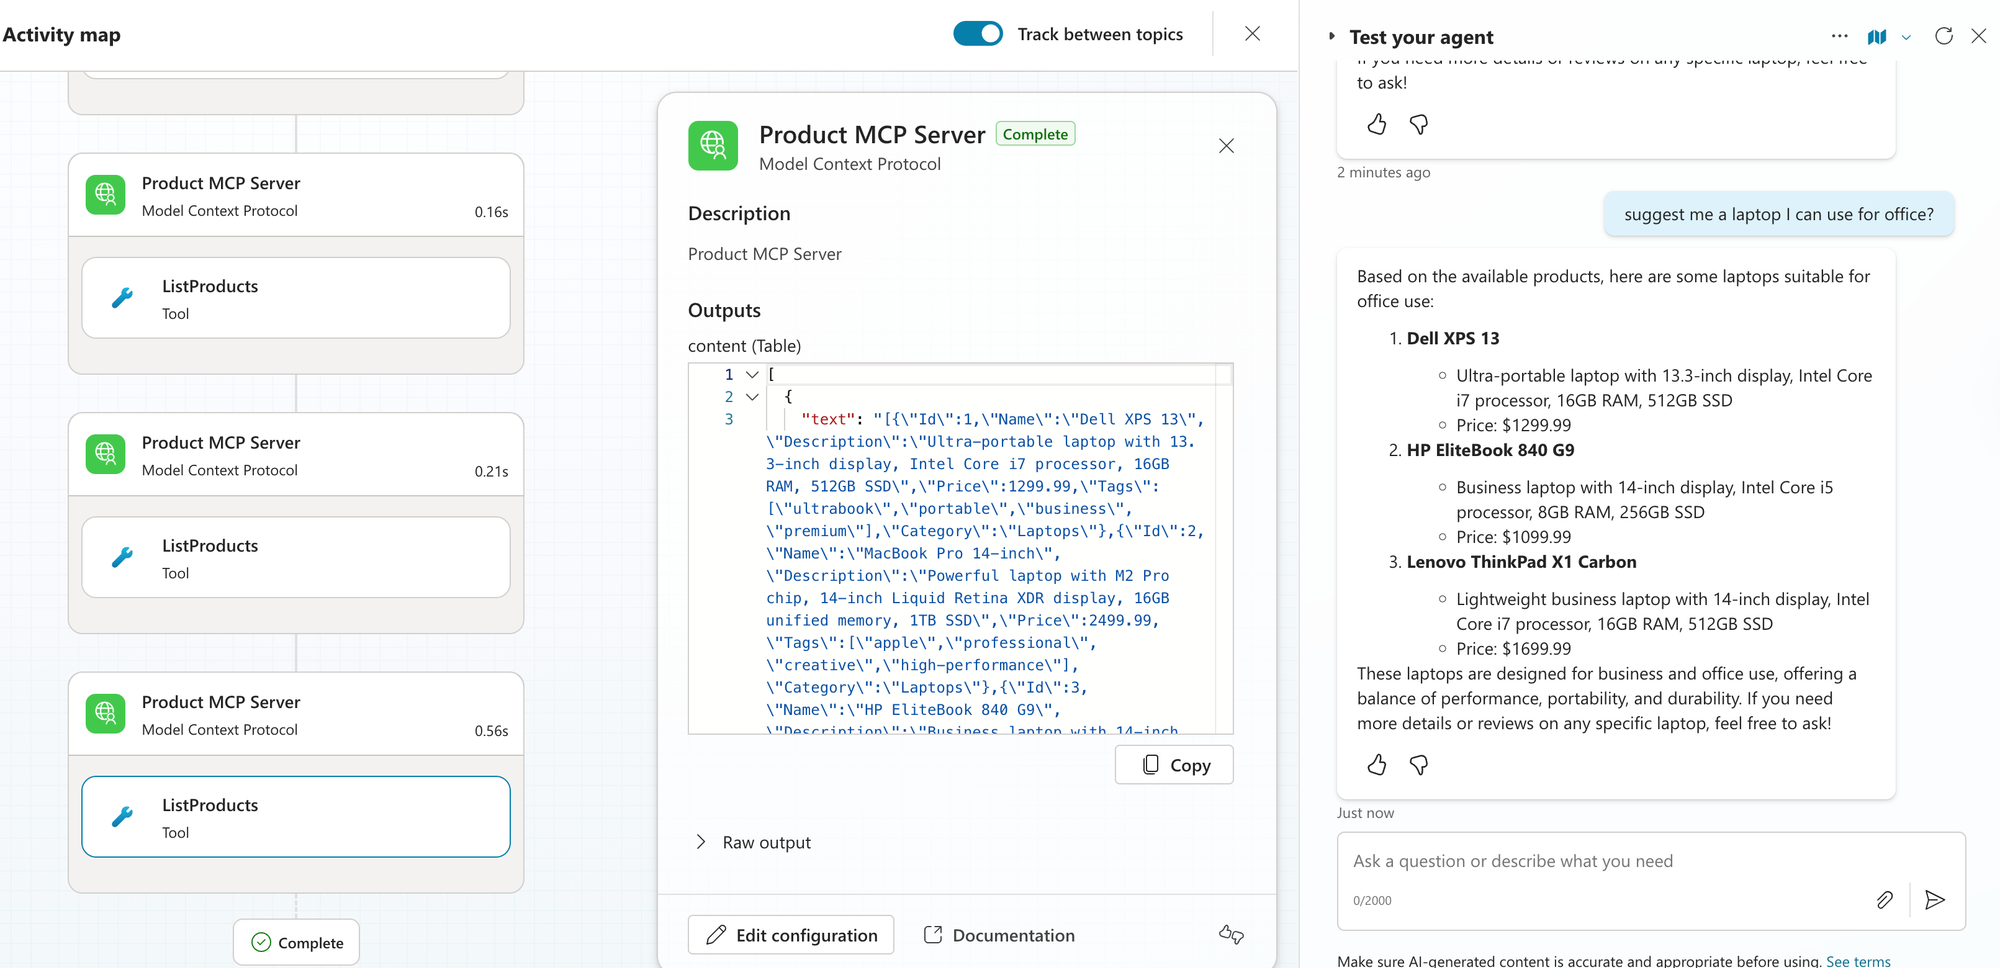
that it did not automatically determine
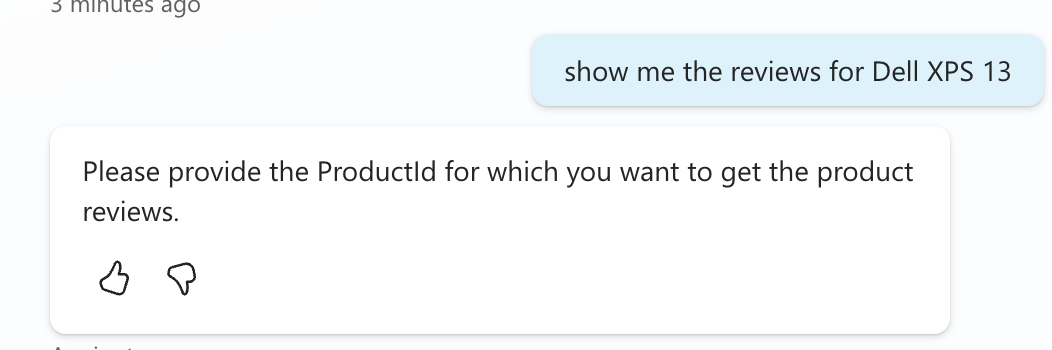
Question about product reviews
Notice that it did not automatically determine the Product ID to use.
We need to provide instructions on the tool to help the agent find the Product ID.

Now, if we try to ask the same question, notice how it follows the instructions and identifies the ProductId.
We could keep going on, but you get the idea.
When Is It Good to Use MCP
This is a tricky one, and I will keep it short as I'm still learning. Based on my understanding, here are scenarios where MCP might be an overkill and when it might be a good solution. Feel free to comment on what you think about them.
Scenarios Where it's Overkill
- You're building a simple, one-off integration or proof-of-concept that only needs to connect to a single API or data source.
- Your use case involves just a few straightforward API calls, like fetching weather data or querying a single database table.
- Your needs are unlikely to expand beyond the initial scope, making MCP's client-server architecture unnecessary overhead.
- When you have existing processes that work very well and are deterministic.
Scenarios where it's a good fit
- You need to connect AI to multiple data sources or tools that will be reused across different applications or AI systems.
- You have teams that use different AI applications, such as Claude, VS Code, Cursor, etc., and want a standardized process for integrating with them.
- Reduce development time, maintenance, and complexity when integrating with an AI application or agent.
- For example, imagine you initially exposed an API, with several endpoints, and configured your agent to provide instructions on when to use them. Now, a few months later, you have added more endpoints and need to go back to the applications that use this API to provide additional set of instructions. With MCP, tool discovery is automatic, and LLM can understand when to use these new tools.
- You need your integrations to work across different AI platforms, and MCP's interoperability makes this seamless.
Summary
We talked about MCP servers. We then examined a simple use case to build our MCP Server using Azure Functions, integrate it with Copilot Studio, and run some tests. Finally, we looked at when they would be a good fit.
This opens many doors, making our AI agents very powerful at connecting to diverse data sources and tools while reducing maintenance effort and reuse. What do you think about MCP, and which MCP server will you build?