Open a Copilot Studio Bot in Model Driven App Side Pane with Context

In my previous blog post, I explained how we could leverage global variables to be used as parameters in the URL to pass information to the Copilot bot and provide context to the bot thus improving the user experience.
In this post, I will expand on that and show how to open the Copilot bot in a Side Pane in the Model-driven app using a Web Resource.
Overview
Here is an overview of how we will implement this.
- Configuring Web Resource for Copilot
- Configuring Modern Command to Open the Web Resource in Side Pane
- Copilot Configuration
If you would like to skip reading through and just want to look at the complete source code used here, you can find it here.
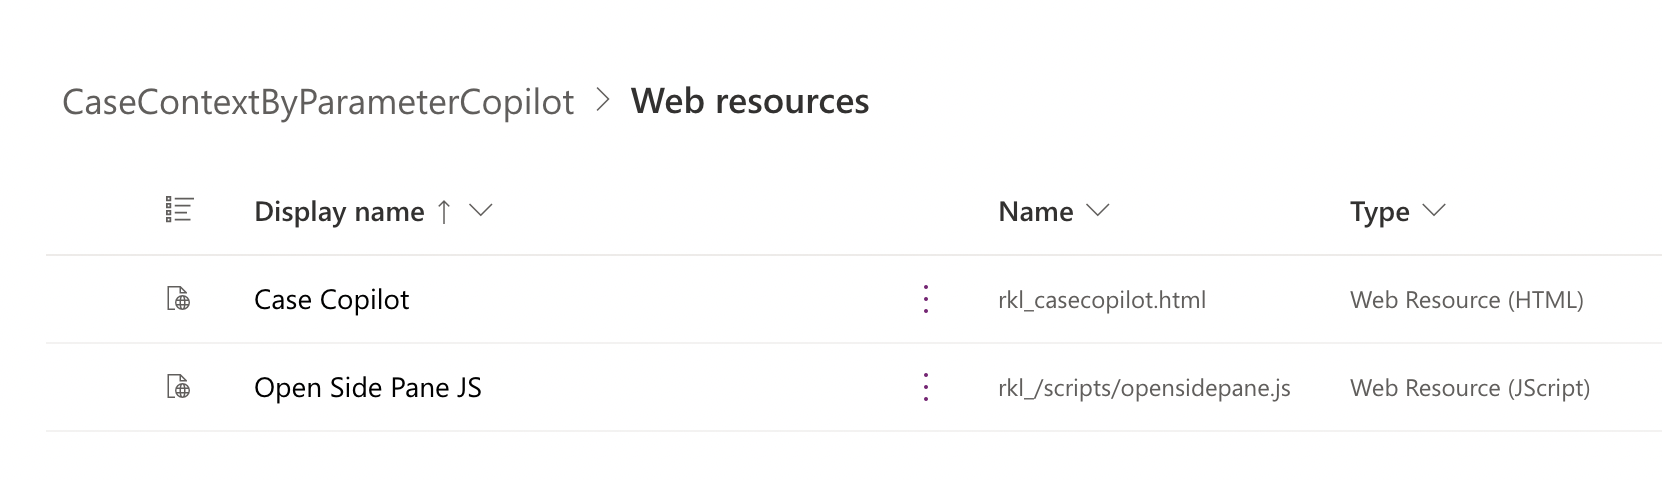
Configuring Web Resource for Copilot
Let's first look at how to configure our Web Resource. This would involve the following steps.
- Passing Record Id of the Case as a Parameter to Web Resource
- Reading the Query Param from the Web Resource URL Query String
- Building the Copilot Bot URL using the Environment Variable
- Rendering the Copilot using iframe.
Passing Record Id as a Parameter to the Web Resource
For Copilot to provide contextual actions on a record we would need access to the record ID. Once we have the ID of the record we want to target we can leverage Power Automate within Copilot to perform the desired actions using the Dataverse connector. We will pass this as a parameter to the HTML web resource in the query string and have Java Script run on the load of the web resource to read the query string and extract the ID.
Let's call this query parameter recordId
Reading the Query Param from the Query String
Our Web Resource is expecting the query parameter data. This query parameter has a value of encoded key-value pairs with the format of recordId={id here}etc.
data=recordId={11c43ee8-b9d3-4e51-b73f-bd9dda66e29c}
But the recordId will be encoded. So, the query string would look like below.
data=recordId%3D%7B11c43ee8-b9d3-4e51-b73f-bd9dda66e29c%7D
Where = is encoded as %3D and { is encoded as %7B and } is encoded as %7D
To extract the value of recordId we will use the below Java Script
  function getQueryParam(param) {
      const urlParams = new URLSearchParams(window.location.search);
      return urlParams.get(param);
  }


  function getDecodedQueryStringParameter(param) {

      const data = getQueryParam('data');

      if (data) {
          const decodedData = decodeURIComponent(data);
          const decodedParams = new URLSearchParams(decodedData);
          return decodedParams.get(param);
      }

      return null;
  }
We will then just call the function to get the recordId
const recordId = getDecodedQueryStringParameter('recordId').replace("{", "").replace("}", "");Building the Copilot Bot URL using the Environment Variable
When a Copilot bot is migrated from the lower environment to the higher environment, the only difference in the URL for the custom website channel of the bot would be the environment ID. We can look at the sample URL from the Channels section in the Copilot Studio as below.
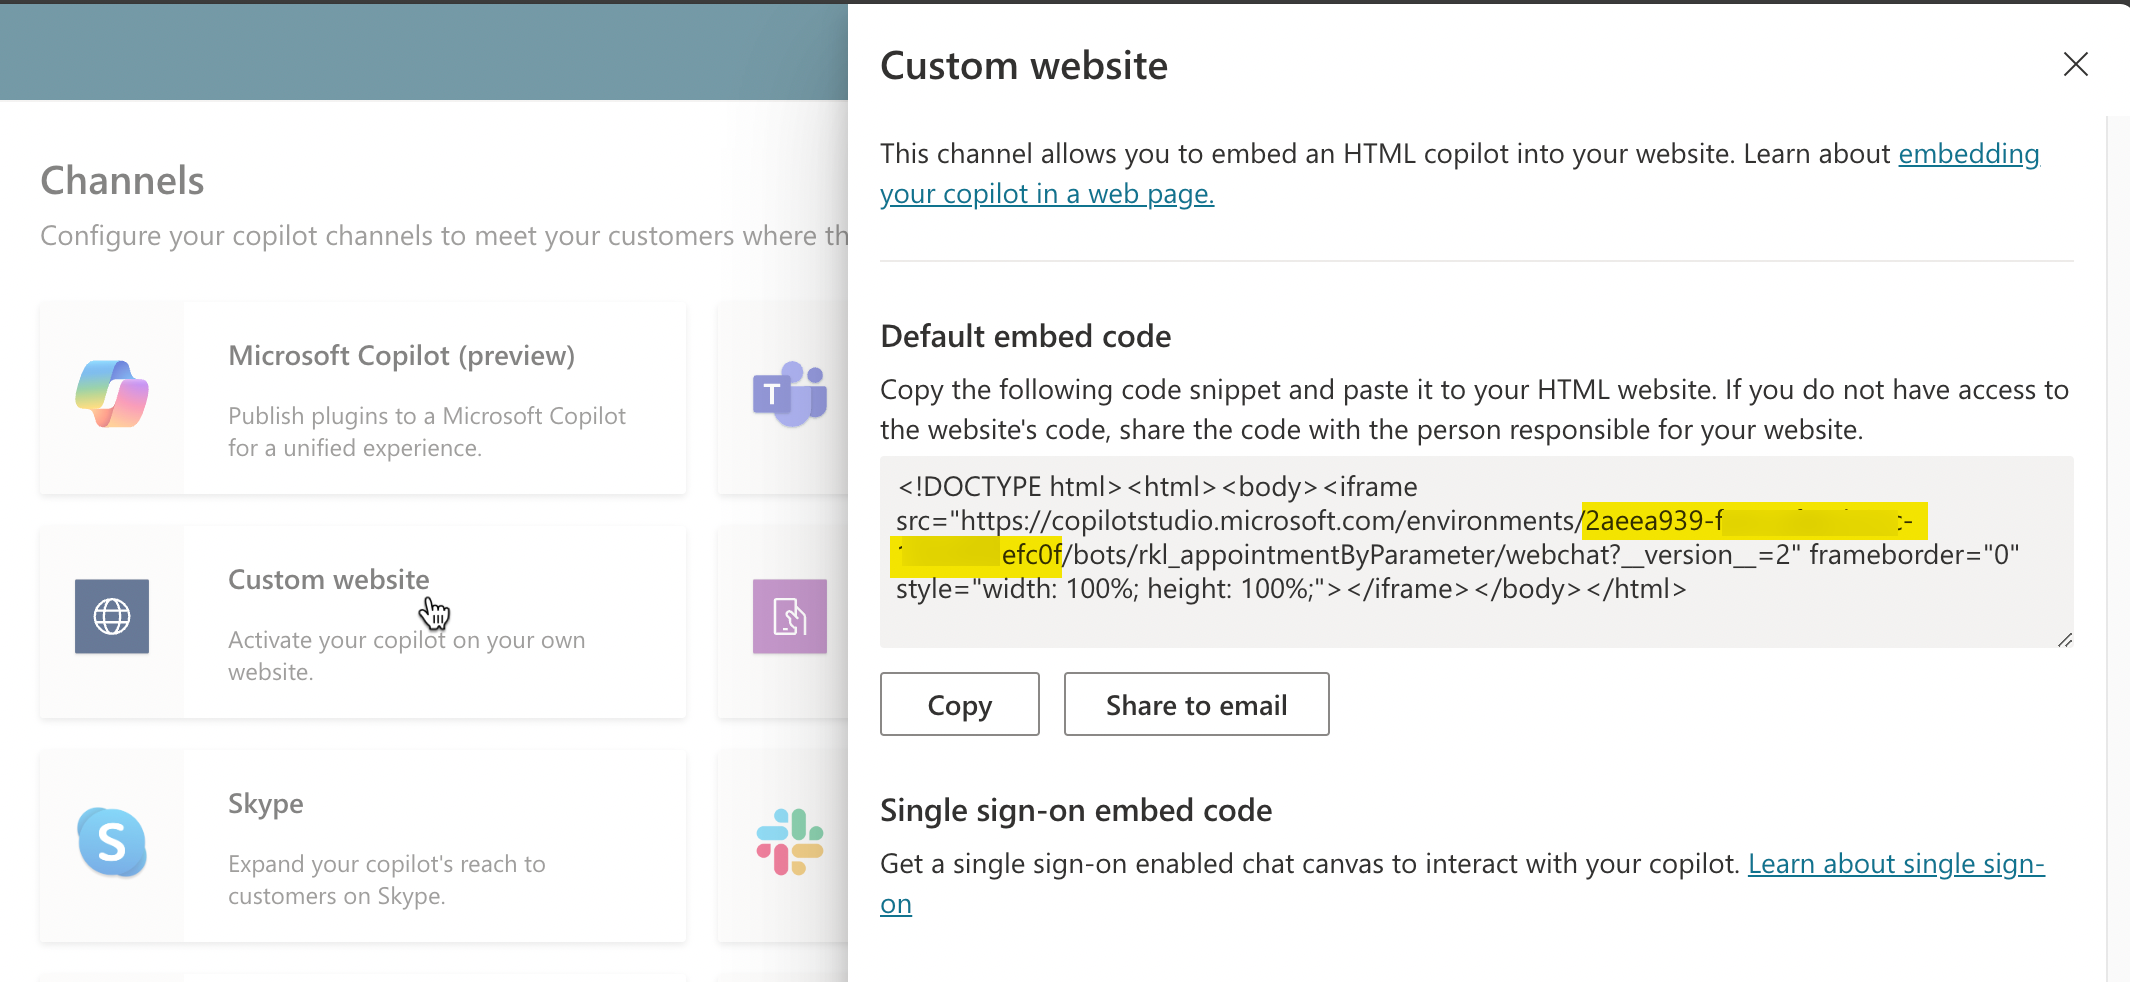
So, if we can get the ID of the current environment in our Web Resource, we would be easily able to build our Copilot URL. Unfortunately, there is no way to get the ID using the client API provided by the model-driven apps. To overcome this limitation, we are going to store the environment ID in the current value of an environment variable as shown below in our solution.

Make sure to remove the current value from the solution when importing to a higher environment after the initial creation. We can then use the Xrm object to access the Xrm.WebApi methods to retrieve the environment ID.
To access the Xrm.WebApi in your Web Resource you need to add a reference to the ClientGlobalContext.js.aspx.
Here is how the code will look like in my instance.
<script src="ClientGlobalContext.js.aspx" type="text/javascript"></script>let result = await Xrm.WebApi.retrieveMultipleRecords("environmentvariablevalue","?$select=value&$expand=EnvironmentVariableDefinitionId($select=schemaname)&$filter=(EnvironmentVariableDefinitionId/schemaname eq 'rkl_EnvironmentId')");
let environmentId = result.entities[0].value;Finally, now that we have both the recordId and the environment ID we can build our Copilot URL
const copilotUrl = `https://copilotstudio.microsoft.com/environments/${environmentId}/bots/rkl_appointmentByParameter/webchat?__version__=2&caseId=${recordId}`Note: Make sure to update the Environment Variable name and the Copilot name to the right values instead of using mine
Rendering the Copilot using iframe
We now have everything we need to render the Copilot in an iframe. Since our Web Resource only shows the Copilot, our HTML will be very minimal and include an iframe element. We will add a little bit of basic styling as well to make sure the Copilot covers the entire space.
<style>
    html,
    body {
        margin: 0;
        padding: 0;
        height: 100%;
        overflow: hidden;
    }

    iframe {
        width: 100%;
        height: 100%;
    }
</style>

<body>
    <iframe id="caseCopilot" frameborder="0" style="width: 100%; height: 100%;"></iframe>
</body>
Finally, let's wrap all our code into a function and trigger it using the DOMContentLoaded event. Since our HTML is very basic, we should be fine with this approach.
document.addEventListener('DOMContentLoaded', function () {
   configureCopilotURL();
});


async function configureCopilotURL() {
  const recordId = getDecodedQueryStringParameter('recordId').replace("{", "").replace("}", "");

  let result = await Xrm.WebApi.retrieveMultipleRecords("environmentvariablevalue",
            "?$select=value&$expand=EnvironmentVariableDefinitionId($select=schemaname)&$filter=(EnvironmentVariableDefinitionId/schemaname eq 'rkl_EnvironmentId')");

  let environmentId = result.entities[0].value;

  const copilotUrl = `https://copilotstudio.microsoft.com/environments/${environmentId}/bots/rkl_appointmentByParameter/webchat?__version__=2&caseId=${recordId}`

  // Set the iframe's src to the URL obtained from the query parameter
  if (copilotUrl) {
    document.getElementById('caseCopilot').src = copilotUrl;
    }
}
Configuring Modern Command to Open the Web Resource in Side Pane
Let's configure our command using the new command designer and trigger a Java Script action. We will be leveraging the new client API Xrm.App.sidePanes to open our Copilot in a side pane.
Configure Java Script Action for Opening Side Pane
Using the documentation, we will just write a generic JS Web Resource that will create a side pane and navigate to our HTML Web Resource that will render the Copilot in an iframe. If the side pane already exists, it will just navigate to the same Web Resource. Refer to the AppSidePane and the navigateTo method for additional details on the API methods and parameters available.
var RRK = RRK || {};
// Add a function to the namespace
RRK.openSidePaneWR = function (paneId, paneTitle, canClosePane, webResourceName, recordId, imageSrc) {


    var pageInput = {
        pageType: "webresource",
        imageSrc:imageSrc,
        webresourceName: webResourceName,
        data: encodeURIComponent(`recordId=${recordId}`)
    };

    var sidePane = Xrm.App.sidePanes.getPane(paneId);
    if (sidePane) {//If the pane is already open, just navigate to the page
        sidePane.navigate(pageInput);
        return;
    }


    var paneOptions = {
        paneId: paneId,
        title: paneTitle,
        canClose: canClosePane
    };

    Xrm.App.sidePanes.createPane(paneOptions).then((pane) => {
        pane.navigate(pageInput);
    });

}
OpenSidePane Method
I have created the JS Web Resource so we can configure this in our modern command next.
Configuring the Command
We will use the Modern Command Designer and add a new modern command that will open our Web Resource. We will target the Case Form for this example as our Copilot is expecting a caseId parameter.
Let's call it Case Copilot and configure the command as shown below.
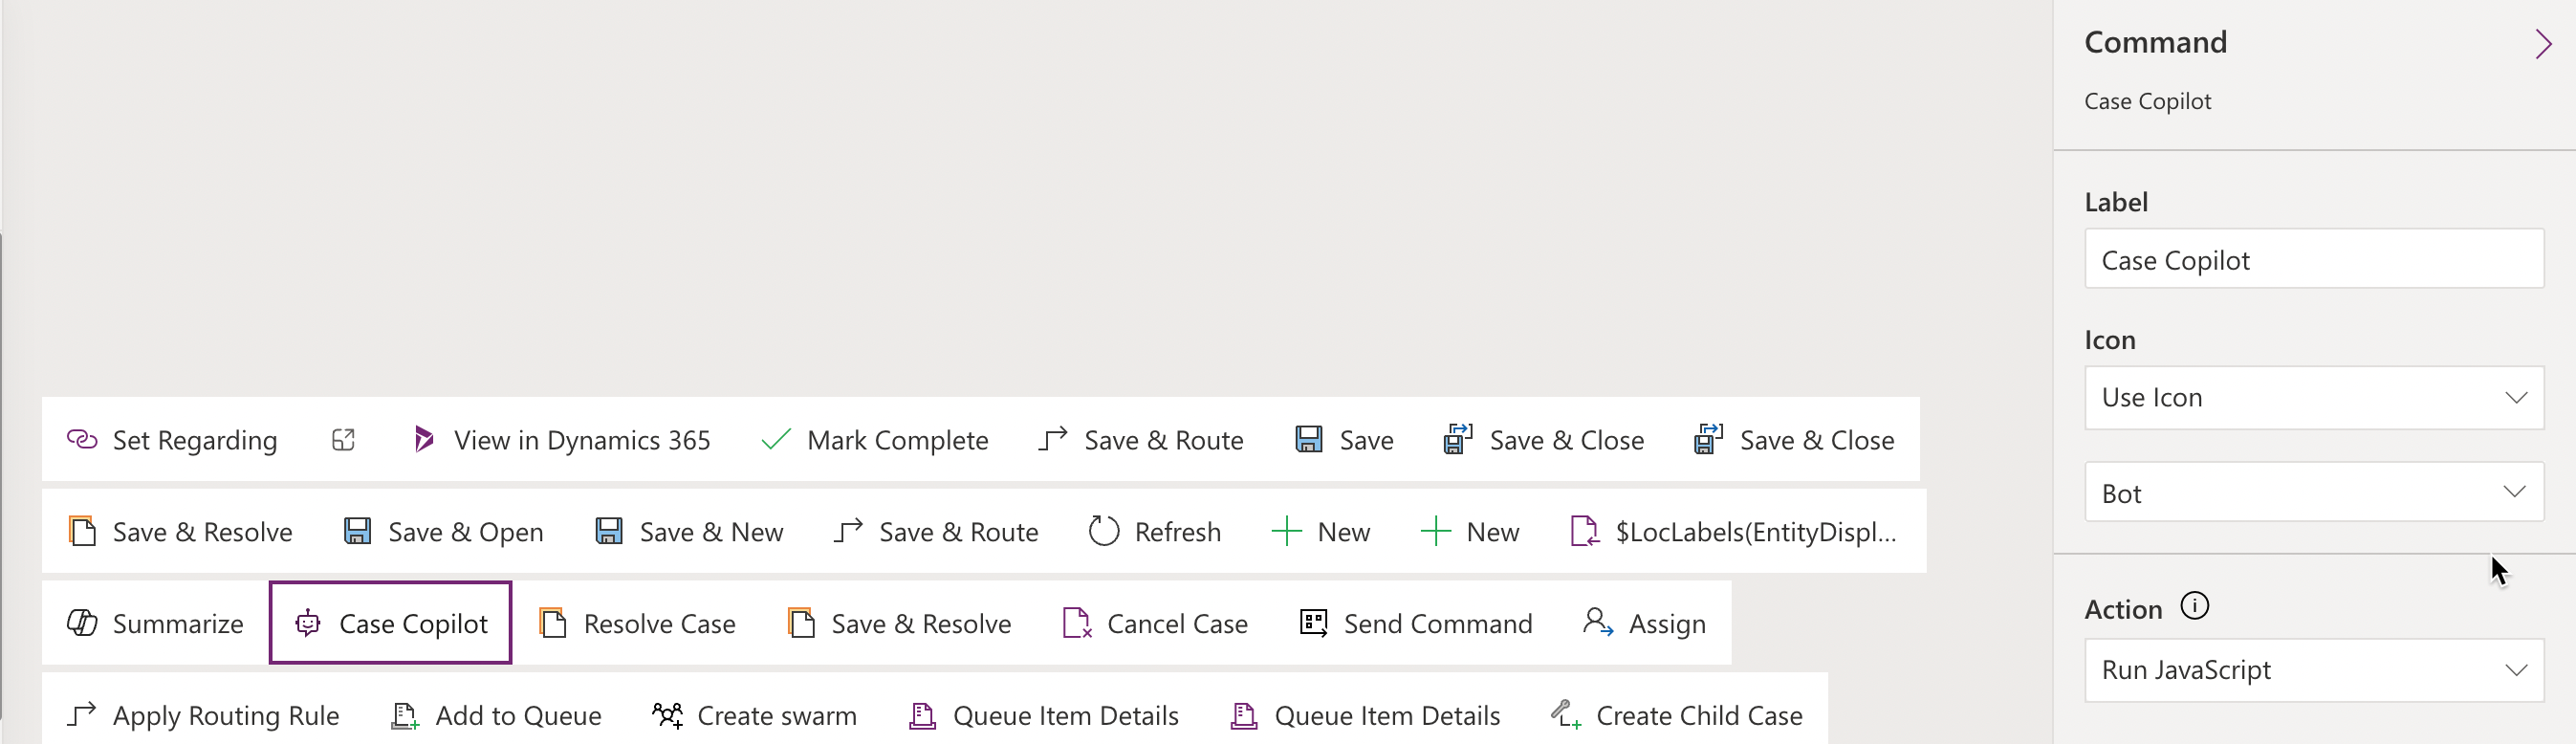
Since our JS function that we previously defined accepts 6 parameters, we are also going to pass the data for these parameters. Notice that for retrieving the ID of the current record we are using the FirstPrimaryItemId as described in the documentation.

Once we publish our app with the command changes, we should now see our Command on the case form.

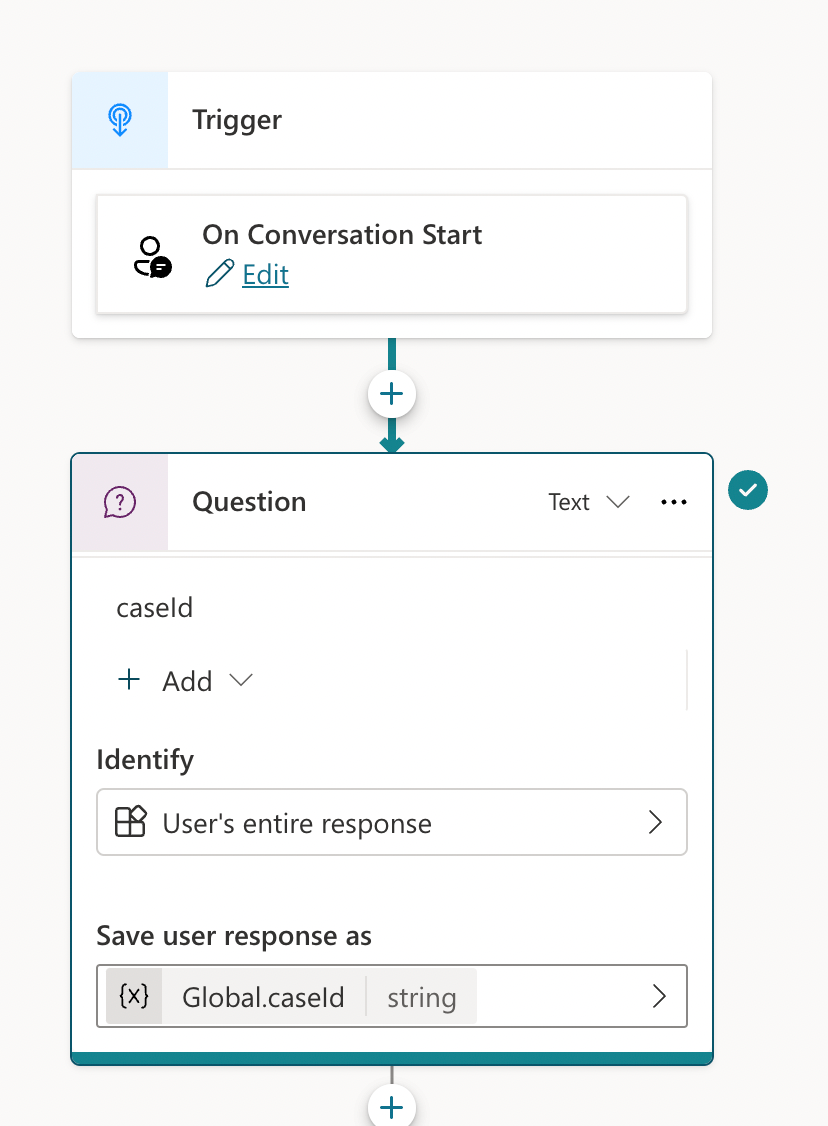
Copilot Configuration
Our Copilot is very straightforward, we have one simple global variable caseId, that we will pass the current case record ID as a parameter to the Copilot. The Copilot then calls a Power Automate flow to get the Case Number and the Customer Name. We are using this as an example here to illustrate how we can leverage contextual actions that we can perform using the case ID and also similarly perform a lot of automation for the user to streamline the process.
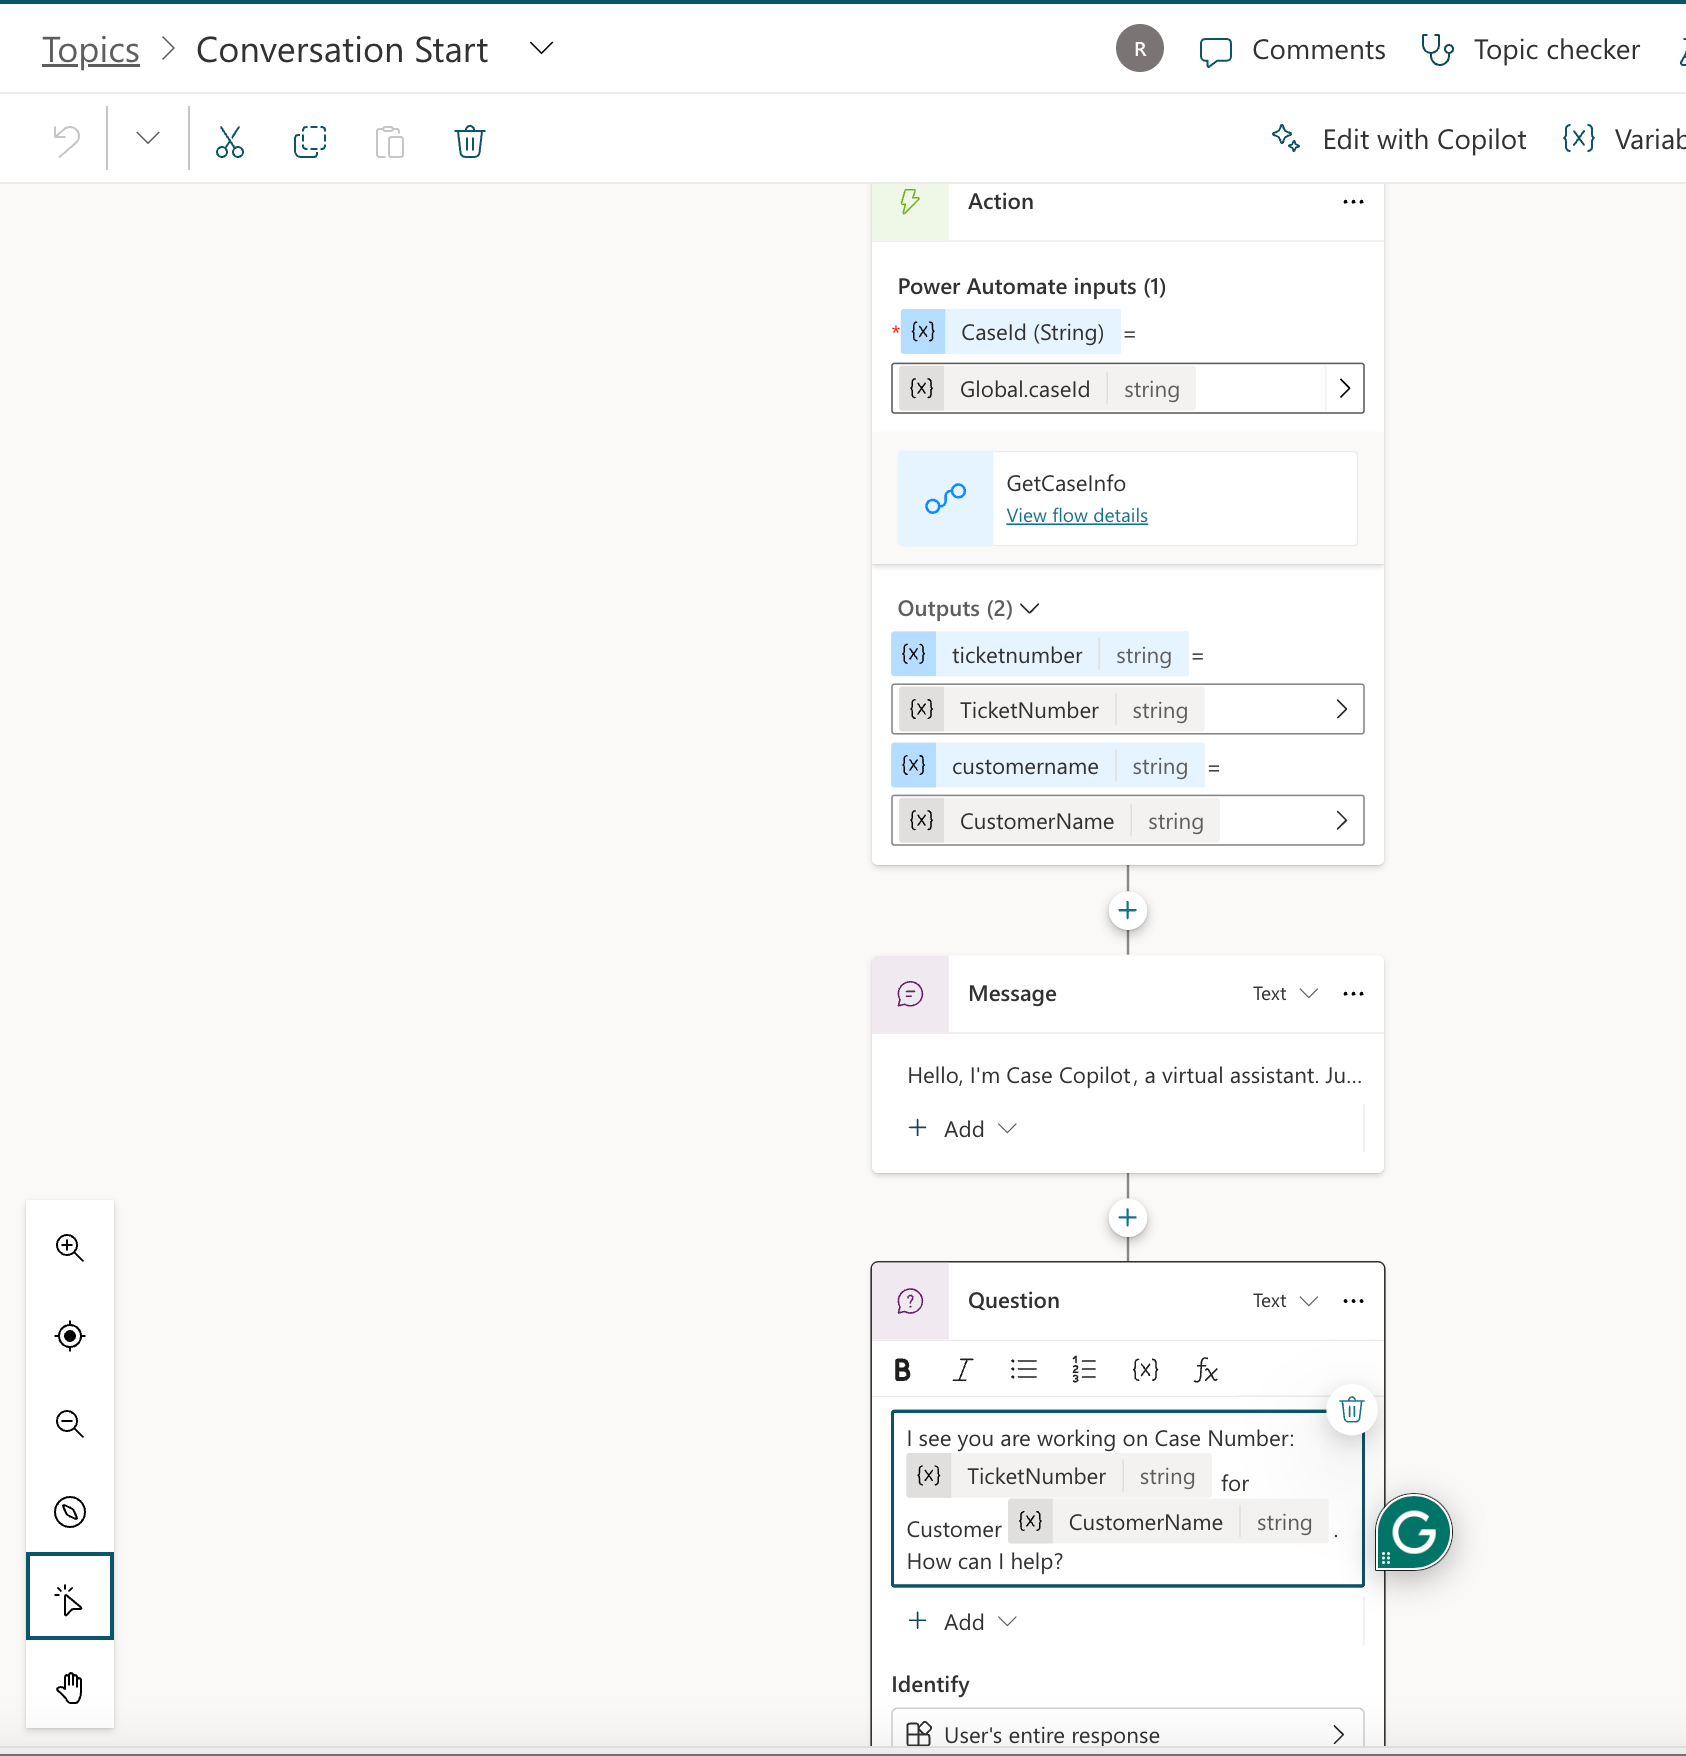
Here is how our Copilot will look in action.
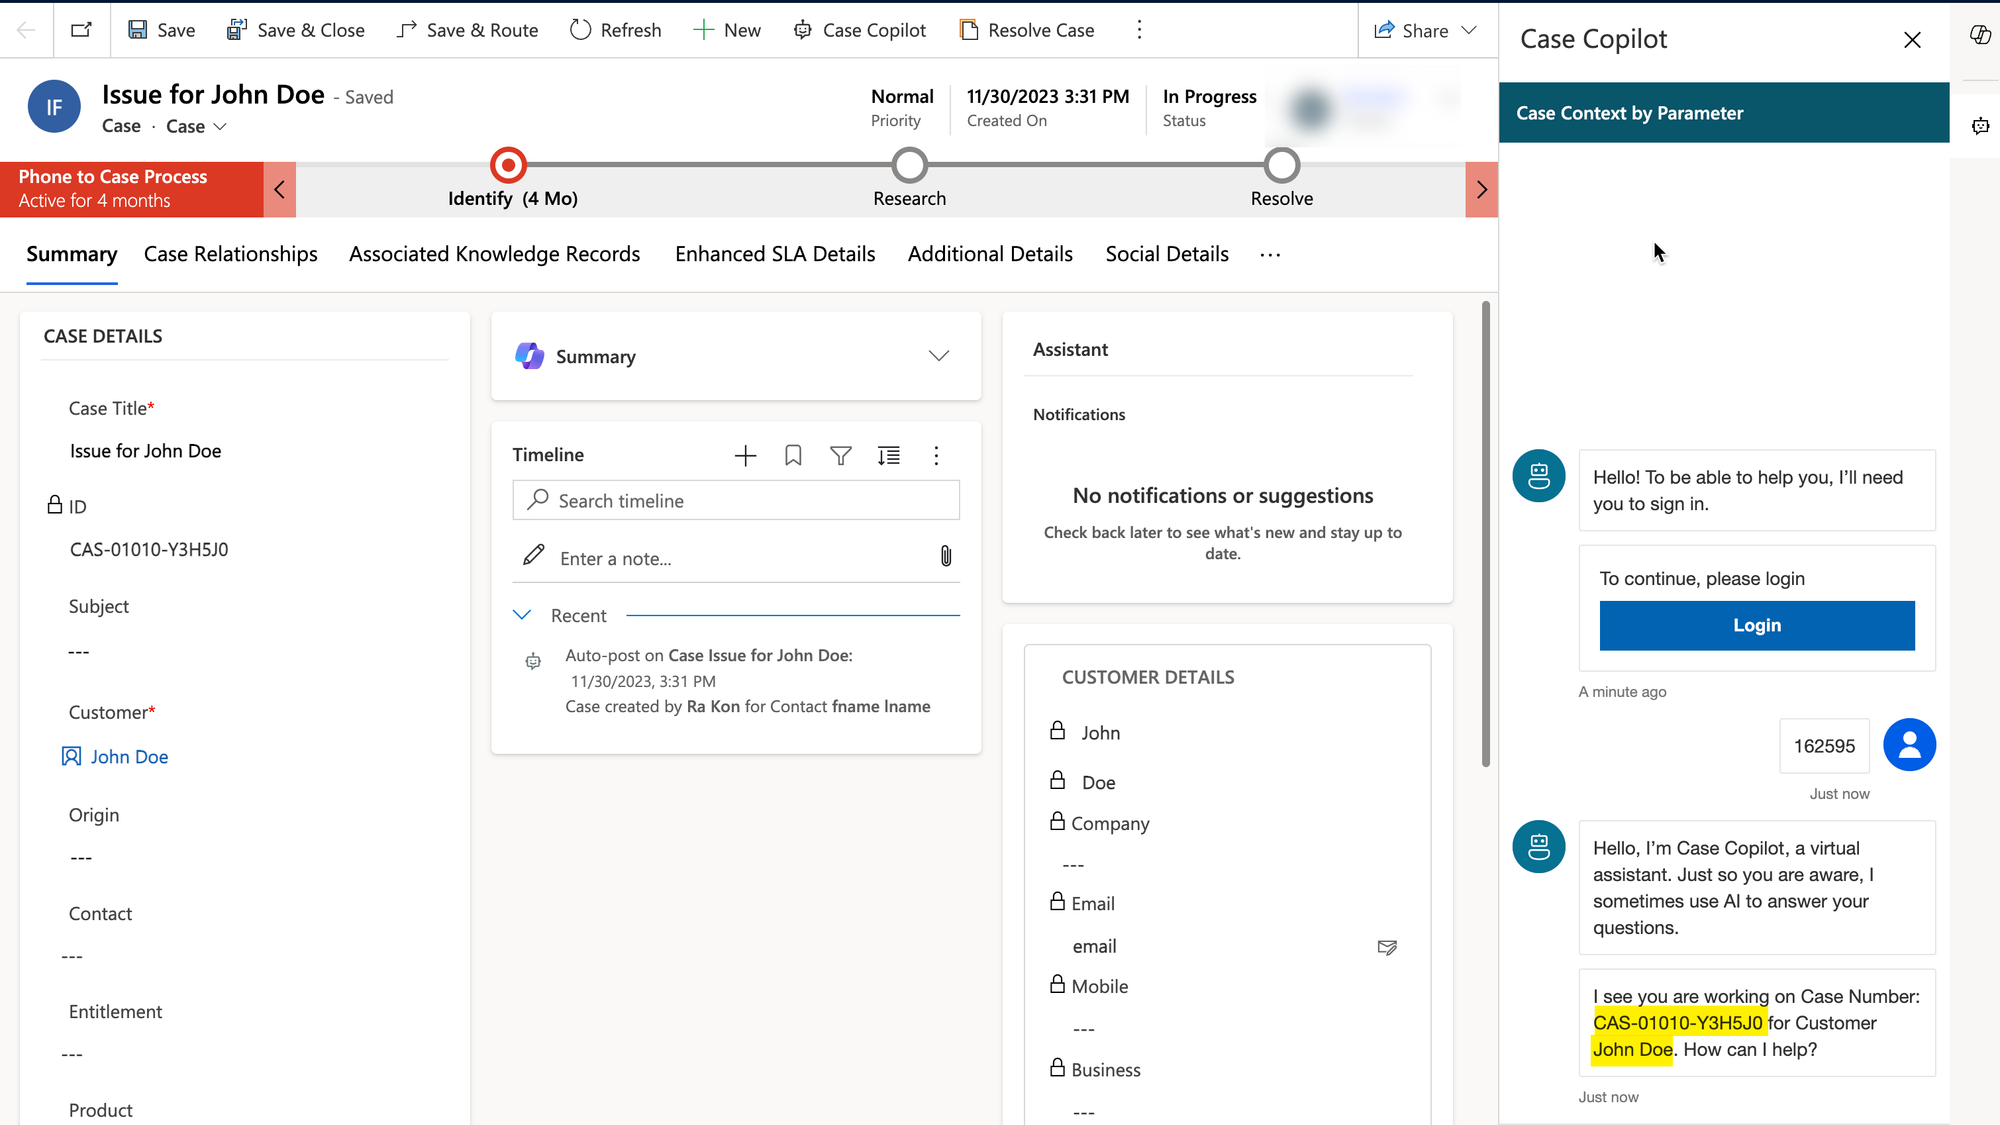
While we haven't performed any useful actions on the Case record itself in this post, we can tweak the Copilot as needed to perform useful actions that meet the needs of our process. For example, updating the case record based on user input.
Copilot is rapidly evolving and while we could use the default Copilot that is provided in the Model Driven app, this approach provides more flexibility. Let me know your thoughts in the comments below.