Building a Retrieval-Augmented Generation (RAG) App with Azure AI Search and Azure OpenAI

Azure AI Search is a cloud-based solution for indexing and querying various data sources and creating comprehensive, high-scale search solutions.
Azure AI Search consists of four main components:
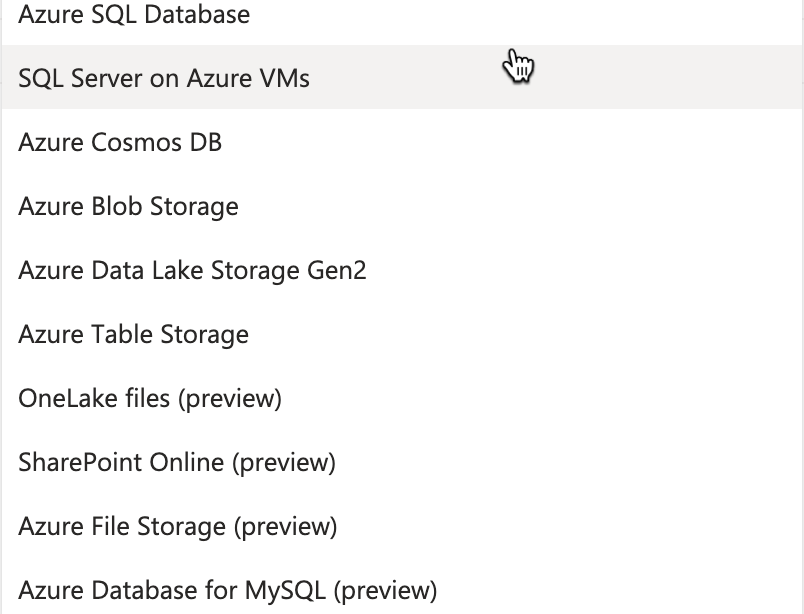
- Data Source: Indicates the data that we want to search. This could include unstructured documents, such as PDFs or Word files, stored in Azure Blob Storage, as well as data from an Azure SQL database, etc. The following sources are supported at the time of this writing; however, we can import data from any other system directly into the index as JSON.
- Skillset: Often, the source data we use might contain certain data elements that are not in the desired state and cannot be used for searching. This data can be enriched through skills to provide content and structure, which can then be mapped to an index for searching. We can add many skills to the skillset and pipe the output of one skill as an input into another.
There are two types of skills:
- Built-in skills: These are provided using Azure AI services and some utility skills. Examples include applying optical character recognition (OCR), language detection, key phrase detection, and entity recognition, among others.
- Custom skills: We can write external code, typically as Azure functions, that can make an HTTP call or a custom Azure machine learning model within the skillset and provide searchable content from the source data.
- Indexer: An indexer is the engine that drives the indexing process in most use cases. It's like the conductor in an orchestra, responsible for mapping the outputs from the skills in the skillset, along with the data and metadata values extracted from the original data source, to fields in the index.
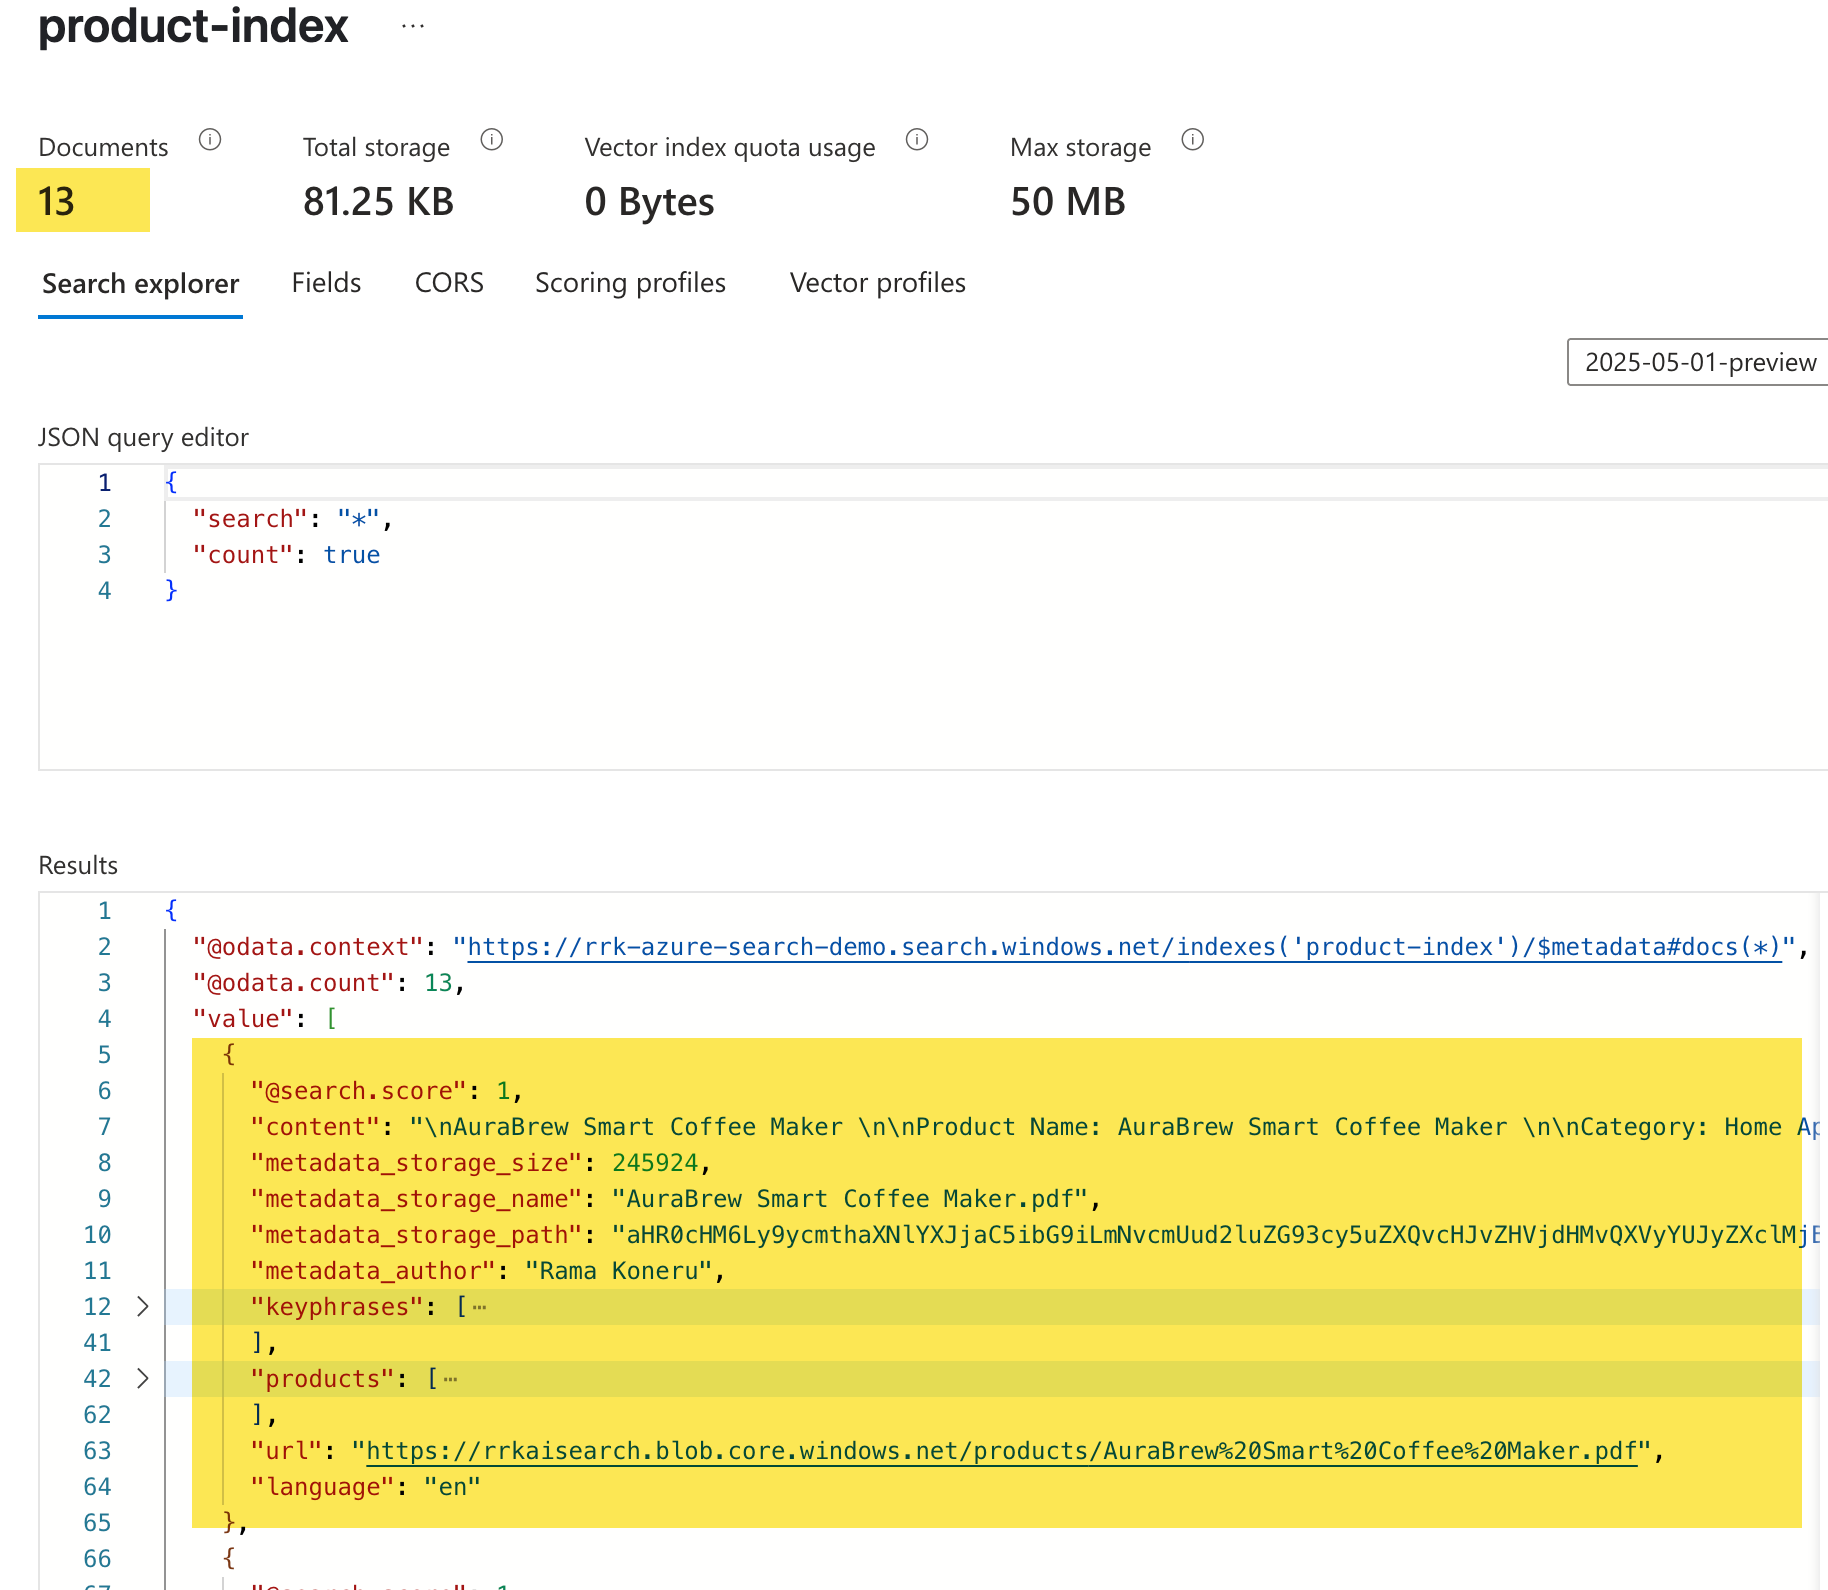
- Index: An index is the final result of the indexing process. It consists of a collection of JSON documents that adhere to a schema we define when creating an index. For example, the index below, product-index, which we will examine shortly, consists of 13 JSON documents where the data is extracted from PDF documents and a few skills are applied. Finally, the indexer is run to generate the collection of JSON documents added to the index. Client applications can then query the index to retrieve, filter, and sort information.
The whole process of loading the data into an index is called indexing. Once the data is available in the index, we can start querying it. Azure AI Search provides different types of querying, but we will use the full text search to keep it simple. We will then leverage a LLM like Azure Open AI to perform natural language queries over the returned data, extracting the data we are interested in.
This blog post explains how to do this using a simple Python application that combines Azure AI Search and Azure OpenAI to enable natural language queries over a set of product documents (PDFs). The solution indexes product documents, enriches them with AI skills, and enables users to ask questions and get answers grounded in the indexed content. Let's look at how to implement this.
Contents
Prerequisites
To follow along it's recommended to have familiarity with the below. However, I tried my best to explain the concepts to provide you an overview of Azure AI search and how we can implement the classic RAG pattern if you just want to follow along.
- An Azure Subscription (with permissions to create resources)
- Azure AI Search resource (Standard tier recommended)
- Azure OpenAI resource (with a deployed chat/completions model)
- Python 3.8+
- PowerShell (for running setup scripts)
- Git (to clone the repository)
- Basic familiarity with the command line
Indexing
We will examine how to perform indexing and prepare the data for querying using the core components. To follow along, you can provision a simple free search service in Azure. You can create this directly in the Azure portal or if you prefer a PowerShell script you can use this.
Configuring Data Source
We will use some fake product documents generated by AI in the PDF format. You can access these documents on the GitHub repo associated with this blog post, along with other scripts. Below is a sample document; each PDF document follows the same format, accompanied by an image. We will not use the images in the document for the search at this time.

We can upload the documents directly by clicking "Import Data" or by navigating to "Data Sources" and following the steps. I have used Azure blob storage for storing the documents.

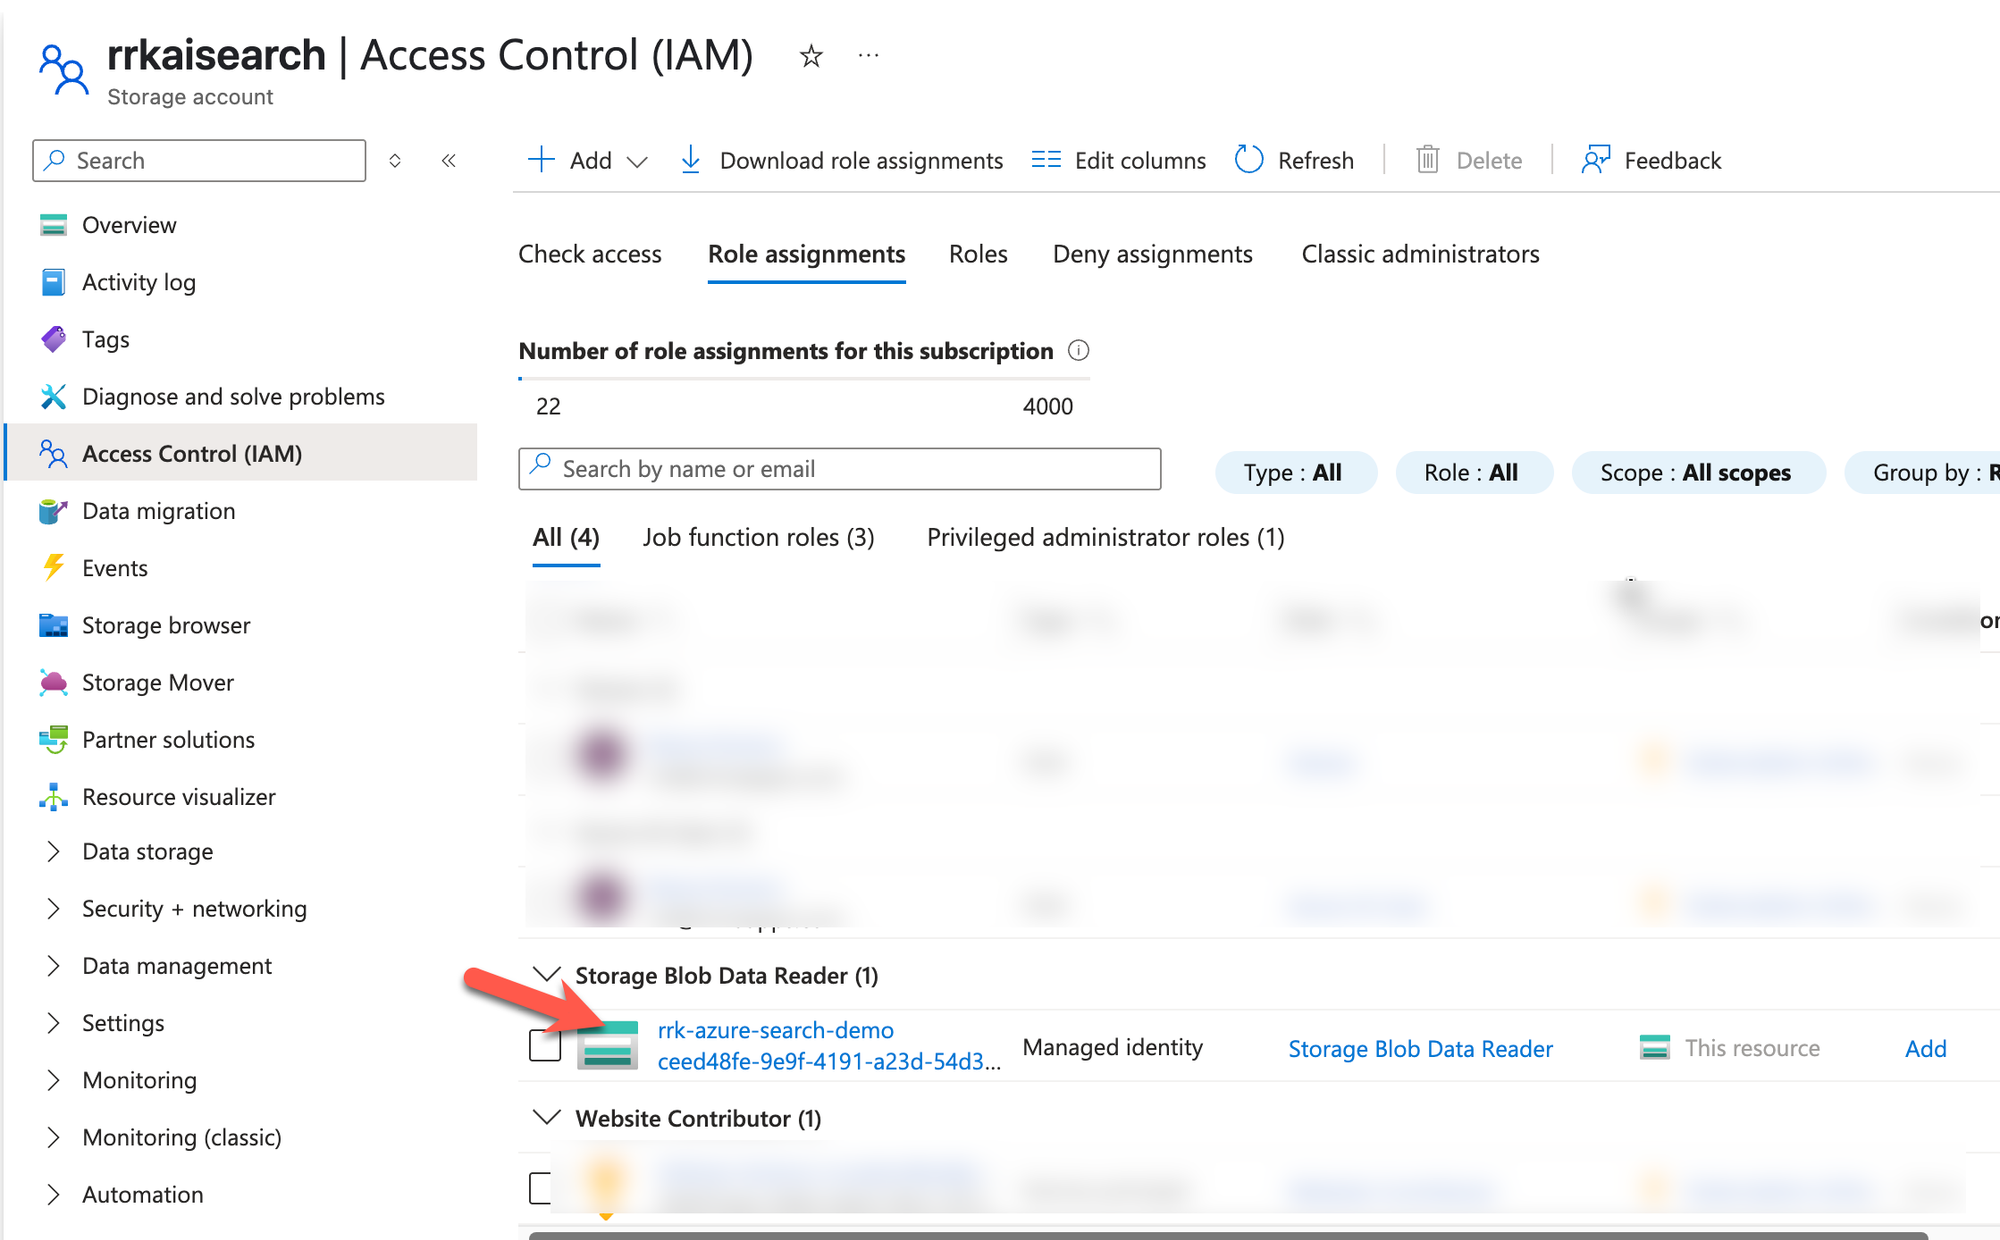
I have configured the search service to use managed identity authentication. This will create a role assignment, as shown below, on the Azure storage account that contains the PDF documents.
Defining the Index
Now that we have our documents, the next step would be to create the index. Think of an index like a schema that defines the contents of a JSON document that contains a collection of records. It's also similar to creating a Table in a traditional SQL database, which describes the schema of the columns that each row could have. There are many properties we could define on the index, you can refer to them in the documentation
Our index uses the following fields:
- content: stores the text content extracted from the document
- metadata fields: Metadata fields are available for storing information gathered from data sources and the document itself during the indexing process. In our index, since we use Azure Blob storage, we have metadata related to the document name, the file extension, and other details, which provides information that could be useful to have in our index. Similarly, based on the document format we use, specific content type properties are available as described here.
For PDF, we have the following fields

We use the following metadata fields in our index
- metadata_storage_content_type
- metadata_storage_size
- metadata_storage_last_modified
- metadata_storage_content_md5
- metadata_storage_name
- url and metadata_storage_path
- metadata_storage_file_extension
- metadata_content_type
- metadata_language
- metadata_author
- metadata_creation_date
- skillset fields: These fields map to the targetName field in the outputs section of the skillset configuration. More on this in the next section.
- keyphrases: stores a list of keyphrases extracted using the skillset
- products: stores a list of products detected from the document
- language: language detected from the document
Here is the complete index.json file. You can also refer to the document in the repo here.
{
    "name": "product-index",
    "fields": [
        {
            "name": "content",
            "type": "Edm.String",
            "searchable": true,
            "filterable": false,
            "retrievable": true,
            "sortable": false,
            "facetable": false,
            "key": false,
            "analyzer": "standard.lucene",
            "synonymMaps": []
        },
        {
            "name": "metadata_storage_content_type",
            "type": "Edm.String",
            "searchable": false,
            "filterable": false,
            "retrievable": false,
            "sortable": false,
            "facetable": false,
            "key": false,
            "synonymMaps": []
        },
        {
            "name": "metadata_storage_size",
            "type": "Edm.Int64",
            "searchable": false,
            "filterable": true,
            "retrievable": true,
            "stored": true,
            "sortable": true,
            "facetable": false,
            "key": false,
            "synonymMaps": []
        },
        {
            "name": "metadata_storage_last_modified",
            "type": "Edm.DateTimeOffset",
            "searchable": false,
            "filterable": false,
            "retrievable": false,
            "sortable": false,
            "facetable": false,
            "key": false,
            "synonymMaps": []
        },
        {
            "name": "metadata_storage_content_md5",
            "type": "Edm.String",
            "searchable": false,
            "filterable": false,
            "retrievable": false,
            "stored": true,
            "sortable": false,
            "facetable": false,
            "key": false,
            "synonymMaps": []
        },
        {
            "name": "metadata_storage_name",
            "type": "Edm.String",
            "searchable": true,
            "filterable": true,
            "retrievable": true,
            "stored": true,
            "sortable": true,
            "facetable": false,
            "key": false,
            "synonymMaps": []
        },
        {
            "name": "metadata_storage_path",
            "type": "Edm.String",
            "searchable": false,
            "filterable": false,
            "retrievable": true,
            "sortable": false,
            "facetable": false,
            "key": true,
            "synonymMaps": []
        },
        {
            "name": "metadata_storage_file_extension",
            "type": "Edm.String",
            "searchable": false,
            "filterable": false,
            "retrievable": false,
            "sortable": false,
            "facetable": false,
            "key": false,
            "synonymMaps": []
        },
        {
            "name": "metadata_content_type",
            "type": "Edm.String",
            "searchable": false,
            "filterable": false,
            "retrievable": false,
            "stored": true,
            "sortable": false,
            "facetable": false,
            "key": false,
            "synonymMaps": []
        },
        {
            "name": "metadata_language",
            "type": "Edm.String",
            "searchable": false,
            "filterable": false,
            "retrievable": false,
            "sortable": false,
            "facetable": false,
            "key": false,
            "synonymMaps": []
        },
        {
            "name": "metadata_author",
            "type": "Edm.String",
            "searchable": false,
            "filterable": false,
            "retrievable": true,
            "stored": true,
            "sortable": false,
            "facetable": false,
            "key": false,
            "synonymMaps": []
        },
        {
            "name": "metadata_creation_date",
            "type": "Edm.DateTimeOffset",
            "searchable": false,
            "filterable": false,
            "retrievable": false,
            "sortable": false,
            "facetable": false,
            "key": false,
            "synonymMaps": []
        },
        {
            "name": "keyphrases",
            "type": "Collection(Edm.String)",
            "searchable": true,
            "filterable": false,
            "retrievable": true,
            "sortable": false,
            "facetable": false,
            "key": false,
            "analyzer": "standard.lucene",
            "synonymMaps": []
        },
        {
            "name": "products",
            "type": "Collection(Edm.String)",
            "facetable": false,
            "filterable": true,
            "retrievable": true,
            "searchable": true,
            "analyzer": "standard.lucene",
            "indexAnalyzer": null,
            "searchAnalyzer": null,
            "synonymMaps": [],
            "fields": []
        },
        {
            "name": "url",
            "type": "Edm.String",
            "facetable": false,
            "filterable": true,
            "retrievable": true,
            "searchable": false,
            "sortable": false
        },
        {
            "name": "language",
            "type": "Edm.String",
            "facetable": false,
            "filterable": true,
            "key": false,
            "retrievable": true,
            "searchable": true,
            "sortable": false,
            "analyzer": "standard.lucene",
            "indexAnalyzer": null,
            "searchAnalyzer": null,
            "synonymMaps": [],
            "fields": []
        }
    ]
}
Specifying the Skills in the Skillset
We populate the below fields on the index using the default Azure AI skills.
- keyphrases: Uses the Key Phrase Extraction cognitive skill to extract the key phrases detected in the document content.
- products: extracts the entities identified in the document using the Entity Recognition skill. We use the Product category.
- language: identify the language of the document using the Language detection cognitive skill.
Let's look at some key properties of the skill
context: defines the scope of the operation under each skill . If the context is pointing to a collection, then it's run for each item in the collection. In our case, it occurs only once in the document content.
inputs: are the parameters that the respective skill needs to operate. Think of them as input parameters to a function that returns a response.
outputs: these are new nodes that are added to the enriched document, which eventually map to the fields on the index if a respective matching node is found. The targetName field is not required. However, you can use it to provide unique names if there is already a property on the index with the same name.
Below is the skillset.json document
{
    "name": "product-skillset",
    "description": "Skillset for the product index",
    "skills": [
        {
            "@odata.type": "#Microsoft.Skills.Text.V3.EntityRecognitionSkill",
            "name": "#1",
            "description": null,
            "context": "/document/content",
            "categories": [
                "Product"
            ],
            "defaultLanguageCode": "en",
            "minimumPrecision": null,
            "inputs": [
                {
                    "name": "text",
                    "source": "/document/content"
                },
                {
                    "name": "languageCode",
                    "source": "/document/language"
                }
            ],
            "outputs": [
                {
                    "name": "products",
                    "targetName": "products"
                }
            ]
        },
        {
            "@odata.type": "#Microsoft.Skills.Text.KeyPhraseExtractionSkill",
            "name": "#2",
            "context": "/document/content",
            "defaultLanguageCode": "en",
            "inputs": [
                {
                    "name": "text",
                    "source": "/document/content",
                    "inputs": []
                }
            ],
            "outputs": [
                {
                    "name": "keyPhrases",
                    "targetName": "keyphrases"
                }
            ]
        },
        {
            "@odata.type": "#Microsoft.Skills.Text.LanguageDetectionSkill",
            "name": "#3",
            "description": null,
            "context": "/document",
            "inputs": [
                {
                    "name": "text",
                    "source": "/document/content"
                }
            ],
            "outputs": [
                {
                    "name": "languageCode",
                    "targetName": "language"
                }
            ]
        }
    ]
}
skillset.json
For more information on Skillsets, refer to the documentation.
Indexer
The indexer maps the fields from the data source and the skillsets onto the fields defined in the index.
Let's review some fields in the indexer:
- dataSourceName: Indicates the name of the data source that has a reference to the storage account container that we manually created using the Import data wizard.
- skillsetName: This maps to the name of the skillset as defined in the skillset.json file
- targetIndexName: maps to the name of the index as defined in the index.json file.
- fieldMappings: tells the indexer how to map the source fields from the data source when the names or outputs are different. We have two mappings, one with a name change and the other with the output change
- metadata_storage_path: we are changing the value that was sent from the source to be base64 encoder instead, using the mapping function base64Encode.
- url: We preserve the original metadata_storage_path but rename it to 'url' for simplicity.
- outputFieldMappings: When we specify the skillsetName, the outputs of the skills in the skillset are generated internally as an enriched document that contains a tree structure. The field mappings indicate which fields from the enriched document are mapped onto the fields on the index.
Below is the indexer.json document
{
    "@odata.context": "https://rrk-azure-search-demo.search.windows.net/$metadata#indexers/$entity",
    "name": "product-indexer",
    "description": "",
    "dataSourceName": "azureblob-1747105495473-datasource",
    "skillsetName": "product-skillset",
    "targetIndexName": "product-index",
    "disabled": null,
    "schedule": null,
    "parameters": {
        "batchSize": null,
        "maxFailedItems": 0,
        "maxFailedItemsPerBatch": 0,
        "configuration": {
            "dataToExtract": "contentAndMetadata",
            "parsingMode": "default"
        }
    },
    "fieldMappings": [
        {
            "sourceFieldName": "metadata_storage_path",
            "targetFieldName": "metadata_storage_path",
            "mappingFunction": {
                "name": "base64Encode"
            }
        },
        {
            "sourceFieldName": "metadata_storage_path",
            "targetFieldName": "url"
        }
    ],
    "outputFieldMappings": [
        {
            "sourceFieldName": "/document/content/keyphrases",
            "targetFieldName": "keyphrases"
        },
        {
            "sourceFieldName": "/document/content/products",
            "targetFieldName": "products"
        },
        {
            "sourceFieldName": "/document/language",
            "targetFieldName": "language"
        }
    ]
}
indexer.json
Now that we have defined our index, skillset, and indexer. We need to create them in the same sequence to complete the indexing process. We can run the PowerShell script Upsert-Search-Components.ps1 to create them using the REST API.
Once this is complete, we should now see the indexer run successfully and documents in our index loaded. We are now ready to query the data.

Querying
Now that we have the documents in the index, let's search for the data without using an LLM, such as the Azure Open AI model.
Challenge with Traditional Search Pattern
By default, Azure Search uses full-text search and attempts to find documents using the Lucene query syntax. There are two variants of this search:
- simple: a straightforward query that matches using the literal query terms
- full: provides additional options to improve the search outcomes. This would include boolean operators, regular expressions, fuzzy search, wildcards, etc. You can refer to these advanced queries here
Let's look at a few examples:
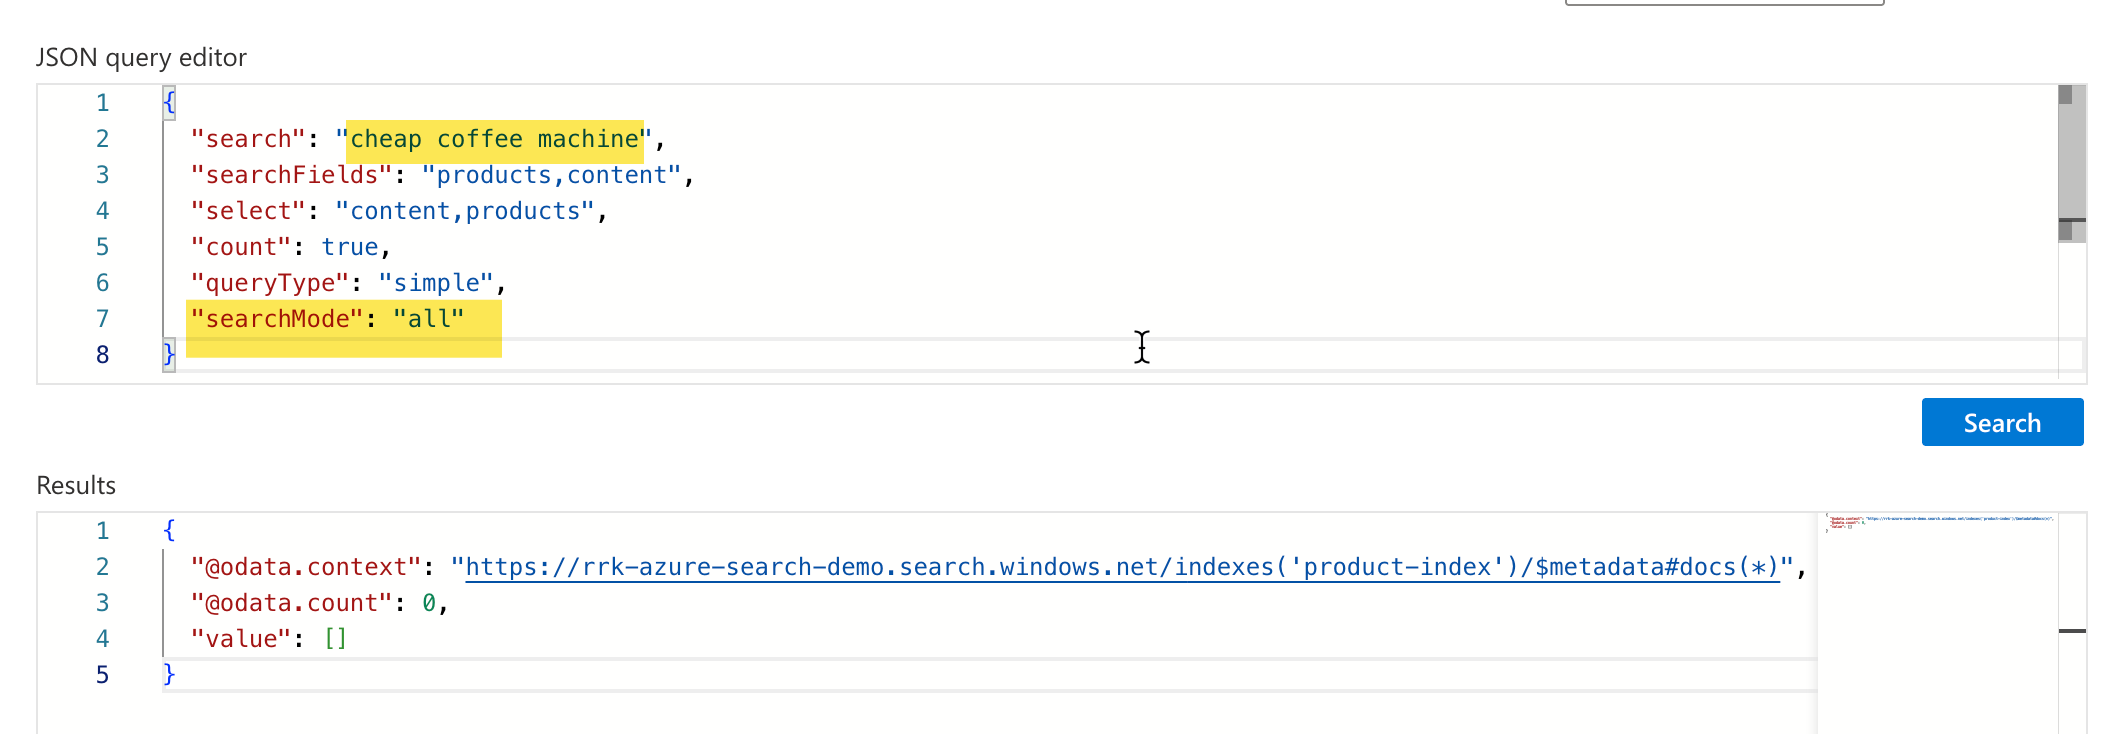
Example 1: Search text is cheap coffee machine and searchMode is all. When the search mode is all, it tries to find a match to a document that contains all the words in it. In this case, we did not have exact matches, and it returned zero results.
Example 2: Search text is cheap coffee machine , searchMode is any. In this case, it found the documents that have any of these words. It does yield results, but it doesn't provide exact matches. The BaristaMaster Pro is not cheap at $699 😄
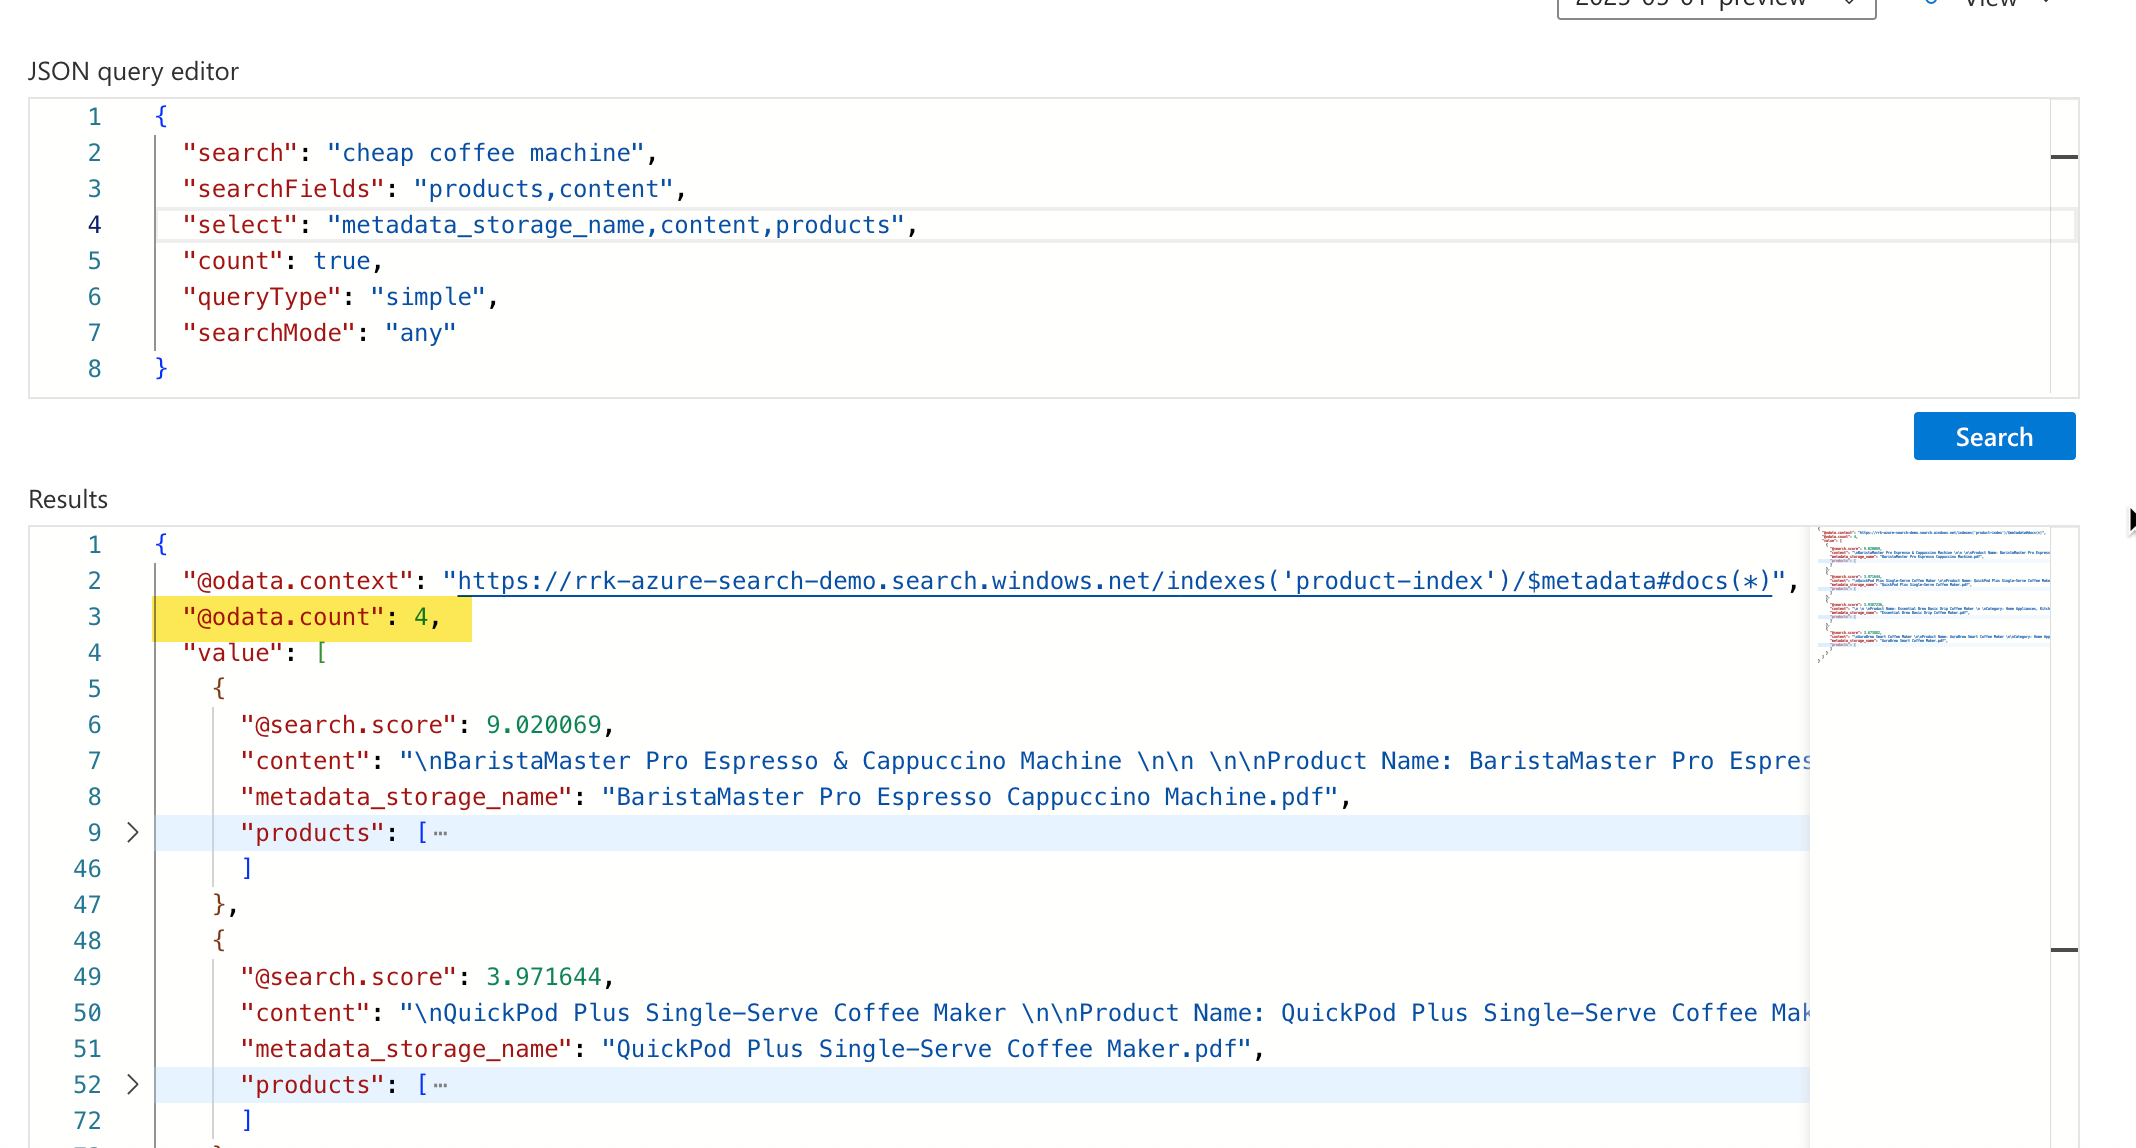
We could continue to explore various filter variations, and we might be able to achieve a reasonably close approximation to the desired outcome. However, there may still be potential gaps where the end-user's search experience needs optimization, and a significant amount of logic must be built around it to achieve accurate matches, user having to click multiple UI elements for filtering etc.
RAG Search Pattern for Natural Language Queries
Now that we have looked at the challenge, let's look at how to accomplish this using a large language model. For the most part, we will still use the same search query as before.
However, the difference is that we send a query to the large language model (LLM). We ground this query to the LLM using the search results as the knowledge source and passing the user's query as the prompt. We used the Azure Open AI in our example for the LLM.
Here is the design of this approach.
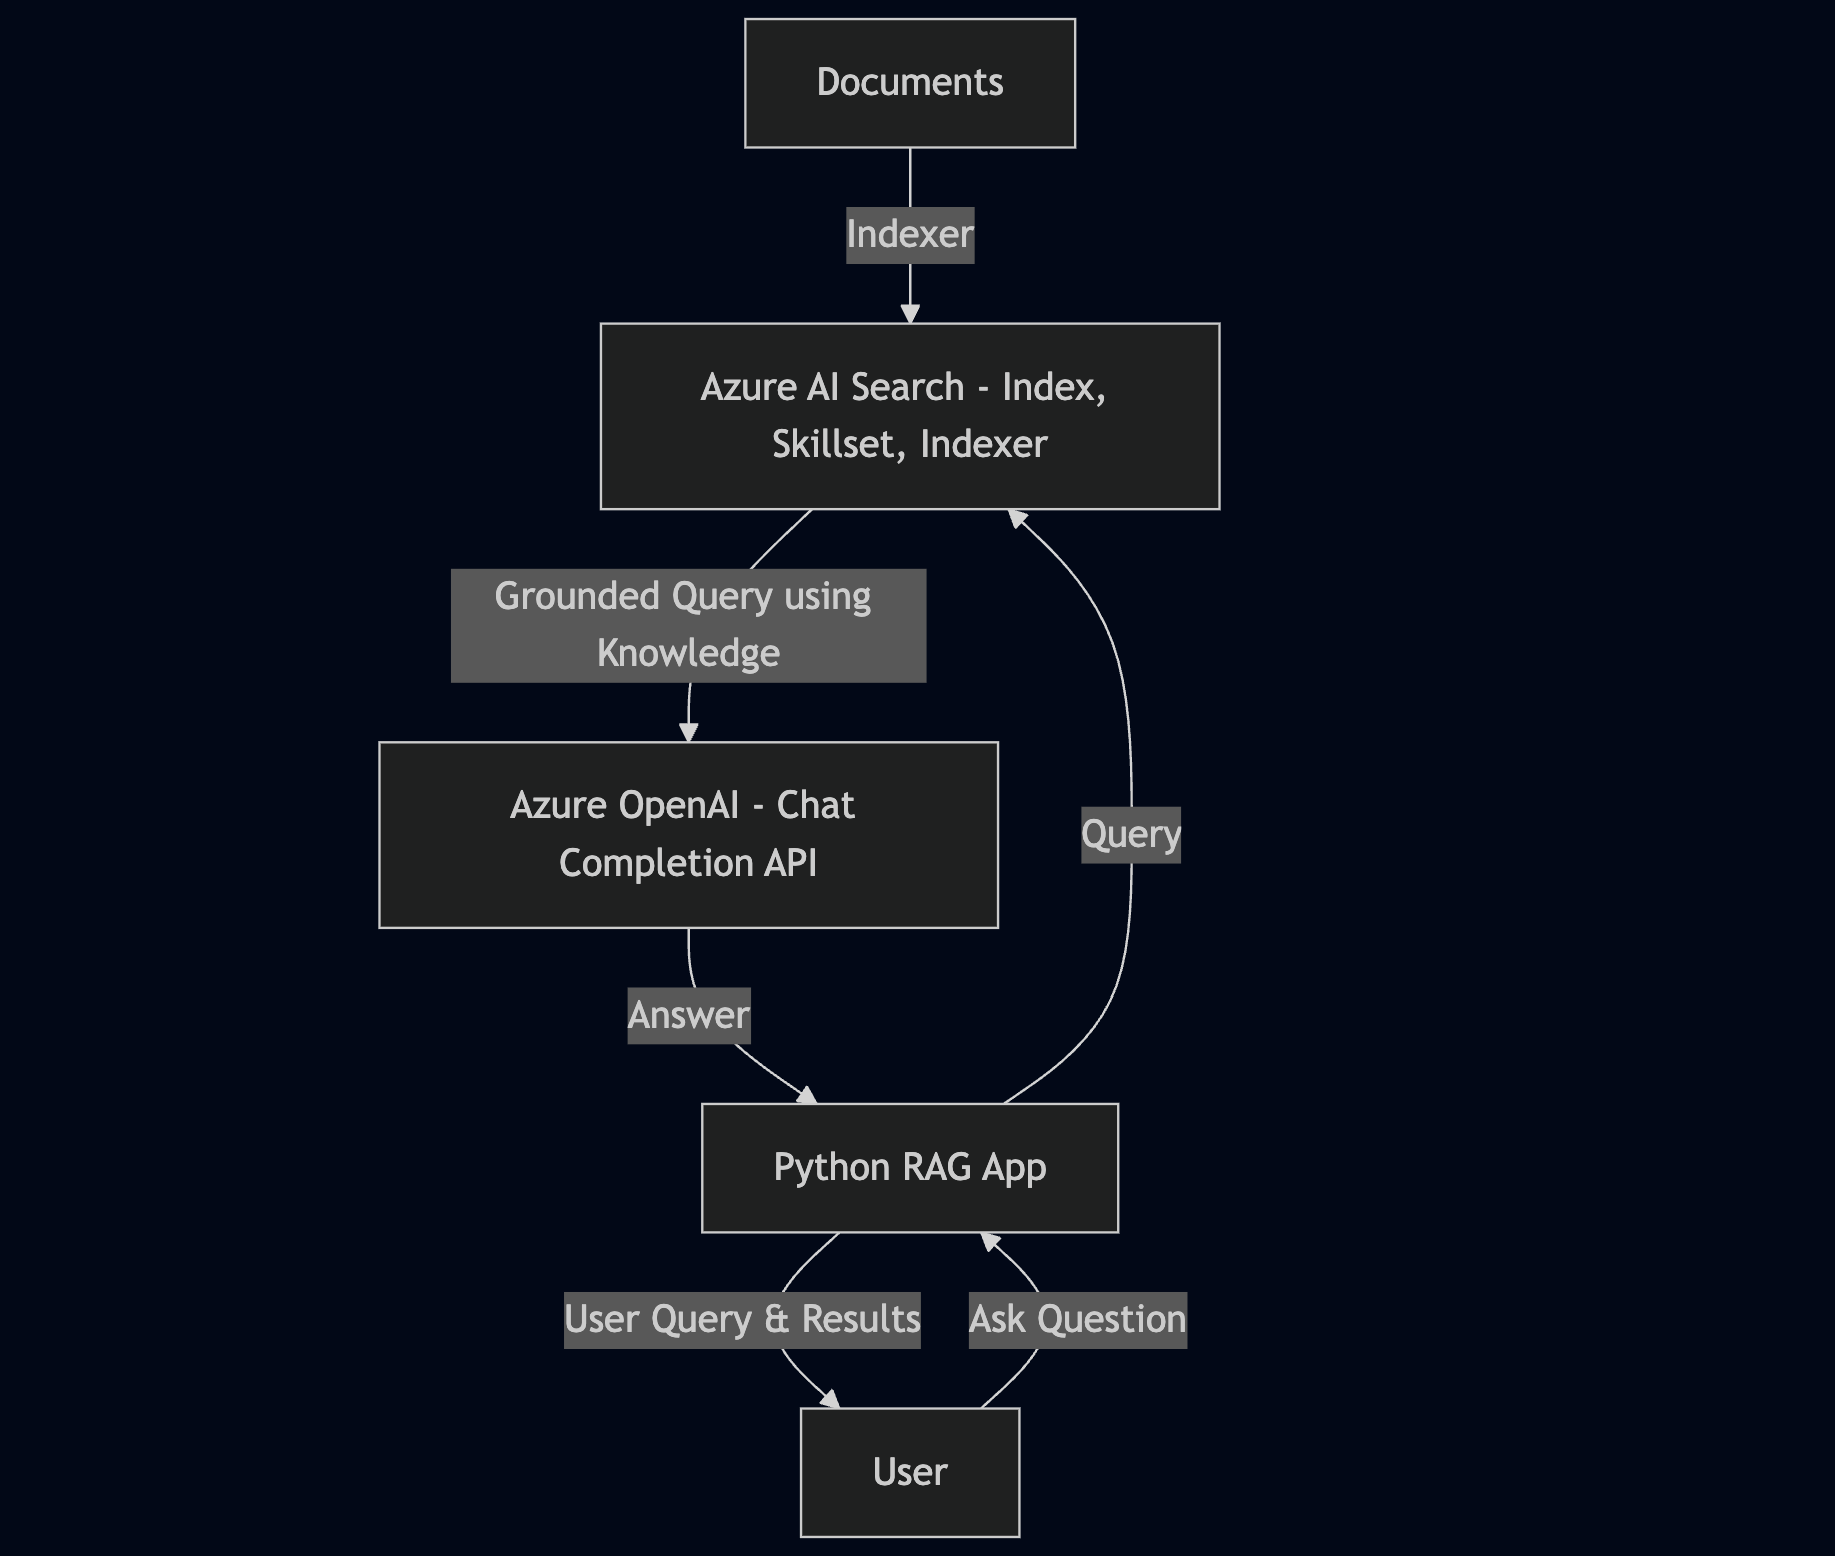
Let's look at this in action. We use a simple Python script that leverages the Chat Completions API on Azure Open AI.
Before getting started, ensure you have the Python virtual environment set up using venv and the following packages installed.
pip install azure-search-documents==11.6.0b5
pip install azure-identity==1.16.1
pip install openai
pip install aiohttp
pip install ipykernel
pip install python-dotenv
Here is an overview of what the script does:
Configuration & Authentication
- We import the necessary packages, primarily the DefaultAzureCredential for managed identity, and load the required packages for environment variables, AzureOpenAI, and Azure AI Search.
- Loads environment variables for Azure OpenAI and Azure Search service endpoints
- Sets up Azure authentication using DefaultAzureCredential for secure access to both services
- Creates client connections to Azure OpenAI and Azure Cognitive Search services
Search & Retrieval
- Prompts user for a product question via console input
- Searches the "product-index" using Azure AI Search to find relevant documents
- Retrieves top matches based on products, content, and keyphrases fields
- Formats search results into a structured string containing document metadata, content, and product information
LLM Response Generation
- Uses a grounded prompt that instructs the LLM only to answer using the provided search results
- Sends the user query and search results to Azure OpenAI for processing
- Generates a factual, source-based response that avoids hallucination by restricting answers to retrieved content
- Outputs the generated response to the user
# Set up the query for generating responses
from azure.identity import DefaultAzureCredential
from azure.identity import get_bearer_token_provider
from azure.search.documents import SearchClient
from openai import AzureOpenAI
from dotenv import load_dotenv
import os
from pprint import pprint


def main():

    load_dotenv()
    # Set up the Azure OpenAI and Azure Search service credentials
    AZURE_OPENAI_ACCOUNT = os.getenv("AZURE_OPENAI_ACCOUNT")
    AZURE_SEARCH_SERVICE = os.getenv("AZURE_SEARCH_SERVICE")
    AZURE_DEPLOYMENT_MODEL = os.getenv("AZURE_DEPLOYMENT_MODEL")

    credential = DefaultAzureCredential()

    token_provider = get_bearer_token_provider(
        credential, "https://cognitiveservices.azure.com/.default"
    )

    openai_client = AzureOpenAI(
        api_version="2024-06-01",
        azure_endpoint=AZURE_OPENAI_ACCOUNT,
        azure_ad_token_provider=token_provider,
    )

    search_client = SearchClient(
        endpoint=AZURE_SEARCH_SERVICE,
        index_name="product-index",
        credential=credential,
    )

    # This prompt provides instructions to the model
    GROUNDED_PROMPT = """
    You are a friendly assistant that recommends products.
    Answer the query using only the sources provided below in a friendly and concise bulleted manner.
    Answer ONLY with the facts listed in the list of sources below.
    If there isn't enough information below, say you don't know.
    Do not generate answers that don't use the sources below.
    Query: {query}
    Sources:\n{sources}
    """

    # Get the query from the user
    query = input("Enter your product-related question: ")

    # Search results are created by the search client
    # Search results are composed of the top 10 results and the fields selected from the search index
    # Search results include the top 10 matches to your query
    search_results = search_client.search(
        search_text=query,
        search_mode="any",
        search_fields=["products,content,keyphrases"],
        select="keyphrases,content,products,url,metadata_storage_name",
    )

    print(f"Search results returned:")

    sources_formatted = "\n".join(
        [
            f'{document["content"]}:{document["keyphrases"]}:{document["url"]}:{document["products"]}'
            for document in search_results
        ]
    )

    # Send the search results and the query to the LLM to generate a response based on the prompt.
    response = openai_client.chat.completions.create(
        messages=[
            {
                "role": "user",
                "content": GROUNDED_PROMPT.format(
                    query=query, sources=sources_formatted
                ),
            }
        ],
        model=AZURE_DEPLOYMENT_MODEL,
    )

    # Here is the response from the chat model.
    print(response.choices[0].message.content)


if __name__ == "__main__":
    main()
Let's look at a few examples.
Example 1: Notice that there is no word machine in the coffee product documents. But since we used the LLM, it was able to interpret the question and generate a response.

Example 2:

Conclusion
Hopefully, this post provided an overview of the capabilities of Azure AI Search and how we can leverage it to build generative search capabilities that enhance the end-user search experience without requiring traditional search customizations.
Azure AI Search has a lot of capability and we just looked at one scenario, and this could feel a little complex initially but once we grasp how the core components work, the rest of it is easy to figure out by following the documentation resources.
Let me know your thoughts, how you have used Azure AI search and if you have any questions in the comments below.